Beautiful garden and BBQ area... Excellent neat works.. You've blown mine right out of the water... As Alan Sugar would say... You're Hired


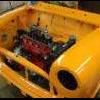
Bbq From The Back End Of A Mini!
Started by
leigh21
, Feb 15 2017 07:11 PM
42 replies to this topic
#16

Lord Lucan
-

- Noobies
-

- 117 posts
Mini Mad
- Location: Sunny Huddersfield
Posted 24 July 2017 - 05:43 PM
#17
jamesmpi
-

- Members
-
- 1,940 posts
Camshaft & Stage Two Head
- Location: Chichester
- Local Club: Abingdon Mini Owners Club
Posted 24 July 2017 - 07:42 PM
Great effort on the back garden. Great transformation
#18
leigh21
-
- Members
-
- 319 posts
Speeding Along Now
Posted 25 July 2017 - 03:21 PM
Had a hour in the garage this afternoon after pinching some white faced chipboard from my dads unit, knocked up some lining for the inside. Not sure if I will keep it as it is, it looks ok and has about 150mm air gap around 3 sides so hopefully ventilation shouldn't be a problem. But I'll have another tinker with it tomorrow.

image img
If anyone has any inspiration for the inside please don't be shy ☺️
image img
If anyone has any inspiration for the inside please don't be shy ☺️
#19
slidehammer
-

- Members
-
- 1,081 posts
One Carb Or Two?
- Location: Surrey
- Local Club: LSMOC
Posted 25 July 2017 - 03:46 PM
Looks great, the rear end you started with was very sound, in much better condition than my usual projects start out at!
#20
lawrence
-

- Members
-
- 1,330 posts
One Carb Or Two?
Posted 27 July 2017 - 08:55 PM
It looks awesome, sad thing is the paintwork and the fit of the bootlid are better then my actual car. Im being upstaged by a bbq  kill me haha
#21
leigh21
-
- Members
-
- 319 posts
Speeding Along Now
Posted 02 August 2017 - 01:29 PM
Thanks for the comments, been and got me some wood and bits this morning, and set to making the mold for the worktop, I would just like to say I have never done this before and just done a lot of research online. Failure is always an option.
I started by cutting the 18mm melamine into the rough shape


multiple image hosting
After deciding on the thickness of the top I cut some lengths to form the part where the BBQ will slot into, glued and screwed into place making sure it's as square as possible, then after fitting the back piece into place I had some very nice flexible plastic which bent round the make the curve at the front (hopefully it's strong enough once the concrete has been poured)


multiple image hosting
I placed the BBQ on upside down just to check the measurements were correct, and everything seem ok at this point.


multiple image hosting
I then cut some reinforcing mesh which will go into the concrete and hopefully make it a bit stronger.

multiple image hosting
I'm going to let the glue dry overnight and get the concrete poured In the morning.
Wish me luck!
I started by cutting the 18mm melamine into the rough shape
multiple image hosting
After deciding on the thickness of the top I cut some lengths to form the part where the BBQ will slot into, glued and screwed into place making sure it's as square as possible, then after fitting the back piece into place I had some very nice flexible plastic which bent round the make the curve at the front (hopefully it's strong enough once the concrete has been poured)
multiple image hosting
I placed the BBQ on upside down just to check the measurements were correct, and everything seem ok at this point.
multiple image hosting
I then cut some reinforcing mesh which will go into the concrete and hopefully make it a bit stronger.
multiple image hosting
I'm going to let the glue dry overnight and get the concrete poured In the morning.
Wish me luck!
Edited by leigh21, 02 August 2017 - 01:31 PM.
#22
leigh21
-
- Members
-
- 319 posts
Speeding Along Now
Posted 05 August 2017 - 04:05 PM
This morning I took the worktop out the mold and by some miricle it's just about perfect.
Here's some photos of it in the mold


And here it is out


Pretty happy with how it's come out, just waiting on some polishing pads to arrive before I put in place.
Nearly BBQ time!
Here's some photos of it in the mold
And here it is out
Pretty happy with how it's come out, just waiting on some polishing pads to arrive before I put in place.
Nearly BBQ time!
#23
xrocketengineer
-

- Members
-
- 1,637 posts
Rocket Man
- Location: Florida, USA
Posted 05 August 2017 - 05:32 PM
Amazing, you were not messing around! Fantastic result! Enjoy it!
#24
Big Sam
-

- Members
-
- 853 posts
One Carb Or Two?
- Location: Merseyside
Posted 05 August 2017 - 08:43 PM
Now what you need to do is stick a rear subframe on, wheels and tow it to mini shows!
#25
panky
-

- Members
-
- 1,776 posts
Camshaft & Stage Two Head
- Location: Cheshire
- Local Club: Northwest Casual Classics
Posted 05 August 2017 - 09:06 PM
I'd go to that show - for a free burger 
#26
leigh21
-
- Members
-
- 319 posts
Speeding Along Now
Posted 06 August 2017 - 02:38 PM
Thanks everyone, jobs left to do are: couple of wheels, bumper and polish the top. Here's some pictures:


(Incase you were wondering the sun never shines here)
(Incase you were wondering the sun never shines here)
#27
Lord Lucan
-
- Noobies
-
- 117 posts
Mini Mad
- Location: Sunny Huddersfield
Posted 06 August 2017 - 10:52 PM
Excellent work. It's given me a few ideas....
#28
magicmat
-
- Noobies
-
- 131 posts
Mini Mad
- Local Club: FABMOC
Posted 07 August 2017 - 09:15 AM
Very nice build, and am loving the concrete top ! very fasionable nowadays,
I think i'd be too scared to use it, wouldnt want the paint getting burnt or damaged
#29
leigh21
-
- Members
-
- 319 posts
Speeding Along Now
Posted 07 August 2017 - 01:09 PM
I know what you mean, it's going to be a bottom clenching few minutes when I finally light it up, fingers crossed 🤞
#30
magicmat
-
- Noobies
-
- 131 posts
Mini Mad
- Local Club: FABMOC
Posted 08 August 2017 - 07:38 AM
I've never known my coal BBQ to spit or anything so I'm sure it will be fine,
Maybe your next project could be a pizza oven out of the print end 😁
Maybe your next project could be a pizza oven out of the print end 😁


1 user(s) are reading this topic
0 members, 1 guests, 0 anonymous users


