Jump to content


Photo
- - - - -

Meet Dilys


  • Please log in to reply
17 replies to this topic

#1 mattj99

mattj99

    On The Road

  • Noobies
  • PipPip
  • 39 posts
  • Location: Caerphilly

Posted 03 March 2017 - 02:06 PM

Hi All


I've been lurking for ages meaning to start a thread about my never ending project so here we go.


I've had 4 previous minis - I passed my test in a rust bucket Mayfair which I ran until it failed the MOT. Then I got another which I ran until it failed the MOT, then another... Back then you could get a half decent mini for about 100 quid in the free ads.  Once I started working I needed something reliable so I got myself a second hand corsa which wasn't glamorous but did start every morning and didn't mind the motorway miles. After about 10 years and various different cars I decided it was time for another mini and got myself a Paul Smith which I absolutely loved. Unfortunately the feeling wasn't mutual and the little bugger ended up costing me a fortune when the engine management computer packed up. It was with Rover for 3 months and cost £1800!! I swore off Minis that day never to return...


Fast forward to 2013 and the little devil on my shoulder kept nagging at me. "Get yourself a nice little Mini" he would say, "you can afford to keep it on the road this time" 


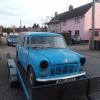
Enter, stage left, Dilys:


1239096_10151643186429033_746461490_o_zp


Isn't she a beaut? Well actually she wasn't too bad. The eagle eyed among you will spot that she's a different colour on the front end to the rest of the car so she'd had a bit of work done. But she drove beautifully thanks to a year old engine rebuild - all receipts included! - and I was happy. I plodded around in her back and for to work, by now I was working about 5 minutes from home, and generally loving driving her.


I kept meaning to have the roof sorted but didn't get round to it - duct tape saw off the leak with ease. And as always happens one year turned in to two, then 3. It was coming up to MOT time and by now all the niggles and problems were showing themselves  The gear box was proving a bit difficult at selecting 3rd, the lovely front end was a nest of rust, the bottom of both doors had rusted out, one of the sills was swiss cheese and when the rear fog light fell off it showed how bad the rear valance was.


So I finally bit the bullet and took her off the road. The gearbox was despatched to guessworks for a rebuild and came back like new. All four gears fully operational!!  The car was then send down to a friends bodyshop for body restoration. This was september last year and she's still there now. Being a mate and a busy repair garage it's taking a while. Of course when he started to chop her up more and more rust was found and it's turned in to a "trigger's broom" job, with almost every panel, including the roof, needing replacement or repair. In hindsight it would probably would have been cheaper to get a new shell but you live and learn.


Now the controversial part. Over the years I owned her I thought long and hard about what i wanted to do with her.  At first it was a full restore as is, to get her as close to how she came from the factory. It played on my mind that there aren't tons of Piccadilly's left on the road and I felt the weight of that on my shoulders. BUT I must admit I have gone the other way and she's not going to be restored as a Piccadilly. I went backwards and forwards so much on the decision but I finally felt I couldn't put so much money in to a car that I wouldn't want to drive myself and as I'm putting quite a bit of money in I decided to do her the way I wanted.  So I've carefully removed the interior and wrapped and boxed everything I took off and that's been stored in my loft and she'll go back on the road in a dark metallic BMW blue with a Tan leather interior. She's not getting sports pack arches or anything like that so if in the future I wanted to put her back to a Piccadilly, then a repaint and refit of all the parts and interior will put her right back.


So that's where I am now. Just waiting on the car to come back to me. Once she's back she'll have a full rust proofing done and then I'll start on the interior.


My plans for the car is to try and make her as comfortable as possible, I'm not a boy racer any more so it'll all be about making her as smooth a ride as I can get. There'll be lots of sound insulation and nice thick carpets to try and make her as quiet as I can get.


I've also always wanted to try and make a Mini with as many modern features as possible - Alarm, Immobiliser, Central Locking, Electric Windows, proper controllable heater etc - and I'll make post about those projects as I go on. I've started on some things already so will be posting those up soon.


This has turned into a really long post so I'll knock it off here. If you made it this far thanks for reading.


And as I always tell the other half...


14102144_10153852531029033_8824711872585


Edited by mattj99, 03 March 2017 - 02:11 PM.


#2 mattj99

mattj99

    On The Road

  • Noobies
  • PipPip
  • 39 posts
  • Location: Caerphilly

Posted 03 March 2017 - 04:21 PM

Here's my first little project I've done while I'm waiting for the bodywork to be completed.


I want the car to have a thoroughly modern interior so I've been looking at ways to better illuminate the clocks.


I got myself another set of clocks from ebay and started messing around. They're not in the best of shape and a bit beaten up so I didn't mind if I ended up wrecking them.


IMG_20170301_190340_zpsf5duj6ea.jpg


When they arrived they were absolutely filthy so I took them apart and put the housing and the plastic face in the dishwasher and they actually came out beautifully.


I tried different bulbs and EL wires but couldn't get the result I wanted.


During my heater project I found a company in Poland called MoMan who produce illuminated faces for clocks and heater controls so I contacted them to see if they could help.


They asked me to scan the current faces on a normal computer scanner and email the result to them


ClassicAustinMini-NipponSeikiClocks90mph


Then we had an email exchange about the design I wanted and I said I liked one from a Volkswagen Jetta I had seen. They had that design already so they worked with that and soon I had a PDF file with the images I needed. They actually asked me to print them out and cut them out to check the sizing. Once were were happy they got to work and 2 weeks later a box arrived.


IMG_20170301_190602_zpsz1sq5zsz.jpg


Here they are out of the box:


IMG_20170301_190446_zps3lgkfz1x.jpg


When I compared them to the original faces they were exactly the same size to the millimeter.


They were very easy to install although I did have to cut a small hole in the speedo housing to make that one fit - I knew that would be the case before I ordered.


IMG_20170301_193132_zpsofeu0sb7.jpg


IMG_20170301_193210_zpse0nio7qt.jpg


IMG_20170301_193215_zpstecaudg6.jpg


IMG_20170301_193308_zpsaugvhsuc.jpg


IMG_20170301_194147_zpsuummtcgo.jpg


IMG_20170301_194247_zpskcpecm0f.jpg


IMG_20170301_192819_zpscgwlsedo.jpg


When I powered them up I was absolutely delighted with them. They were even better than I was expecting.


IMG_20170302_175841_zpsreonbkrz.jpg


Obviously there's no illumination bulbs fitted here so you can't see the needles very well but I've ordered an illuminated needle kit from ebay to see if I can make that work. If I can't get that going I've got some needle paint to give them a cleaner look and they'll be done


Edited by mattj99, 03 March 2017 - 04:34 PM.


#3 jamesquintin

jamesquintin

    One Carb Or Two?

  • TMF+ Member
  • PipPipPipPipPipPipPip
  • 1,016 posts
  • Location: Harlow

Posted 03 March 2017 - 05:30 PM

wow, that looks great!


Are they able to add extra lights behind the black parts..? Ie on my Focus there are warning lights that can come on, and wanted to do the same on mine (not sure what to add though!)


Q


#4 mattj99

mattj99

    On The Road

  • Noobies
  • PipPip
  • 39 posts
  • Location: Caerphilly

Posted 03 March 2017 - 05:59 PM

I'm not sure what they can really. I only asked them to duplicate what was there already. I still have the Ignition, Oil and Main beam warning light there as I didn't touch that. They are incredibly flexible about what they can do so well worth contacting them. Their site is http://moman.pl.


I forgot to say the total cost with shipping was £94 euros.


#5 panky

panky

    Camshaft & Stage Two Head

  • Members
  • PipPipPipPipPipPipPipPip
  • 1,776 posts
  • Location: Cheshire
  • Local Club: Northwest Casual Classics

Posted 03 March 2017 - 06:56 PM

That looks brilliant, subtle but brilliant :D


#6 alittleawkward

alittleawkward

    Passed Test

  • Noobies
  • PipPip
  • 34 posts
  • Location: London

Posted 03 March 2017 - 07:19 PM

amazing story, and very nice to hear you wanting to properly hold onto this one :)


#7 mattj99

mattj99

    On The Road

  • Noobies
  • PipPip
  • 39 posts
  • Location: Caerphilly

Posted 05 October 2017 - 10:05 AM

Well it's been 6 months since I last posted in here about Dilys.  As I said she's with a friend who's working on her between his regular jobs but it's been very slow going with hardly any progress week to week. 


However yesterday he messaged me with a tiniest tease of a photo. Astonishingly it showed paint! PAINT!! After a whole year she's finally got some paint.


Now since I posted last I've had another change of mind about the colour and finally settled on Sepang Blue, commonly found on Audi RS models.


Attached File  WhatsApp Image 2017-10-04 at 13.09.25.jpeg   27.58K   2 downloads


When pressed he thinks that he'll be done by November - which probably means January - but it's nice to see the end in sight.


#8 mattj99

mattj99

    On The Road

  • Noobies
  • PipPip
  • 39 posts
  • Location: Caerphilly

Posted 04 November 2017 - 06:46 PM

We the day finally arrived, today I went to pick her up. Astonishingly after a little bit of work she passed the MOT with only a few minor advisories so I was able to drive her home.


As I mentioned before I had such a dilemma about the colour and ended up going back and forth a few times. Finally I settled on an Audi blue with grey wheels. The painter hates the wheel colour but I love it.  It's been a real labour of love for the guys in the workshop and the deal they gave me honestly didn't come close to covering the work they had to put in to get the job done. It's going to be so nice to have a dry car.


I've still got a long list of thing I want to do including rust proofing, a new exhaust, sound proofing, and fitting out the interior. So lots of fun jobs for me to do and luckily I've secured the use of a dry garage so I can crack on through the winter and not leave it until the spring.


Anyway here she is. There's a few snags I need to sort out including refitting the front number plate, getting the bonnet to sit straight and fitting a new boot lid seal. Also I think need to move the rear fog light as he's fitted it on the left and I believe it needs to be on the right.


Attached File  DSC_0460.JPG   84.28K   3 downloads

Attached File  DSC_0462.JPG   95.35K   3 downloads

Attached File  DSC_0464.JPG   102.06K   3 downloads

Attached File  DSC_0461.JPG   92.62K   5 downloads


Edited by mattj99, 04 November 2017 - 06:52 PM.


#9 wingnut

wingnut

    Speeding Along Now

  • Members
  • PipPipPipPipPip
  • 462 posts
  • Location: bury st edmunds

Posted 04 November 2017 - 08:14 PM

What a great colour


#10 Cypher

Cypher

    Just On Tickover

  • Noobies
  • Pip
  • 6 posts
  • Location: Cheltenham
  • Local Club: GMOC

Posted 05 November 2017 - 11:01 AM

Great color!  Any future go faster upgrades planned at all? 


#11 blueovalcraig

blueovalcraig

    Mini Mad

  • Members
  • PipPipPipPip
  • 193 posts
  • Location: Rothesay, Isle of Bute

Posted 05 November 2017 - 11:22 AM

What a lovely colour!  


Enjoy it !


#12 mattj99

mattj99

    On The Road

  • Noobies
  • PipPip
  • 39 posts
  • Location: Caerphilly

Posted 05 November 2017 - 03:23 PM

Great color!  Any future go faster upgrades planned at all? 


Not in particular. Maybe a stage one kit. My boy racer days are behind me. I want comfort nowadays. As long as it's running as well as it can be then a 1000 is enough for me to get back and forth to work.

#13 mattj99

mattj99

    On The Road

  • Noobies
  • PipPip
  • 39 posts
  • Location: Caerphilly

Posted 11 September 2018 - 01:48 PM

Hi All
 
I said ages ago that I'd update this thread with little projects I've been doing but to be honest due to lack of funds the car hasn't seen much action this summer. I've just been tinkering away slowly doing little jobs here and there. I have actually got one thing finished that I've been meaning to do for ages.  
 
I've never been happy with the standard interior light and I wanted to find a way to improve it and also add a bit of ambient lighting to the car at the same time.  I always liked the inteior light setup I had in my modern BMW Mini. So I got on ebay and found the same light in a breakers yard for a tenner.
 
Attached File  s-l1600.jpg   44.14K   2 downloads
 
Once I got it I took a look and worked out it could do what I wanted with a bit of rewiring. There are two led bulbs that I wanted to be on with the headlights and to provide a gentle orange glow on the gearstick. Then there are two regular bulbs. I wanted these both to come on when the doors are open but also to be able to be switched on individually like a map light. I planned to mount this centered above the gearstick.
 
Finally I like the B pillar ambient lights that I've seen on the modern mini so I wanted to find something similar to that. Luckily I found an after market seller in Korea that sold a similar fitting.
 
Attached File  111.jpg   40.59K   1 downloads
 
I worked out the wiring needed and figured that in addition to the exisiting wiring I'd also need a new switched live from the headlights circuit for the ambient lights. I pulled this through from the engine bay and ran it inside the cabin down to the aux switch panel near the fog light switch on the right of the steering wheel. I figured I better fit a switch to turn off the ambient lighting if needed so I picked up a savage switch as these are the switches I'll be fitting when I do the dashboard and center console.
 
Attached File  IMG_20180906_081327.jpg   89.01K   1 downloads
 
As I was going to fit two B Pillar lights I figured I could reuse the existing light fitting but needed to fashion a new one for the drivers side. I made a template from the exisiting and made the new one from some sheet metal I got from work.  I'll fix this in the same spot opposite the exisiting one.
 
Attached File  MVIMG_20180809_200417.jpg   57.99K   2 downloads
 
Now I needed to run some new cables around the roof line for the new lights.  I got cable in the correct colours and some connectors from ebay and got going. This is the end result. A nice neat job. 
 
Attached File  MVIMG_20180815_074718.jpg   83.21K   1 downloads

Attached File  IMG_20180906_081310.jpg   59.43K   1 downloads

Attached File  IMG_20180906_081323.jpg   96.4K   2 downloads
 
Once I figured out the wiring of the new light I put my terrible soldiering skills to work and, ignoring the exiting connector, added new cables and a plug to connect to the wiring I just made.
 
Attached File  IMG_20180906_081253.jpg   56.57K   5 downloads
 
Once this was done I fitted new door switches as mine were proving troublesome and then it was time to give it a whirl.
 
Attached File  IMG_20180906_081245.jpg   53.99K   4 downloads
 
To my delight it worked exactly as I hoped. The lights came on when the door was opened. They could be switched on individually as required and the ambient lights came on with the headlights.
 
Attached File  IMG_20180910_185251.jpg   41.31K   2 downloads

Attached File  IMG_20180910_185238.jpg   37.21K   1 downloads

Attached File  IMG_20180910_185230.jpg   36.19K   3 downloads


I'm just waiting for the engineers in work to fabricate the fitting for me to fix to the roof and I'll be able to fit it in place. It's going to be placed between the first and second headlining roof bars and I've measured it so it'll be at the same level as the completed roof lining. The roof lining will be glued to the fitting and then I'll be able to cut a hole for the new light.


Edited by mattj99, 11 September 2018 - 02:15 PM.


#14 antidigerati

antidigerati

    Learner Driver

  • Noobies
  • PipPip
  • 23 posts
  • Location: Victoria BC

Posted 11 September 2018 - 04:37 PM

Very cool lighting project. Thanks for all the detail you are providing. I really like your approach of making the car fit your needs even though it wasn't originally built that way.

#15 mattj99

mattj99

    On The Road

  • Noobies
  • PipPip
  • 39 posts
  • Location: Caerphilly

Posted 12 September 2018 - 07:45 AM

Thanks. I'm trying to do simple things that'll make the car more comfortable as an everyday driver.  At the same time I'm making sure that anything I do can be undone and returned to standard quickly and simply. There's nothing worse than a mini that has had the wiring turned into a rats nest.


I've done other jobs over the summer like fitting the new exhaust, rebuild the carb, tidying the engine bay, but these are everyday things so I didn't see much point in making posts for them. It's the out of the ordinary stuff I'll share.  The next one will hopefully be a new heater and heating control system that's been on the drawing board for a few years.


Unfortunately over the weekend a lovely patch of rust has been found inside one of the rear pockets - it looked perfectly sound with no marks on the paint at all (save for dirt) and I'm almost sure I'd checked it but I guess I must have missed it.  I only found it when measuring for a pocket liner and tapped it and it sounded wrong. A quick inspection with the screwdriver revealed the dreaded metal worm had been to work!!  So she'll have to go off to the garage for that to be sorted - more cost I hadn't budgeted for but it has to be done.


0 user(s) are reading this topic

0 members, 0 guests, 0 anonymous users