Jump to content


Photo
- - - - -

1972 Mini 1000 - Nut And Bolt Restoration.


  • Please log in to reply
109 replies to this topic

#1 SamG

SamG

    Stage One Kit Fitted

  • Noobies
  • PipPipPip
  • 88 posts
  • Location: Somerset

Posted 16 April 2017 - 03:36 PM

Here goes....

Hi all, I've been meaning to start this thread for about 18 months now. This is very much a slow burner of a project mainly due to the money involved, so updates might be few and far between although Ill aim to put something up here at least monthly. Its going to be a tale of poor decision making, financial misery, gross naivety and very occasionally, a little joy. So buckle up!


ff_VBj_YY6q_Tq_Tc_CGFto_Gt4_XCu_Xfs_E2_Y


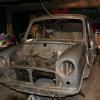
It was a blind eBay purchase which I probably paid over the odds for due to a little bidding fever and having narrowly missed out on a couple of Minis in the weeks previous. Once I got the car home the strip down commenced. It came with an A+ Series engine which is obviously incorrect, so that came out with a little help from some work colleagues. Please excuse me for lifting the engine via the water pump, I didn't have access to a lifting beam and I didn't know any better.


3h_FSvi_Bh1_Eh_O_z_ADc_sju8yg1_X_yf_Jd_T


Edited by SamG, 13 October 2017 - 05:55 PM.


#2 SamG

SamG

    Stage One Kit Fitted

  • Noobies
  • PipPipPip
  • 88 posts
  • Location: Somerset

Posted 16 April 2017 - 03:45 PM

Next was to remove everything else – glass, front and rear subframes, what there was of the interior, so I was left with just the shell, even the wife mucked in and gave me a hand!. Easy bit over and done with, I thought it’d be a quick lick of paint and it’ll be done! This will be a doddle I thought! How wrong was I…?!


The front end was first up. The car had been fitted with later outer wings with side repeater holes so they came off with the fairly rotten front panel leaving just the inner wings. 


IMG_5316.jpg


IMG_5309.jpg


When I was bidding on the car I was seduced by the ‘solid floors’, which to the sellers credit they were, but being the rookie I am I didn’t notice it had a later rod change tunnel (badly) welded in whereas the car would have had a remote gear change when it came out of the factory in 1972. Elsewhere there was more bad news. The car had oversills fitted which covered a whole load of well…holes. There was not much left of the original outer sills at all as you can see. 


IMG_5315.jpg


IMG_5579.jpg


The rot had spread and there were small pinholes in the inner sills too.  I already had a sinking feeling, what had I got myself into? I didn’t know how to weld and although I planned to learn on this car, the size of what I’d taken on was started to dawn on me, I certainly had some big decisions to make! It was at this time that I met my good friend, saviour, and fellow TMF member Ellis Leisk. He’s got his own thread of his ’73 restoration on here that’s well worth a read. He also has a unit locally and kindly offered me a little space up there along with his expertise in bodywork and all things Mini. I honestly think I would’ve given up if it weren’t for his intervention and guidance so huge credit has to go to him for how far I’ve come so far.


Edited by SamG, 13 October 2017 - 06:45 PM.


#3 SamG

SamG

    Stage One Kit Fitted

  • Noobies
  • PipPipPip
  • 88 posts
  • Location: Somerset

Posted 16 April 2017 - 03:55 PM

With the rotten inner and outer sills and incorrect tunnel, we decided that rather than cutting out all the individual sections, measuring all the new panels and having lots of seam welds all over the place, cutting the entire floor out and fitting a full M-Machine floor was the best course ahead. It was a step I would never have taken on my own but I’m glad I did as it’s saved so much time and hassle. I’ll try to stop waffling now and let the pictures do the talking.


IMG_5998.jpg


We decided to make a jig to make sure the new floors and any subsequent new panels were in exactly the right place. This ran the entire length of the car and mounted in the following places – front cross member and toeboard where the front subframe mounts, the heelboard and boot floor where the rear subframe mounts, and up the rear suspension turrets in the wheel arches. This meant we could be fairly confident the car was straight and that hopefully it wouldn’t crab down the road, if it ever gets there!


IMG_6067.jpg


IMG_6003.jpg


As you can see we started by bracing the shell front to back and side to side at the door apertures and diagonally corner to corner. Confident the shell couldn’t twist and once the companion bins were cut out, we proceeded to start drilling out the hundreds of spot welds holding the floor in (along both door steps, and along the boot floor at the rear seat bin). We cut the front of the floor at the toe board and were pretty much ready to drop it out!


Edited by SamG, 13 October 2017 - 06:49 PM.


#4 SamG

SamG

    Stage One Kit Fitted

  • Noobies
  • PipPipPip
  • 88 posts
  • Location: Somerset

Posted 16 April 2017 - 04:02 PM

IMG_6113.jpg


I tried to drill the floor the door step sport welds as carefully as I could so as to preserve the original steps but with the metal being so thin and my ham fisted approach they ended up being beyond repair and decided to replace them. We welded a couple of little jigs onto the existing frame to make sure the new door steps were in exactly the same as the old ones that we then cut out. Plug welded on the A-pillar and seam welded on the B-pillar the new door steps were in and primed to prevent flash rust.


IMG_6149.jpg


IMG_6148.jpg


Edited by SamG, 13 October 2017 - 06:52 PM.


#5 SamG

SamG

    Stage One Kit Fitted

  • Noobies
  • PipPipPip
  • 88 posts
  • Location: Somerset

Posted 16 April 2017 - 04:15 PM

Time to offer the new floor up! It was a surprisingly good fit and didn’t take much fettling to get into place. Happy with the fit, I removed it again to paint and tiger seal between the inner and outer sills, and spray weld thru primer on all the mating faces that would subsequently be spot welded to the new door steps.


IMG_6136.jpg


20160915_193439.jpg


We offered the new floor back up and clamped it all into place on the jig and started to spot weld! All the measuring, prep and double checking meant that thankfully this all went pretty quickly and without incident. 


IMG_6163.jpg


IMG_6161.jpg


Edited by SamG, 13 October 2017 - 06:55 PM.


#6 SamG

SamG

    Stage One Kit Fitted

  • Noobies
  • PipPipPip
  • 88 posts
  • Location: Somerset

Posted 16 April 2017 - 04:22 PM

20160923_162141.jpg


20160923_162405.jpg


20170220_164002.jpg


20160929_192024_HDR.jpg


This takes us up to September ’16. As you’ll recall unfortunately I’m in the Royal Navy and rather inconveniently I was sent to sea for the last 3 months of 2016 so this is how I left the car. 


Edited by SamG, 13 October 2017 - 06:59 PM.


#7 sonikk4

sonikk4

    Twisted Paint Polisher!!!

  • Admin
  • PipPipPipPipPipPipPipPipPipPipPip
  • 15,899 posts
  • Name: Neil
  • Location: Oxfordshire

Posted 16 April 2017 - 04:26 PM

Happy days, i have been down that route of buying blind on eBay with my lads car. A lesson learnt.


We continued and i wish we had done what you did by replacing the complete floor instead of four individual section. (Project Erm)


#8 SamG

SamG

    Stage One Kit Fitted

  • Noobies
  • PipPipPip
  • 88 posts
  • Location: Somerset

Posted 16 April 2017 - 04:29 PM

On my return I was keen to get cracking on with the next job, the boot floor. Again, I hadn’t originally planned to change the boot floor but although solid, the old one was a patchwork quilt of historic repairs and I wanted to do things properly. Another call to Doreen at M-Machine and a couple of weeks later my new boot arrived. I drilled out and seam split all the spot welds at the rear wheel arches, along the mating face with the rear panel and a few little strengthening plates in the boot and the boot floor was free!


20170213_145326.jpg


20170213_152322.jpg


20170213_155659.jpg


20170213_161909.jpg


New boot floor offered in and again it was a really good fit at both the wheel arches and the rear panel. After measuring the rear subframe over and over again to ensure it was square we offered it up and bolted it up to the new floor at the heelboard mounts. We then bolted the boot floor to it so we knew it was in the right place and seam welded along the underside of the rear seat bin where it meets the boot floor. Now I know it would’ve been spot welded originally but you’re never going to see it and I think it’s a much stronger weld. We also seam welded the outside join for extra security. Once linished back, painted and hidden behind the subframe it’ll barely be visible.


Edited by SamG, 13 October 2017 - 07:03 PM.


#9 SamG

SamG

    Stage One Kit Fitted

  • Noobies
  • PipPipPip
  • 88 posts
  • Location: Somerset

Posted 16 April 2017 - 04:41 PM

20170214_155056.jpg


20170220_165652.jpg


This takes us up to March ’17. The next job was to replace both rear wheel arches as they were pretty badly dented from the car being used as a grass track racer in a previous life. Obviously they were already unattached from the boot floor, so it was just a case of splitting the seam with the rear three quarter panel and the strengthening plates that are on the rear bulkhead. Once I’d wrestled it out I was left with this hole...


20170405_154557.jpg


Which I filled with new metal!


20170405_160911.jpg


Again, to my surprise everything lined up well and measured correctly when compared to the right hand wheel arch so after doing the usual removing of paint and applying weld-thru primer to the mating faces, I spot welded the arch to the boot floor. 


20170413_140541.jpg


20170413_161717_HDR.jpg


This pretty much takes me up the present day. Next up, right hand wheel arch.


Edited by SamG, 13 October 2017 - 07:07 PM.


#10 phil hill

phil hill

    Super Mini Mad

  • TMF+ Member
  • PipPipPipPipPipPip
  • 616 posts
  • Location: Lincoln, UK

Posted 18 April 2017 - 12:28 PM

Good work there!!

Phil.

#11 pete l

pete l

    One Carb Or Two?

  • Members
  • PipPipPipPipPipPipPip
  • 1,360 posts
  • Location: East of France

Posted 18 April 2017 - 02:13 PM

I have the same spot welder but my spot welds don't look as good as yours. 


Can you tell me how did you set it up ? 


Pete


#12 SamG

SamG

    Stage One Kit Fitted

  • Noobies
  • PipPipPip
  • 88 posts
  • Location: Somerset

Posted 22 April 2017 - 10:13 AM

I have the same spot welder but my spot welds don't look as good as yours. 
 
Can you tell me how did you set it up ? 
 
Pete

Hi Pete. Ive only just found the 'goldilocks' settings, and it seems to depend on a few factors. My setting are -

Weld type - pulse
Metal thickness - 1.2mm + 1.2mm
Timing - default

What I found most important is that you need to ensure both seam surfaces are making a really good contact with each other. I use molegrips to squeeze the two seams together and close the gap between them so the current can run nicely.

After grinding the surfaces to bare metal, I spray this fully conductive Weld-Thru Primer on both surfaces to get some extra protection in there too.
http://www.rust.co.u...aerosol/p512960

Hope that helps!

Edited by SamG, 22 April 2017 - 10:15 AM.


#13 johnR

johnR

    Up Into Fourth

  • Members
  • PipPipPipPipPipPipPipPipPip
  • 2,244 posts
  • Location: Dorset

Posted 22 April 2017 - 02:00 PM

Almost seems like cheating using complete new floors! These projects always cost way more than you think - the way to justify it is that you are saving it for posterity.  looks as though you are going with original spec throughout?

I couldn't resist going down the Mk1 Cooper s replica with my '89 City but if I did another I would keep it factory standard.  Keep up the good work - hope Putin & Kim Jong Il don't interfere with your work!


#14 SamG

SamG

    Stage One Kit Fitted

  • Noobies
  • PipPipPip
  • 88 posts
  • Location: Somerset

Posted 22 April 2017 - 06:47 PM

Almost seems like cheating using complete new floors! These projects always cost way more than you think - the way to justify it is that you are saving it for posterity.  looks as though you are going with original spec throughout?
I couldn't resist going down the Mk1 Cooper s replica with my '89 City but if I did another I would keep it factory standard.  Keep up the good work - hope Putin & Kim Jong Il don't interfere with your work!


Haha, thanks! I am wanting to keep this one pretty standard, bar a few subtle engine mods (295 or 202 head, subtle carb and exhaust mods) and brake upgrades to make it more driveable and keep it safe on modern roads! If I ever get round to doing another Mini it'll be a later Clubman, heavily modified!

#15 pete l

pete l

    One Carb Or Two?

  • Members
  • PipPipPipPipPipPipPip
  • 1,360 posts
  • Location: East of France

Posted 23 April 2017 - 08:01 AM

I have the same spot welder but my spot welds don't look as good as yours. 
 
Can you tell me how did you set it up ? 
 
Pete

Hi Pete. Ive only just found the 'goldilocks' settings, and it seems to depend on a few factors. My setting are -
Weld type - pulse
Metal thickness - 1.2mm + 1.2mm
Timing - default
What I found most important is that you need to ensure both seam surfaces are making a really good contact with each other. I use molegrips to squeeze the two seams together and close the gap between them so the current can run nicely.
After grinding the surfaces to bare metal, I spray this fully conductive Weld-Thru Primer on both surfaces to get some extra protection in there too.http://www.rust.co.u...aerosol/p512960
Hope that helps!

Thanks for that.
Two more setup questions for you:

How did you set the distance between the two copper points,
How did you set the spring pressure in the handle

Thanks

Pete.


2 user(s) are reading this topic

0 members, 2 guests, 0 anonymous users