Loveling your work buddy & look forward to seeing the finished project!
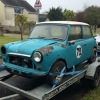

1972 Mini 1000 - Nut And Bolt Restoration.
Started by
SamG
, Apr 16 2017 03:36 PM
109 replies to this topic
#76

Curley
-

- TMF+ Member
-

- 469 posts
Speeding Along Now
- Location: Basingstoke, Hampshire
- Local Club: Not MINI friendly
Posted 28 March 2019 - 06:35 PM
#77
SamG
-
- Noobies
-
- 88 posts
Stage One Kit Fitted
- Location: Somerset
Posted 04 April 2019 - 05:53 PM
any progress mate? Its not far off this time next year now!
sadly looks like your pic links have died!
Yes! Lots of progress! I'll do a big update shortly. I'm hopeful of getting the bodywork completed this month but we'll see.
#78
SamG
-
- Noobies
-
- 88 posts
Stage One Kit Fitted
- Location: Somerset
Posted 04 April 2019 - 05:57 PM
Are you still able to make these? Would be interested for my Van if you could!
Unfortunately not! I've just finished work ahead of our emigration in June. However I may have some spare at the unit, I'll have a look when I'm next up there on Monday.
#79
mini_surfari
-

- Members
-
- 326 posts
Speeding Along Now
- Location: Wiltshire
Posted 05 April 2019 - 09:36 AM
Are you still able to make these? Would be interested for my Van if you could!
Unfortunately not! I've just finished work ahead of our emigration in June. However I may have some spare at the unit, I'll have a look when I'm next up there on Monday.
Thats very kind, I appreciate it.
#80
cp2708
-

- Just Joined
-
- 171 posts
Mini Mad
- Location: London
- Local Club: LSMOC
Posted 05 April 2019 - 11:00 AM
Unfortunately I've been struggling to get up to work on the mini recently due to work and family commitments, but I have managed to get the rear end pretty much finished off. I opted for a Magnum rear valance mainly due to it being less than half the price of a heritage panel. It's the first non-heritage or M-Machine panel I've gone for and although the steel is noticeably thinner, the fit was more than acceptable and it lined up well. Along with the valance I bought M-Machines rear valance closing panel/subframe mount panel.
I didn't take any pictures of it all clamped up but it all fitted together well. Here's the O/S closing panel tacked in place ans spot welded to the valance. Note the ropey seam weld along rear of the wheel arch - I couldn't get the spot welder in there to weld all three panels together so tried to run a seam along the top, not the prettiest but it'll do for now! One of the holes for rear subframe bolt is unavoidably slightly out so that'll need re-drilling later on too.
And fully seam welded in place.
In future I'll also drill holes in the closing panel and plug weld it to the boot floor, not sure why I didn't this time, I think I just got a but of tunnel vision and overlooked it
.
Here's the other one welded on too along with the valance.
And a shot from underneath after welding the valance on. It was all nice and easy due to being nice new steel so the spot welder took really well to it, it was just a slow process as the duty cycle only allows 2 welds per minute. I also made sure to crank it up as it was essentially welding a 3 panel sandwich.
The only bit I'm not happy with is the the very ends of closing panels not mating with the end of the valance as you can see. I put this down to a slightly incorrect profile shape on the M-Machine closing panel but it won't be too much work to quickly knock up a piece to fill it in.


Mine has all original factory panel work in that area and also has the gap there just as yours (as I've used it to inject rust proofing stuff), so I wouldn't personally worry about it.
Nice work by the way.
Edited by cp2708, 05 April 2019 - 11:14 AM.
#81
SamG
-
- Noobies
-
- 88 posts
Stage One Kit Fitted
- Location: Somerset
Posted 21 June 2019 - 08:21 PM
RIght then, good news is the major bodywork is complete bar the outer wings and front panel! Bad news - even though I have plenty of pictures I'm struggling to remember how I actually went about all my repairs etc as I have neglected updated this thread for too long. I'll try and get this to make sense but forgive me if it's a little disjointed.
So the last thing I updated on here was the N/S a-pillar. What a cow that turned out to be  . Basically I rushed into cutting metal away and didn't leave enough to keep the shells strength. I cut the a-pillar away having forgotten I'd already sliced down between the a-post and the top dash rail, this allowed the whole a-post to pop and twist outwards leaving me with no datum. I didn't realise this at the time so I went ahead and welded on the a-pillar I fabricated at work which managed to fit (although with no real references)

Happy and ignorant I then fitted the door to see how it lined up and immediately wished I hadn't - it was way off. The back of the door hung at least and inch too low and it wouldn't even wrestle into the aperture. This is when I realised the A-post had moved 
There was no way I was going to be able to magic up the correct shaped panel so I bit the bullet and bought this...

#82
SamG
-
- Noobies
-
- 88 posts
Stage One Kit Fitted
- Location: Somerset
Posted 21 June 2019 - 08:31 PM

After cutting out my previous work and the curve at the top of the a-pillar, I set about chopping this new panel up so I just had the very top of the a-post, the a-pillar and the curve at the top. Having these complex curves meant I could be confident that when it all lined up top and bottom, it was indeed in the correct place. Before I welded it in I offered up the door and was pleasantly surprised how well it fitted.

Edited by SamG, 21 June 2019 - 08:36 PM.
#83
SamG
-
- Noobies
-
- 88 posts
Stage One Kit Fitted
- Location: Somerset
Posted 21 June 2019 - 08:45 PM
I seem to have a bit of a black hole picture-wise here but the bit I used of the heritage door surround fitted really well, so that's that panic over. Once that was all hunky dory I turned my attention to fitting the new windscreen surround. This went pretty well as there's only really one place it can go. it fitted nicely inside both a-pillars and matched the profile of the dash rail at the bottom, here it is tacked in place.

I only got this tacked on with a few spot welds on each side in case it had to move later on for whatever reason, and I also left the bottom few inches completely unattached as I did with the scuttle as I knew I'd need to take that off later to fit the inner wings/front end.
#84
SamG
-
- Noobies
-
- 88 posts
Stage One Kit Fitted
- Location: Somerset
Posted 21 June 2019 - 08:53 PM
Starting to look a little more like a car now! A nice sight which wouldn't last long...
Next up was the roof, a job which I'd be both looking forward to (because it's a major step forward) and dreading (because I knew it'd be at least a few days worth of grinding). I roughly cut along the bottom each side being careful not to slice into the roof rails, but also trying to take the most I could off to avoid grinding the excess off later. Here's what it looked like...


Although the inside of the cant rail looks pretty minging it cleaned up nicely with a wire wheel. (rust treatment info to follow)
#85
SamG
-
- Noobies
-
- 88 posts
Stage One Kit Fitted
- Location: Somerset
Posted 21 June 2019 - 09:07 PM
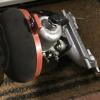
So after grinding down all of the remaining roof panel and wire wheeling the surface rust off the cant rail here is what I was left with. Some really good metal here.

I had to grind down with the edge of a cutting disc (I know, I know), but there was no other way to get properly into the gutter. As you can tell I sometimes have a tendency to be a little heavy handed which meant I went through the gutter panel a few times. No major issues as I'll just fill the holes with weld at a later date. wit the cant rails looking fresh I was looking for some sort of pre-paint bare metal treatment and decided to go with another Bilt Hamber product after reading really good reviews. It's not cheap but alot of these sorts of things need washing off with water afterwards which to me defeats to object?! This one you just paint on, leave to turn dark purple (in about 10 mins, crazy) and paint over 24 hours later. I have better pictures of it in action later on.


I had to grind down with the edge of a cutting disc (I know, I know), but there was no other way to get properly into the gutter. As you can tell I sometimes have a tendency to be a little heavy handed which meant I went through the gutter panel a few times. No major issues as I'll just fill the holes with weld at a later date. wit the cant rails looking fresh I was looking for some sort of pre-paint bare metal treatment and decided to go with another Bilt Hamber product after reading really good reviews. It's not cheap but alot of these sorts of things need washing off with water afterwards which to me defeats to object?! This one you just paint on, leave to turn dark purple (in about 10 mins, crazy) and paint over 24 hours later. I have better pictures of it in action later on.
Edited by SamG, 21 June 2019 - 09:20 PM.
#86
SamG
-
- Noobies
-
- 88 posts
Stage One Kit Fitted
- Location: Somerset
Posted 21 June 2019 - 09:17 PM
Quick note - In those pictures above you can see the new section of a-pillar etc welded in.
So after a couple of coats of that rust treatment I painted the entire cant rail the whole rail round. I hate thinking of the fact that these hidden areas never get topcoated so i went to town with the Zinc primer on these areas, probably about 5-6 coats, overkill but hey.
After this was all nicely painted I was able to trial fit the new roof panel. Mega exciting! side to side it fitted really well but front to back the flanges were 5mm too long overall. There's obviously a bit of discrepancy here due to the pressing of the panel so I decided to grind off an equal amount from each end, leaving enough of a flange to get a spot weld tip onto later on. More to follow very soon. Promise.
#87
Avtovaz
-

- Members
-
- 1,133 posts
One Carb Or Two?
- Location: widnes
Posted 22 June 2019 - 05:19 PM
nice one your getting there mate! that hydrate 80 stuff is meant to be really good, ive used it aswell!
#88
1330RG
-
- Just Joined
-
- 219 posts
Mini Mad
- Location: southampton
Posted 22 June 2019 - 08:21 PM
Coming along again mate. Are you going to be spot welding the new roof on then? Rather than trying to mig it on? I know the original was some kind of running spot weld type of affair.
#89
SamG
-
- Noobies
-
- 88 posts
Stage One Kit Fitted
- Location: Somerset
Posted 23 June 2019 - 06:34 PM
nice one your getting there mate! that hydrate 80 stuff is meant to be really good, ive used it aswell!
It absolutely stinks doesn't it?! I always think thats a sign of a good product!
#90
SamG
-
- Noobies
-
- 88 posts
Stage One Kit Fitted
- Location: Somerset
Posted 23 June 2019 - 06:35 PM
Coming along again mate. Are you going to be spot welding the new roof on then? Rather than trying to mig it on? I know the original was some kind of running spot weld type of affair.
The roof is on! Details to follow tonight...


0 user(s) are reading this topic
0 members, 0 guests, 0 anonymous users


