
any progress on this yet?I find myself keep checking back for updates

1979 Mini 1000
Started by
Ghostrider
, Jun 14 2017 10:16 AM
51 replies to this topic
#17

blueovalcraig
-

- Members
-

- 193 posts
Mini Mad
- Location: Rothesay, Isle of Bute
Posted 06 August 2017 - 11:03 AM
Following this one too. Look forward to seeing updates.
#18
Ghostrider
-
- Noobies
-
- 68 posts
Stage One Kit Fitted
- Location: Basingstoke, London and Peterborough
- Local Club: Basingstoke Mini Club
Posted 31 August 2017 - 12:33 PM
So this thread has been quite dead over the past month, I completely forgot! 
But its back, I have been working on this little car day and night, when I get back from work and my days off, scrambling to get as much of it done before I head back to university. But I can just about see the light at the end of the tunnel 
I'll try to post as much info as ive got because quite a bit of progress has been made since my last update so here it all is.
Once this car had been stripped completely towards the start of this project, my garage was full with parts to the point where it was impossible to move but now however every part that came off the car has been restored and is ready to go.

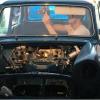
This is all of the engine parts ready to be put back together that all look good as new

Here is all the parts for the rear underside; new shocks, cones, radius arms etc, the subframe was de-rusted and coated with por 15.

This beauty arrived yesterday, stage 1 kit from mini sport, nothing fancy just a slightly nicer exhaust, cone air filter, alloy manifold, uprated carb needle and spring, just something to give me a bit more power and turn a few more heads.

Freshly cleaned up block, had to clean out a load of s**t from the water jacket that was clogging the drain plug, had some slight surface corrosion on cylinders 2 and 4 which has mostly cleaned off but i may have a few issues on startup as some remains. other than that everything else is good, checked the end float and bearings and its all tip top!

I wanted to put the original 10" steel wheels back on the car but mine came with horrible 12" ones so i got a set of 10's on ebay for around 40 quid, didn't have any money for powder coating so just a couple of rattle cans and my angle grinder with a wire brush. ill let the photo do the talking.

I will get back into the habit of uploading plenty of photos especially when the car is going back together but for the time being you'll have to bear with me just uploading a few each day or so.
I am really working my socks off with this car for example i spent 7 hours rebuilding the gearbox last night, finished at 5am then slept in my garage. that's how commuted I am to finishing this car!
Ill try to get a few photos of the body work, the main objective now is to get the underside done. the car is currently sitting on its roof where i am putting in new floors, sills, repairing odd places etc. then clean up the underside, primer, stone chip and waxoyl where i will then put exhaust, brake and fuel lines etc on and flip the car back over onto its new complete rear subframe and wheels etc. Allowing me to start work on the top.
Best get back to it.
#19
minimissions
-

- Members
-
- 3,427 posts
Up Into Fourth
- Location: North West
- Local Club: M.M.O.C
Posted 03 September 2017 - 06:52 AM
ooo loads of new bits there, bet you cant wait to start fitting them all on. Nice progress :)
#20
Ghostrider
-
- Noobies
-
- 68 posts
Stage One Kit Fitted
- Location: Basingstoke, London and Peterborough
- Local Club: Basingstoke Mini Club
Posted 03 September 2017 - 04:10 PM
ooo loads of new bits there, bet you cant wait to start fitting them all on. Nice progress :)
Haha yeah, I can't wait. It's going to be like one big Mecano set!
#21
Ghostrider
-
- Noobies
-
- 68 posts
Stage One Kit Fitted
- Location: Basingstoke, London and Peterborough
- Local Club: Basingstoke Mini Club
Posted 06 September 2017 - 11:17 PM
Just a small update, I'm working my fingers to the bone trying to get the underside of the car finished. I would upload some photos of my progress but my phone broke whilst working on the mini  , so until i fix it ill try to snap a few photos with the I pad.
Anyway another small bit is my gearbox rebuild has finally finished!


Just need a new roller bearing for on the end of the shaft as I accidentally damaged it working on it . But all works, tested it with the selector and checked everything by the book with my Haynes bible  .
.
I was going to clean the sump up a bit better but i really could not be bothered, it will only get dirty after a few drives down some country lanes!.
Quick before and after of the diff:


Should have quite a few updates in the next few days as its all hands on deck with the bodywork.
Stay Tuned!
#22
Ghostrider
-
- Noobies
-
- 68 posts
Stage One Kit Fitted
- Location: Basingstoke, London and Peterborough
- Local Club: Basingstoke Mini Club
Posted 13 September 2017 - 12:51 PM
So just a quick update, just patching a few rotten areas on the underside that i discovered stripping the old waxoyl out of the arches, and a few others hidden by the paint;


I have now patched these, I was however hoping to finish the rest but i ran out of co2 for the welder so until i get some more i cant get thos last few annoying areas done.
However i went and cleaned the underside off with the wire brush on my grinder, getting rid of any surface rust or muck but still trying to keep a good amount of the paint on.


Its nothing amazing and there are still a few areas that need grinding down then re primering as well as the other side of the car but its progress. When i get back home on Friday I'll hopefully be able to patch those last few areas, put the closing panels into the rear valence, then clean up the underside for more primer, then stonechip and waxoyl!
#23
minimissions
-
- Members
-
- 3,427 posts
Up Into Fourth
- Location: North West
- Local Club: M.M.O.C
Posted 13 September 2017 - 04:20 PM
It defo makes life easier working on the car that way round doesn't it.
#24
Ghostrider
-
- Noobies
-
- 68 posts
Stage One Kit Fitted
- Location: Basingstoke, London and Peterborough
- Local Club: Basingstoke Mini Club
Posted 13 September 2017 - 05:32 PM
It defo makes life easier working on the car that way round doesn't it.
Oh defiantly, I see people walking past in the street looking at me as if i don't have a clue that its upside down
#25
minimissions
-
- Members
-
- 3,427 posts
Up Into Fourth
- Location: North West
- Local Club: M.M.O.C
Posted 14 September 2017 - 05:35 AM
haha I bet it does look odd to the people who don't understand. Do you have a finish deadline for this or its just as and when?
#26
Ghostrider
-
- Noobies
-
- 68 posts
Stage One Kit Fitted
- Location: Basingstoke, London and Peterborough
- Local Club: Basingstoke Mini Club
Posted 14 September 2017 - 11:24 AM
haha I bet it does look odd to the people who don't understand. Do you have a finish deadline for this or its just as and when?
Yeah, my deadline was originally before I go back to uni (So this week) might have been a bit ambitious . So really its as soon as possible, id like to be cruising around in it ideally next summer, considering all that needs doing is the shell, and a few other misc interior parts, I cant see it taking much longer once its painted. I can put it back together in a week with the help of a few mates, get everything working and eliminate any gremlins.
None the less I'm still quite pleased with what I've managed to do in 4 months regardless of what people say
#27
73MkIII
-

- Noobies
-
- 158 posts
Mini Mad
- Location: Worcestershire
Posted 14 September 2017 - 12:00 PM
When you compare it to a lot of the threads on here, which are still ongoing 6-10 years down the road, you have worked fast. No one can say otherwise. I am just psyching myself up to get started on my project. May be ready for my son to learn to drive in (He is 30 months old).
#28
minimissions
-
- Members
-
- 3,427 posts
Up Into Fourth
- Location: North West
- Local Club: M.M.O.C
Posted 14 September 2017 - 12:41 PM
haha I bet it does look odd to the people who don't understand. Do you have a finish deadline for this or its just as and when?
Yeah, my deadline was originally before I go back to uni (So this week) might have been a bit ambitious
None the less I'm still quite pleased with what I've managed to do in 4 months regardless of what people say
Yeah I think that is the case with most people and deadlines, its good to have one by 80% of us go past them. It sounds like you have a plan and that's the main thing. Like you say with a few mates you can build them up pretty fast. 4 months to get to the point you have is good in my book also.
It will all be worth it in the end. Keep post and enjoying doing it.
#29
Ghostrider
-
- Noobies
-
- 68 posts
Stage One Kit Fitted
- Location: Basingstoke, London and Peterborough
- Local Club: Basingstoke Mini Club
Posted 24 October 2017 - 03:38 PM
So been stuck at uni for the past few months and I've only really been able to do a small amount of work on Project Mini. However the past few weekends i have been able to get some vital bits done before winter closes in and it becomes too cold and damp to do anything.
Anyway, the waxoyl has been done! Just need to tack in one more closing panel then give that a small cover of waxoyl, line the fuel, brake and battery lines then flip it back over onto the fully restored and assembled rear sub frame.


Just fitted the old 12" wheels on as my restored 10"ones have no tyres yet. However the 12" tyres are too big or ive put the subframe back together wrong. they wont even fit all the way onto the hubs. Mind you they have no spacers so because 10" wheels are going back on im sure itll be fine.

I thought another before and after photo would really show how bad things where, and how much better things are now


Not bad i think, once its flipped i need to add new door steps and sills then give another quick over with the waxoyl. I'm dreading the door steps because of the level of accuracy involved, if its slightly off the door wont close! but one thing at time.
in the meantime I'm part hunting every day for things that are needed, vinyl rear seats (mk3 type), seat belts, black carpet, black door cards with the elasticated pocket, a new drivers door, a new front sub frame. the list goes on.
Nobody ever said restoring a mini was quick, or cheap.
With winter fast approaching the car needs to be flipped so i can wheelbarrow it into the garage and do the occasional work on it with the help of a heater to stop me from freezing!
#30
Vinay-RS
-

- Members
-
- 2,093 posts
Put's foolish ideas in peoples heads
- Location: Cape Town
Posted 24 October 2017 - 04:02 PM
That floor really does look good. A vast improvement from how it was before. Well done :)


0 user(s) are reading this topic
0 members, 0 guests, 0 anonymous users


