Hi everyone. I have a 1978 Leyland sedan and have just put in adjustable lower arms (the standard looking ones) with the special C-STR632- LOWER ARM BUSH SET FOR MODIFIED GEOMETRY ROAD GRADE RUBBER. I am having difficulty putting the lower arm pins back in. There is about a 3mm gap between the face of the large diameter of the pin to the outer surface of the subframe. These were in flush with the old set and the pins do sit in flush when I insert them without the lower arm in there. I've tried using clamps and tightening the nut on the other end of the pin to no avail. Any tips? Thanks.


Lower Arm Pin-How Far In?
Started by
Angrywasp
, Jun 24 2017 11:57 AM
17 replies to this topic
#2

nicklouse
-

- TMF+ Member
-

- 17,937 posts
Moved Into The Garage
- Location: Not Yorkshire
- Local Club: Anonyme Miniholiker
Posted 24 June 2017 - 12:03 PM
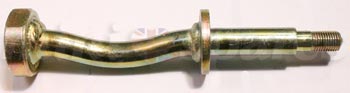
the shoulder of the bolt its flush with the subframe.
http://www.minispare...=350/2A4362.jpg
that is the wider bit after the thread.
http://www.minispare...=350/2A4362.jpg
that is the wider bit after the thread.
#3
Posted 24 June 2017 - 12:47 PM
Thanks. How would I know when that part is flush against the subframe, as it will be hidden by the bushings? Here are photos I took today. The square edge of the pin looks like it should sit flush to that piece of steel welded to the subframe to prevent the pin from rotating or something along those lines. But this is as far as I can get the pin to go through.
Attached Files
-
 IMG_20170624_224312.jpg 45.75K
39 downloads
IMG_20170624_224312.jpg 45.75K
39 downloads
-
IMG_20170624_224042.jpg 44.4K
45 downloads
#4
nicklouse
-
- TMF+ Member
-
- 17,937 posts
Moved Into The Garage
- Location: Not Yorkshire
- Local Club: Anonyme Miniholiker
Posted 24 June 2017 - 03:33 PM
are those before and after images?
as the second one it looks like the bush is dead.
like i said the bolt goes through until the shoulder seat on the rear subframe leg. it can not go any further.
so fit without the arm or bushes then you then know just how far it does go in.
as the second one it looks like the bush is dead.
like i said the bolt goes through until the shoulder seat on the rear subframe leg. it can not go any further.
so fit without the arm or bushes then you then know just how far it does go in.
#5
Rorf
-

- Members
-
- 857 posts
One Carb Or Two?
- Location: Cape Town
Posted 24 June 2017 - 08:02 PM
That pin looks like it has been bashed to hell.
#6
Posted 24 June 2017 - 09:59 PM
The image of the destroyed Bush is the original that I've replaced. The pin looked like that when I got the car a few months ago but I haven't been gentle with it either.
If I fit the pin without the bushes it sits further in by a few mm. But I've tried for hours and I can't get the pin to go in that far with the bushes installed.
I'll measure the length of the thread poking out with no arm installed (when the shoulder is flush with the subframe) and compare it to when the arm and bushes are installed. They should be the same obviously. The bushes are a hard compound and don't compress much so I'm not sure it's possible for the shoulder to still sit flush.
#7
Deathrow
-

- TMF IT Specialist
-
- 5,734 posts
Have you tried turning it off and on again?
- Name: Adam
- Location: Manchester, UK
Posted 24 June 2017 - 10:08 PM
Have you tried sliding the bush over the pin off the car? Does it seat properly?
When I removed mine, there was corrosion on the part of the pin where the bush seats, it needed some clean up before a new bush would seat fully.
Also, is there a nut on the rear of the pin?
#8
Spider
-

- Admin
-
- 13,904 posts
Moved Into The Garage
- Location: NSW
- Local Club: South Australian Moke Club
Posted 24 June 2017 - 10:15 PM
Along with Deathrow's suggestions, dry fit the pin on it's own in to the Subframe, you'll get a better picture as to how it should sit too.
#9
Posted 24 June 2017 - 10:20 PM
I haven't tried sliding the bushings over the pin without the arm yet, no. I'll give that a try next.
And yes there's a nut and a spring washer installed. I only see one thread exposed after the nut. I saw 3 with the old bushings but the bushings were destroyed so the pin was able to go deeper through the subframe mount.
And yes there's a nut and a spring washer installed. I only see one thread exposed after the nut. I saw 3 with the old bushings but the bushings were destroyed so the pin was able to go deeper through the subframe mount.
#10
AeroNotix
-

- Noobies
-
- 267 posts
Mini Mad
- Location: Krakow (Blackpool, originally)
Posted 24 June 2017 - 10:25 PM
On old parts, worn out or corroded, even slightly the lower pins need a bit of jimmying to get them seated properly. That said, they're 30 quid each from what I remember likely would be better off with some seeing to.
All in all, take some (very) light abrasive to them and twiggle them about when seating them. They'll go in proper.
#11
Posted 24 June 2017 - 10:55 PM
Well the shoulder is inside the bushing still as you can see so no wonder it can't sit flush. The bushings don't compress enough for the pin to slide through anymore either.
Attached Files
-
IMG_20170625_085402.jpg 43.75K
15 downloads
-
IMG_20170625_085402.jpg 43.75K
0 downloads
Edited by Angrywasp, 24 June 2017 - 10:56 PM.
#12
Spider
-
- Admin
-
- 13,904 posts
Moved Into The Garage
- Location: NSW
- Local Club: South Australian Moke Club
Posted 25 June 2017 - 12:09 AM
That is how they are, even the original sleeved rubber bushes should be like that. The idea being when done up, the inner sleeves of the bushes are pinched tight.
#13
Posted 25 June 2017 - 01:00 AM
Perhaps the last owner did the old ones up way too tight then. I'll leave them as is for now and listen for any noises etc when I drive it again then recheck everything afterwards. Now to try stop this balljoint from spinning so the nut will go on... I think I'll just have to buy a new balljoint as the thread doesn't look perfect anymore. Thanks for everyones help.
#14
Magneto
-

- Members
-
- 889 posts
One Carb Or Two?
- Location: Kansas City, USA
- Local Club: KC MINI Club
Posted 25 June 2017 - 01:45 AM
Is it the upper or lower ball joint you're trying to tighten?
If the upper, put a trolley jack under the lower ball joint and out some upward pressure on the joint, that should seat the taper enough that you can tighten the nut.
If the lower, put the jack under the arm itself and raise the jack just enough to again seat the taper in the arm, then you should be able to tighten it OK. It shouldn't, but don't bend the control arm!
#15
Posted 25 June 2017 - 02:04 AM
Cheers I ended up having to use a Jack under the front drum to take some weight off the assembly and then use an assembly of a socket, extension and socket to drill adaptor to put weight upward onto the balljoint stud. I soaked the stud and nut in penetr8 and tightened the nut very slowly with a spanner. It worked in the end haha. Everything is together now along with longer tie rod ends and adjustable tie bar rods. I'll be able to start adjusting my suspension geometry now and take it for a professional alignment soon enough.


1 user(s) are reading this topic
0 members, 1 guests, 0 anonymous users


