Jump to content


Photo
- - - - -

Lone Star Mini Restoration


  • Please log in to reply
151 replies to this topic

#136 GraemeC

GraemeC

    Crazy About Mini's

  • TMF+ Member
  • PipPipPipPipPipPipPipPipPipPip
  • 7,315 posts
  • Location: Carnforth

Posted 21 August 2018 - 08:35 AM

I think it is a borderline case, dependant on budget, skill and desired finish.


A new inner wing will be more expensive but will be a much neater finish unless you are a pro at letting in patches.

(actually I say expensive - that depends on how you would make the patches - whether you can fabricate well or whether you'd need to cut them from a donor panel)


And as Pete says - removing it will let you get to all the joins behind it which will, undoubtedly, need attention.  There'll be a lot of repair work needed in the shock mount area for one.


#137 Mini Waco

Mini Waco

    Speeding Along Now

  • Members
  • PipPipPipPipPip
  • 432 posts
  • Location: Texas

Posted 21 August 2018 - 11:32 AM

Thanks GraemeC and Pete1..  I like the way you think.  I just have to learn how to correctly align all the interfacing panels so that I don't end up with large gaps between door, bonnet and scuttle...   Of course I'm wondering how it affects the alignment of the suspension too if I'm not spot on...


#138 GraemeC

GraemeC

    Crazy About Mini's

  • TMF+ Member
  • PipPipPipPipPipPipPipPipPipPip
  • 7,315 posts
  • Location: Carnforth

Posted 21 August 2018 - 12:59 PM

It won't affect the suspension alignment in the slightest - the only part of the suspension touching that panel is the damper mount and the damper doesn't affect alignment.

You'd also be hard pushed to get the damper mount in the wrong place as the threaded bars that the bolts screw into are welded to the cross member and don't move when you remove the inner wing - it simply has oversized through holes.


#139 Petrol

Petrol

    One Carb Or Two?

  • Members
  • PipPipPipPipPipPipPip
  • 967 posts

Posted 21 August 2018 - 09:42 PM

I repaired my inner wings.......

Its important to get the height of the inner wing correct if replaced as once welded on, it's very difficult to move. Whilst the shock absorber mounting holes will help you, there will be some movement. 2mm at the shock absorber mounting point could result in 10mm at the front of the inner wing causing gap problems to the hood. I also decided you can only cut so much out before running into problems. My front fenders were cut off the same as yours and their isn't much left to align to. Most panels have to be made to fit and cutting too much out can be a recipie for hassles later down the line.

This is what I did.

Post #135

http://www.theminifo...-rebuild/page-9


As you can see I cut the rotten metal out behind the shock mount. There are also stiffeners welded inside the inner wing. 


I worked on the LH inner and outer sill, the inner wing and the flitch panel all at the same time


http://www.theminifo...rebuild/page-12


It looked like this when done


ff1f0c514b243d02abb91c9e48251f2077e20f2b


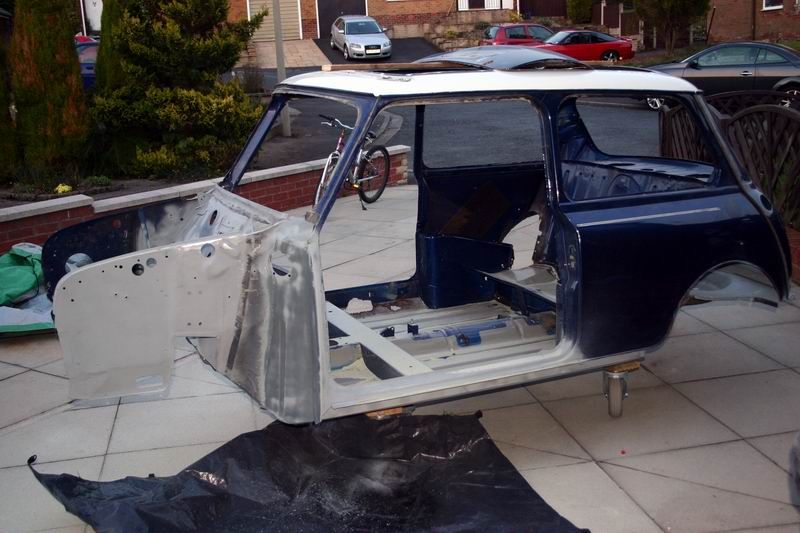
GraemeC is absolutely right about the shock absorber mounts. Have a look on the inside of the inner wing and you can see that it bolts through the cross member that runs along the bulkhead.


Hope that helps you


Pete


#140 Mini Waco

Mini Waco

    Speeding Along Now

  • Members
  • PipPipPipPipPip
  • 432 posts
  • Location: Texas

Posted 22 August 2018 - 01:06 AM

Thanks Petrol..  I do believe that a full replacement is a tad more than I'm ready to tackle.   I'm going the route of repair vs replace entirely.  I will need to order a few panels and study the shapes and how all the flanges interface..  Meanwhile, I'll tackle more cleanup and removing the sound dampening on the floor (inside shell).


#141 neon1991

neon1991

    Stage One Kit Fitted

  • Noobies
  • PipPipPip
  • 77 posts

Posted 23 August 2018 - 10:38 AM

great thread! huge attention to detail already! :)


#142 Daz1968

Daz1968

    Up Into Fourth

  • Members
  • PipPipPipPipPipPipPipPipPip
  • 2,058 posts
  • Location: Dudley

Posted 23 August 2018 - 04:48 PM

I wouldn’t worry with full panel replacement I found it much easier and quicker, it virtually lines itself up and as stated above makes it much easier to repair other areas. I did one side at a time so I could reference the other side for measurements. Part panels I find much more difficult to align.

#143 Mini Waco

Mini Waco

    Speeding Along Now

  • Members
  • PipPipPipPipPip
  • 432 posts
  • Location: Texas

Posted 25 August 2018 - 07:00 PM

Started a proper video on the shell, but got side tracked with a video for my Brother-n-law...  He has worked long and hard on a '68 Chevy  and it's a beautiful truck..  Here's a short teaser video that I'm working on....


#144 Mini Waco

Mini Waco

    Speeding Along Now

  • Members
  • PipPipPipPipPip
  • 432 posts
  • Location: Texas

Posted 26 August 2018 - 03:18 AM

Thanks Neon & Daz..   As typical with my life, it really doesn't matter which direction I choose because it will most likely be the wrong decision.  Either way however, It will be a learning experience.


So..  lessons learned today while cleaning the R/H Inner Wing.  I quite enjoy cleaning all the oily grime/whatever off.  Perhaps when I've done 3-4 Minis, it will be old hat, but right now everything is new so it's fun.  Besides I actually like to clean so it's kind've therapeutic for me.  Then since I can't do anything else, the time it takes to clean give me a since of accomplishment on the Mini.   Lessons learned....
- Definitely wear goggles or a face shield when grinding/sanding anything - especially if you wear contacts.
- Seriously think about wearing a mouth/nose dust shield because I blew out black dirt for an hour afterwards
- My air tools do not have the same torque/power that the electric tools have
- Electric tools get quite hot, my air tools do not. .in fact some of my air tools get freak'n cold.
- The head of the electric drill hurts/burns like a @#$% when your finger rubs up against it during use
- You end up like a metal porcupine after pressing hard with the metal wire abrasive brush
- You also end up like a coal miner after using the abrasive wheel to clean oily dirt
- It helps (I think) to heat up rusted bolts when trying to screw/drill them out
- To keep your finger clear of vice clamps because they too hurt like #$% when they grab your skin after clamping down on a rusted bolt


I have begun documenting my restoration from a novice perspective (videos available soon).  I do this with no claims or posture and I aim to be an open book.  My hopes are to give back by giving hope to others in the same boat/situation as myself who has nothing more than the desire to fix/restore a Mini.  Most everything I share is learned from the knowledge bank I've met online.


Attached Files


#145 MacGyver

MacGyver

    One Carb Or Two?

  • TMF+ Member
  • PipPipPipPipPipPipPip
  • 1,027 posts
  • Location: Fribourg

Posted 26 August 2018 - 08:30 AM

? no fun is it. ?
You should always wear eye and skin protection, but no one thinks of ears...
I would recommend having a comfortable pare of ear plugs or better some ear 'shells' you'll regret it later if you don't. And long sleeved clothes and leather gloves to protect your hands.
Wire brushes are a nightmare to get out of skin, trust me... ?
We All learn from our mistakes, if we didn't make any we wouldn't learn anything!
Keep on with the good work and keep safe!


Ben

#146 Mini Waco

Mini Waco

    Speeding Along Now

  • Members
  • PipPipPipPipPip
  • 432 posts
  • Location: Texas

Posted 01 February 2019 - 01:55 PM

Wow.. so much has taken place since I last left an update.  I've actually made progress, but as usual, 1-2 steps forward, then 2 steps backwards..   My daughter and I first removed all the sound dampening from the shell floor panels.  I thought I would be replacing the A-post first so I had to educate myself on how all the panels interfaced.  Plans change as I expect they will multiple times throughout the project.  Then since I didn't have a welder at the time, I made a bracing system that attached via nuts & bolts (no welds).  In my mind, this works better in that I can remove a section if I need to access and it is re-usable for the next restoration.  I have decided to capture 100% of my restoration on film so I'm creating my "Lone Star Mini" restoration on Youtube...  

Attached Files


#147 Mini Waco

Mini Waco

    Speeding Along Now

  • Members
  • PipPipPipPipPip
  • 432 posts
  • Location: Texas

Posted 01 February 2019 - 02:03 PM

At some time in the mix around Halloween of 2018, my wife and I drove the other Mini to a Halloween party.  Coming home, the engine overheated and we had our first Mini Wrecker call.... the funny story was that my wife and I did a $5 quick costume in that I was a lightning bolt and she was the one I hit..  Therefore she dressed up as if she were "fried".. Long story short.. as the engine over-heated and we coasted into a convenience store, my wife went running in looking for some water..  they clerk at the store saw her dressed like that, looked out the window and saw smoke pouring out of the Mini and wondered.. What the heck!?!?     Needless to say I was less than one mile from the house so the Wrecker dude told me that "This is the smallest car I've ever towed and the shortest distance I've ever delivered to"..       Needless to say this side-tracked my restoration for a short bit.

Attached Files


#148 Mini Waco

Mini Waco

    Speeding Along Now

  • Members
  • PipPipPipPipPip
  • 432 posts
  • Location: Texas

Posted 01 February 2019 - 02:09 PM

with the overheating of the engine, this caused me to pause on the restoration and learn a little about my engine.  The first thing I learned about was the Mechanical Temp Gauge and found a leak at the Heater valve.  I first learned how to remove the dash board to access the temp gauge, then I disassembled the temp gauge to learn about the Bourdon Tube and how the gauge operates.. rather fastening.. all on video at Lone Star Mini - Youtube

Attached Files


#149 Mini Waco

Mini Waco

    Speeding Along Now

  • Members
  • PipPipPipPipPip
  • 432 posts
  • Location: Texas

Posted 01 February 2019 - 02:20 PM

Next, I thought I was getting away from life and Minis when I took my family East to the Smokey Mountains for Thanksgiving.  Through a YouTube connection, this is where I found myself at the home of a complete stranger named Paul Ireson who had some of the coolest Minis I've ever seen..  Van, Pickups, Saloons, & some MInt Jaguars.  Two of his Minis are featured in Mini World Magazine.  The Pickup that was featured has 2 550 HP engines, one in the front and one in the back totally 1100HP..    downright incredible...  So here I am in the middle of Tennessee and I found myself around incredible Minis.  If that were not enough, when in a touristy town of Gatlinburg TN, Ripley's Believe It Or Not had a diamond studded Mini with USA scenery uut front..  It was a newer BMW mini, but still cool. 

Attached Files


#150 Mini Waco

Mini Waco

    Speeding Along Now

  • Members
  • PipPipPipPipPip
  • 432 posts
  • Location: Texas

Posted 01 February 2019 - 02:24 PM

When going to Tennessee, I originally planned to drive my classic Mini down "The Tail of the Dragon" which is a USA famous road for Hot Rods and motorcycles that has 318 curves in an 11 mile stretch around the mountains with no guard rails and people die every year..  Well..  since my engine over heated, I did the next best thing in renting a newer BMW mini.  My brother-n-law and daughter joined me for a really cool experience.  It turned out that we were the only car on the 'Dragon' for the most part.  I think we passed 2 cars going one way and a couple returning back..  two were porches racing each other... Needless to say we had a beautiful drive .. but I still want to drive my classic on the 'Dragon'..   the dragon you see below is made from motorcycle parts... 

Attached Files


Edited by Mini Waco, 01 February 2019 - 02:27 PM.


0 user(s) are reading this topic

0 members, 0 guests, 0 anonymous users