I can't see all four arms pointing up being a mistake, there must be a reason for it, maybe the weight of the shell on them straightens them out ? Did you ask the company that sold it to you ? and how much did it cost ? it looks amazing.


Lone Star Mini Restoration
Started by
Mini Waco
, Aug 27 2017 10:36 PM
151 replies to this topic
#31

pete l
-
- Members
-

- 1,360 posts
One Carb Or Two?
- Location: East of France
Posted 31 August 2017 - 07:07 AM
#32
Mini Waco
-
- Members
-
- 432 posts
Speeding Along Now
- Location: Texas
Posted 31 August 2017 - 11:21 AM
I can't see all four arms pointing up being a mistake, there must be a reason for it, maybe the weight of the shell on them straightens them out ? Did you ask the company that sold it to you ? and how much did it cost ? it looks amazing.
Agreed. I did talk with the company, but the person I spoke with was of little help. All he could do was call his vendors and suppliers and ended up telling me they have always been that way (no help). I retail price was approx 900 GBP, but I made a trade offer and ended up only paying just under 180 GBP for it. It worked out to be a good deal for me and them. Now I just have to pick up some steel and figure out how to attach it.
#33
Mini Waco
-
- Members
-
- 432 posts
Speeding Along Now
- Location: Texas
Posted 04 September 2017 - 03:05 AM
A friend re-welded my rotisserie arms for me and I refinished them. The arms are now straight and the rotisserie is ready minus attachment to car. Looking for a Steel company that sells 2" tubing. Meanwhile, I cleaned the engine a little and found that it was once yellow in color. Waverli and I then made the wood dolly in preparation of removing everything else from the car. I thought we were close, but I have to figure out how to remove the rear axle and sub-frames. I'm not sure how difficult that is going to be. To close out my day and since I won't be using them, I hung the 13" wheels (extra set that came with the second mini). Hopefully Waverli and I will make good progress tomorrow since it's a holiday and I'm off of work. Today's lessons for Waverli included measuring, marking and cutting lumber (including how to be safe using a miter saw). Measuring, marking and drilling holes to attach swivel casters. Removing and attaching air tools to the quick disconnect (seemed to be a challenge for her). Then assembling the Dolly.
Attached Files
-
 Day 6-1.jpg 49.21K
2 downloads
Day 6-1.jpg 49.21K
2 downloads
-
Day 6-2.jpg 73.58K
3 downloads
-
Day 6-3.jpg 59.4K
5 downloads
#34
Mini Waco
-
- Members
-
- 432 posts
Speeding Along Now
- Location: Texas
Posted 06 September 2017 - 12:07 AM
Today I picked up 2" steel tubing in order to complete the rotisserie attachment to the shell. I had a neat experience going inside the steel company facilities and see a little metal work being accomplished. That was a sweat box for sure.... So I brought home my 2" tubing and then tried to organize a little with the anticipation of rolling the rottsserie with Shell into the shop. Part of my organization included building a wall mounted rack for the maintenance ramps. The ramps came out nice I think... I am getting anxious to for more hands-on Mini education..
Attached Files
-
Day 7-1.jpg 63.25K
1 downloads
-
Day 7-2.jpg 40.96K
2 downloads
#35
Mini Waco
-
- Members
-
- 432 posts
Speeding Along Now
- Location: Texas
Posted 17 September 2017 - 03:58 AM
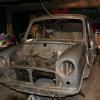
I'm a little closer to a bare shell. Managed to empty the engine bay of everything except the brake system. I see that the master cylinder is somehow tied to the pedals and I'll attempt to figure that out tomorrow. The other item that I was unable to manage was disconnecting the speedometer cable from the backside of the gauge console. Therefore I diverted my attention and removed the exhaust and jacked the car up with expectation of removing sub-frames tomorrow. I'm hoping to wake up with a little clarity and determination of learning how to remove the brake system and speedo cable.
#36
Mini Waco
-
- Members
-
- 432 posts
Speeding Along Now
- Location: Texas
Posted 17 September 2017 - 04:01 AM
I'm a little closer to a bare shell. Managed to empty the engine bay of everything except the brake system. I see that the master cylinder is somehow tied to the pedals and I'll attempt to figure that out tomorrow. The other item that I was unable to manage was disconnecting the speedometer cable from the backside of the gauge console. Therefore I diverted my attention and removed the exhaust and jacked the car up with expectation of removing sub-frames tomorrow. I'm hoping to wake up with a little clarity and determination of learning how to remove the brake system and speedo cable.
Attached Files
-
Day 8-1.jpg 77.28K
0 downloads
-
Day 8-2.jpg 103.04K
1 downloads
#37
73MkIII
-

- Noobies
-
- 158 posts
Mini Mad
- Location: Worcestershire
Posted 17 September 2017 - 06:59 AM
Got a follow from me.looks like quite a solid shell for an 80's mini. You seem to be going quick too. I would imagine your climate will suit a mini well once the rust is gone.......
Love the garage, so much space and will be interesting keeping all the stuff clean once the grinders and welders start up. Good luck with it.
Love the garage, so much space and will be interesting keeping all the stuff clean once the grinders and welders start up. Good luck with it.
Edited by 73MkIII, 17 September 2017 - 07:02 AM.
#38
Northernpower
-

- Members
-
- 2,409 posts
Mr. 7-Port
- Name: Graham
- Location: North Yorkshire (God's County)
- Local Club: Its out there somewhere
Posted 17 September 2017 - 07:00 AM
I'm a little closer to a bare shell. Managed to empty the engine bay of everything except the brake system. I see that the master cylinder is somehow tied to the pedals and I'll attempt to figure that out tomorrow. The other item that I was unable to manage was disconnecting the speedometer cable from the backside of the gauge console. Therefore I diverted my attention and removed the exhaust and jacked the car up with expectation of removing sub-frames tomorrow. I'm hoping to wake up with a little clarity and determination of learning how to remove the brake system and speedo cable.
You're about to discover the delights of the brake master cylinder clevis pin. There's no easy way to tell you this but its considered by many to be the most difficult job on a Mini to remove. Read your Haynes and enjoy. 
#39
Mini Waco
-
- Members
-
- 432 posts
Speeding Along Now
- Location: Texas
Posted 17 September 2017 - 12:45 PM
Got a follow from me.looks like quite a solid shell for an 80's mini. You seem to be going quick too. I would imagine your climate will suit a mini well once the rust is gone.......
Love the garage, so much space and will be interesting keeping all the stuff clean once the grinders and welders start up. Good luck with it.
Thanks mate.. I have so much to learn that this task is a tad daunting. One step at a time and hopefully I can make you Brits proud.
#40
Mini Waco
-
- Members
-
- 432 posts
Speeding Along Now
- Location: Texas
Posted 17 September 2017 - 01:08 PM
You're about to discover the delights of the brake master cylinder clevis pin. There's no easy way to tell you this but its considered by many to be the most difficult job on a Mini to remove. Read your Haynes and enjoy.
I will red the Haynes, but I've not had great success with the manual as it seems to be lacking by only covering the basics of mechanics. I understand the yellow older Haynes is more complete so I will be looking to pick that up soon. At least now I know the brake system has been defined as a difficult job.. I am determined.. I will see how it goes.. thanks for the heads up.
#41
73MkIII
-
- Noobies
-
- 158 posts
Mini Mad
- Location: Worcestershire
Posted 17 September 2017 - 02:48 PM

I was recommended to start with these, we will see how useful they are as I am about to start stripping my car. Really looking forward to the gear linkage and the washer bottle I can tell you.....
#42
Mini Waco
-
- Members
-
- 432 posts
Speeding Along Now
- Location: Texas
Posted 17 September 2017 - 03:41 PM
I was recommended to start with these, we will see how useful they are as I am about to start stripping my car. Really looking forward to the gear linkage and the washer bottle I can tell you.....
I have the Blue one and will be ordering the yellow as a TMF friend has sent me clips from the yellow which seems to be much better. Great.. let me know if you create a post on your restoration as I'm sure we can bounce ideas off one another since we will be going through it at the same time. I now have the master brake cylinder out.. it was a bear for sure. now for the master clutch cylinder...
#43
73MkIII
-
- Noobies
-
- 158 posts
Mini Mad
- Location: Worcestershire
Posted 17 September 2017 - 05:08 PM
I was recommended to start with these, we will see how useful they are as I am about to start stripping my car. Really looking forward to the gear linkage and the washer bottle I can tell you.....
I have the Blue one and will be ordering the yellow as a TMF friend has sent me clips from the yellow which seems to be much better. Great.. let me know if you create a post on your restoration as I'm sure we can bounce ideas off one another since we will be going through it at the same time. I now have the master brake cylinder out.. it was a bear for sure. now for the master clutch cylinder...
changed my signature so hoping it has the link in now.
#44
Mini Waco
-
- Members
-
- 432 posts
Speeding Along Now
- Location: Texas
Posted 17 September 2017 - 08:29 PM
Good progress today and I've definitely become more intimate with my Mini. Laying on my back with head under the steering column trying to remove the dang pins that for the Master Brake/Clutch cylinders. While I knew what needed to be done, it was by far the most time consuming task I've accomplished to date. Since I plan on replacing the items, I had thoughts of cutting the items out, but I wanted to do it proper so that I would know how next time. The pin for the brake cylinder was a down right BEAR. After I finally heard a loud POP with the brake pin coming out, the clutch cylinder pin came out within minutes. Then I tackled the speedo cable. I pinched and pulled the connection on the backside of the speedometer console. I finally got it. Afterwards, I removed the steering column and gutted the engine/dash of all wiring - felt as though I was pulling the guts out. I then went on for the front hubs and removed the massive 1 5/16 bolts from the front sub-frame. I still have a few hours left in the day so I'm still hopeful to remove the front frame after my cooling off break as it is still 93 degrees and only getting hotter.
Attached Files
-
Day 9-1.jpg 36.71K
3 downloads
-
Day 9-2.jpg 53.12K
2 downloads
-
Day 9-3.jpg 60.95K
2 downloads
-
Day 9-4.jpg 80K
1 downloads
-
Day 9-5.jpg 43.44K
0 downloads
-
Day 9-6.jpg 57.77K
0 downloads
-
Day 9-7.jpg 97.67K
2 downloads
-
Day 9-8.jpg 59.2K
0 downloads
Edited by Mini Waco, 17 September 2017 - 08:32 PM.
#45
Mini Waco
-
- Members
-
- 432 posts
Speeding Along Now
- Location: Texas
Posted 20 September 2017 - 12:09 AM
Managed to remove the arm just below the trumpet.. I've not had much luck compressing the cone with the Sykes tool.. Hopefully this will help now.
Attached Files
-
Day 10-1.jpg 65.61K
1 downloads
-
Day 10-2.jpg 85.8K
0 downloads


0 user(s) are reading this topic
0 members, 0 guests, 0 anonymous users


