Glad you got it sorted,
seems light enough now!
Yes... thank you


Speeding Along Now

Posted 22 November 2017 - 12:15 PM
Glad you got it sorted,
seems light enough now!
Yes... thank you
Speeding Along Now
Posted 22 November 2017 - 11:00 PM
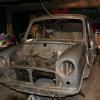
Now the scary part begins. I went ahead and took a few pictures of what I assumed to be some of the worst rusted areas. Then I learned how the wiring was routed and I pulled all wiring. I learned that there were loads of foam padding stuffed in all the seams. I will have to research a product to replace this old foam. Pulled off the headliner foam pads and removed battery cable, brake line and fuel lines. I then randomly picked a small location for cleaning. WOW.. the amount of bondo (I think it's bondo) that covered holes and crevices. It didn't take me too long to uncover what appears to be patch jobs and simple "cover-ups". Well.. now is when I find out the true condition of the shell. Then I will have to seek advice from you experienced folk on what is best.. replacement or repair. Either options will begin my learning curve. Looks like I'm going to have beautiful weather over the next few days for this archeological dig.
 Cleanup 01.JPG 65.93K
0 downloads
Cleanup 02.JPG 63.33K
0 downloads
Cleanup 03.JPG 84.21K
2 downloads
Cleanup 01.JPG 65.93K
0 downloads
Cleanup 02.JPG 63.33K
0 downloads
Cleanup 03.JPG 84.21K
2 downloads
Speeding Along Now
Posted 24 November 2017 - 12:17 AM
Enjoyed a fabulous day working on the Mini only to come in for a Thanksgiving lunch with my girls and then fell asleep for a couple hours. Cleaning the bottom panel was therapeutic. I pulled the rotisserie sideways so that the sun would help me see my work. While cleaning the bottom panel, I uncovered respectable holes in nearly every corner. They were largely hidden by wonderfully thick yellow bondo. Also learned that the entire left side of the floor panel had been replaced in the past due to the spot welding evidence. another lesson learned was that it helps to degrease before cleaning with scrotch-brite discs. I got about half of the entire floor panel totally cleaned (minus small rust pits that my discs could not reach). Final conclusion for the day is that I am going to replace the entire floor panel rather than fight individual holes for repair. I think in the end for time and money, I will come out ahead with a better product.
Cleanup 05.jpg 64.75K
6 downloads
Cleanup 09.jpg 60.26K
3 downloads
Speeding Along Now
Posted 02 January 2018 - 03:54 PM
Drove East to see my family for Christmas - 17 hours of driving (one way). While there, I stopped over to meet a guy who put an Acura 3200cc engine in the back of his '83 Mini.. 0 to 60 in 3.6 seconds. While there and since he has moved into 'power' with more extreme modifications, he had no need for typical suspension parts he had previously purchased from Mini Spares. Therefore I got a good deal on a near complete suspension setup of parts saving me approx. $250. I also brought home a bag of clecos that may come in handy during the restoration. Then just before leaving to head back to Texas, I met a wonderful couple who had a 1964 Austin Cooper tucked away in their shop of Vintage vehicles. Therefore 2017 ended on a fabulous Mini note... It's always good to be home...
Edited by Mini Waco, 02 January 2018 - 03:58 PM.
One Carb Or Two?

Posted 06 January 2018 - 11:30 PM
Your Mini looks par for course, No surprises with the rust.
I'm not really into rear engined mini's but his car looks a quality build. I have driven some mega modified cars of the years... 550 HP in an Astra and it was..... well *******
A car needs to be synergy..... all the parts need to work in harmony, not insane power the chassis can't handle.
Quick story for you.....
My more or less stock 200sx nissan (200 ponies... ish).... Cosworth sierra.... 550 on the dyno.... The 200 left it for dead due to the turbo lag on the Sierra....
It's horses for courses.... The Mini is nippy, not fast.
What's most fun?
Speeding Along Now
Posted 14 January 2018 - 01:28 PM
Your Mini looks par for course, No surprises with the rust.
I'm not really into rear engined mini's but his car looks a quality build. I have driven some mega modified cars of the years... 550 HP in an Astra and it was..... well *******
A car needs to be synergy..... all the parts need to work in harmony, not insane power the chassis can't handle.
Quick story for you.....
My more or less stock 200sx nissan (200 ponies... ish).... Cosworth sierra.... 550 on the dyno.... The 200 left it for dead due to the turbo lag on the Sierra....
It's horses for courses.... The Mini is nippy, not fast.
What's most fun?
Hey Petrol.. the Mini is more fun... of course.
Edited by Mini Waco, 14 January 2018 - 01:28 PM.
Speeding Along Now
Posted 12 August 2018 - 01:18 PM
Had a busy summer, but a friend, Petrol, nipped over to give me a lift and help me crank up my project. Petrol helped me give a proper survey of the empty shell and we began to dissect it panel by panel. We then removed one of the over-sills and found exactly what we expected - nothing but rotted panels all the way through. Afterwards we removed the front panel and wings as an assembly. Petrol confirmed that my shell is on par for what he has seen in the UK being full of filler and typical bodywork. What great fun we've had working together and learning the many differences we have in terminology (i.e. alumi-NUM vs alumi-NIUM)
Restoration 3.jpg 88.71K
3 downloads
Restoration 2.jpg 77.54K
1 downloads
Restoration 1.jpg 83.83K
5 downloads
Edited by Mini Waco, 12 August 2018 - 03:03 PM.
Speeding Along Now
Posted 12 August 2018 - 11:50 PM
Route 66 1.jpg 46.17K
1 downloads
Route 66 2.jpg 96.27K
1 downloads
Route 66 3.jpg 68.12K
0 downloads
Route 66 4.jpg 95.06K
0 downloads
Edited by Mini Waco, 13 August 2018 - 12:33 AM.
Speeding Along Now
Posted 18 August 2018 - 03:28 PM
Today's Task is simply a test day to find out which methods/tools/techniques will help me properly clean the 2-3 mm thick oil & grime. Since I don't have a media blaster set up, I'm starting off the restoration with cleaning the shell by hand. There is something intriguing with the idea of touching every square inch of the Mini as if I'm taking full ownership of the restoration. Based on discussions with Petrol and learning from his restoration, I'm starting off with an arsenal of tools as each may prove best for various situations. We have a store here in the States that offer tools at reasonable pricing so I went shopping for cheap tools that are bound to get destroyed or used up.
- Heat gun to attempt to heat up the oil/grime to see if that helps with the removal.
- Flat head screw driver of varying lengths to chisel away the grime buildup
- Heavy duty scraper set
- Flat thin scraper
- Wire abrasive wheels to remove grime & rust pits
- Nylon abrasive wheels to remove final coat of paint & clean up
Tool Test-TMF.jpg 95.73K
0 downloads
Tool Test1-TMF.jpg 81.89K
1 downloads
One Carb Or Two?

Posted 18 August 2018 - 04:51 PM
Save yourself a load of time/hassle and just replace the whole inner wing! Wish I had done that on mine. You can get the inner wing with the a panel already attached too
Q
Speeding Along Now
Posted 18 August 2018 - 05:56 PM
@jamesquintin: Thanks. replacing the entire inner wing is an option although one that may be more than I bargain for. I would have to do a lot of research on how to remove & install so that the wing was perfectly aligned. Once I clean up, I will be able to assess which direction I want to go. I don't mind spending the time/effort cleaning up as it's good experience for me.
I should preface my steps with a little interesting learned fact that is certainly worth notating. Our friend from England came for a visit the last two weeks. Right off the bat, he noticed that our Texas environment could possibly change methods and/or technique. When he placed his hand on my Mini shell, he was amazed at how warm the metal was (in the shade), therefore in working with metal, I’m starting off with warm metal vs cold. Touching the engine block to him was as if the engine had been running while in fact, it had sat for days in the shade. I burned my shoulder on the concrete crawling on the ground under the mini whereas my friend uses a foam leather base to help keep his back from getting cold. The temperature of the environment does make a difference. Today our temperature is 38 degrees C which may contribute to the ease of removing oily grime. It was interesting to note just how different our climates truly are…
Lessons Learned on removing Oily Grime:
At this point via the pictures, I was only about 10 minutes in – very fast & efficient work flow.
The electric drill that I was using put out a lot of heat. In fact it was hard to hold at times because the vents are right on the side where I like to hold the drill.
I plan to continue cleaning up the oily grime before I learn to tackle the rust areas. I guess this is where I have to figure out what protective measure I need to treat the cleaned metal…
Tool Test2-TMF.jpg 77.74K
1 downloads
Tool Test3-TMF.jpg 87.78K
0 downloads
Tool Test4-TMF.jpg 136.38K
0 downloads
Tool Test5-TMF.jpg 117.21K
0 downloads
Tool Test6-TMF.jpg 81.68K
2 downloads
One Carb Or Two?
Posted 20 August 2018 - 07:47 AM
That doesn't look like oil to me, that looks like some kind of rubber based / bitumen based underseal.
One Carb Or Two?
Posted 20 August 2018 - 09:42 PM
Guys, you can't imagine how hot it is over there. The bitumen sound deadening inside of the floor almost peeled off when it was a cool evening! The shell has the usual rust / oil / grime / underseal underneath but it's that hot it comes off easily.
I suggested an electric drill would be useful and couldn't understand why air tools were the preferred choice over there. Now I know why, they get hot! That said, electric tools offer much more torque and that's what you need when wire brushing.
White spirit (the stuff you use to reduce house paint) might be a better option than oven cleaner. Oven cleaner might contain acids.
Knowing your climate.... I think a coat of any primer over cleaned up areas will be fine.
The area you have cleaned up looks spot on. Good job 
Pete
Speeding Along Now
Posted 21 August 2018 - 01:46 AM
Thanks Petrol.. I will pick up some primer and spray over until I decide how to move forward.
With the shown rust, what is recommended by all you experienced folk.. repair the rusted bits or replace the entire inner wing?
Inner Wing rust.jpg 84.19K
0 downloads
One Carb Or Two?
Posted 21 August 2018 - 07:10 AM
Personally I would replace the whole inner wing. That way you will be able to tackle all the other rust that will be sitting underneath the inner wing 


0 members, 0 guests, 0 anonymous users


