Good afternoon all,
I was wondering if you could post pictures of how you have mounted your bucket seats for comply with MSA blue book regulations (I am particularly interested in hill climbing)? I am currently trying to research how people have done theirs before I get the welder out.
Do most people weld in the rails from tunnel to sill? I have seen some people weld from the cross member to the rear heel board. Which would be considered safer/better?
Any help or advice would be appreciated.
Chris :)

Welded Seat Mounting Rails
Started by
mini_mentalist_chris
, Sep 26 2017 11:31 AM
15 replies to this topic
#1

mini_mentalist_chris
-
- Noobies
-

- 137 posts
Mini Mad
- Location: Barrow-in-Furness
- Local Club: S.L.M.O.C.
Posted 26 September 2017 - 11:31 AM
#2
rally1380
-

- Members
-
- 1,893 posts
Camshaft & Stage Two Head
- Location: Cheshire
Posted 26 September 2017 - 11:53 AM
Exhaust tunnel to inner sill is the more common method and the way I will be doing mine.
Spec of the tube sizes will be in the blue book and i'd also use spreader plates at each end too.
#3
nicklouse
-

- TMF+ Member
-
- 17,935 posts
Moved Into The Garage
- Location: Not Yorkshire
- Local Club: Anonyme Miniholiker
Posted 26 September 2017 - 11:54 AM
yes.
take your pick.
cross car will be stiffer though.
#4
nicklouse
-
- TMF+ Member
-
- 17,935 posts
Moved Into The Garage
- Location: Not Yorkshire
- Local Club: Anonyme Miniholiker
Posted 26 September 2017 - 12:02 PM
note as far as the blue book is concerned you can bolt straight through the floor.as long as you have spreaders of the prescribed size.
#5
minisi35
-

- Members
-
- 723 posts
One Carb Or Two?
- Local Club: british mini club shropshire
Posted 26 September 2017 - 12:03 PM
#6
mini_mentalist_chris
-
- Noobies
-
- 137 posts
Mini Mad
- Location: Barrow-in-Furness
- Local Club: S.L.M.O.C.
Posted 26 September 2017 - 07:09 PM
Cheers guys. Did you fabricate your own? Or did you buy a 'kit'? I'd personally like them to be made from CDS, but I imagine I'd have to buy a few metres of it at a time!
To be honest the kits look pretty good at around £40 per side, especially by the time you have messed about fabricating floating nuts.
#7
mini_mentalist_chris
-
- Noobies
-
- 137 posts
Mini Mad
- Location: Barrow-in-Furness
- Local Club: S.L.M.O.C.
Posted 26 September 2017 - 07:27 PM
Just had a read through your thread. Great build!
Was just wondering if the heat from welding the rails to the sill affected the paint on the outside? I imagine you will have had to have done it in sections, as to keep the heat down.
I also thought of this modification after my paint was done, so the last thing I want to do is have a huge paint repair to do. I don't mind getting the inside blown back over though, as I still have some paint left. :)
#8
nicklouse
-
- TMF+ Member
-
- 17,935 posts
Moved Into The Garage
- Location: Not Yorkshire
- Local Club: Anonyme Miniholiker
Posted 26 September 2017 - 07:48 PM
all the welds are under the sill line or on a box section.
but before you do anything you need to decide on your seat position.
#9
mini_mentalist_chris
-
- Noobies
-
- 137 posts
Mini Mad
- Location: Barrow-in-Furness
- Local Club: S.L.M.O.C.
Posted 26 September 2017 - 08:22 PM
Cheers, I thought so. I just don't want to wreck the paint lol.
Yeah, you're right! That is what I'm currently researching. Seat position is a big thing, so need to nail it first time.
Will have to purchase the new seat and brackets before I can mock it up! I reckon I'll try and put the seat in on wooden blocks/board inside the car first to get the position, then work from there.
Do most people use a steering column drop bracket for motor racing? I imagine it puts the steering wheel in a more comfortable position.
#10
minisi35
-
- Members
-
- 723 posts
One Carb Or Two?
- Local Club: british mini club shropshire
Posted 26 September 2017 - 09:39 PM
Thanks , I also decided on the seat mounting after the car had been painted( I had hoped to do some stage rallying so it was made to meet the regulations just in case)Just had a read through your thread. Great build!Have a look at my build here
http://www.theminifo...project/page-19
shows how I put mine in
Was just wondering if the heat from welding the rails to the sill affected the paint on the outside? I imagine you will have had to have done it in sections, as to keep the heat down.
I also thought of this modification after my paint was done, so the last thing I want to do is have a huge paint repair to do. I don't mind getting the inside blown back over though, as I still have some paint left. :)
The heat was kept down by welding in small amounts and I kept checking for any heat transfer. Luckily I hadn't got to the stage of applying cavity wax which would have caused a problem
I can't remember where I got the kit from....
A lot of time was taken to get the car level first. As I was using side mounted seats then you can get a lot more adjustment but every thing was tacked in to place until I was happy it was level and I had all the adjustment I needed (I'm 6ft6 and my wife is 5ft7 so we can both use the current position . You can see too well from the pictures but the navigators seat is slightly lower and set a bit further back than my seat.
#11
mini_mentalist_chris
-
- Noobies
-
- 137 posts
Mini Mad
- Location: Barrow-in-Furness
- Local Club: S.L.M.O.C.
Posted 27 September 2017 - 11:35 AM
Thanks , I also decided on the seat mounting after the car had been painted( I had hoped to do some stage rallying so it was made to meet the regulations just in case)Just had a read through your thread. Great build!Have a look at my build here
http://www.theminifo...project/page-19
shows how I put mine in
Was just wondering if the heat from welding the rails to the sill affected the paint on the outside? I imagine you will have had to have done it in sections, as to keep the heat down.
I also thought of this modification after my paint was done, so the last thing I want to do is have a huge paint repair to do. I don't mind getting the inside blown back over though, as I still have some paint left. :)
The heat was kept down by welding in small amounts and I kept checking for any heat transfer. Luckily I hadn't got to the stage of applying cavity wax which would have caused a problem
I can't remember where I got the kit from....
A lot of time was taken to get the car level first. As I was using side mounted seats then you can get a lot more adjustment but every thing was tacked in to place until I was happy it was level and I had all the adjustment I needed (I'm 6ft6 and my wife is 5ft7 so we can both use the current position . You can see too well from the pictures but the navigators seat is slightly lower and set a bit further back than my seat.
That's good! I can't imagine it would be good welding with Waxoyl in the sills.
It's good to know that you have that much adjustment in one seat bracket. I was saying to my mrs last night that she might not be able to drive the mini when it's finished, as the seats will be welded in place lol! Although there is not as much of a height difference between us; I'm 5'10" and she is 5'6". Nevertheless, I still don't know whether she could handle a 180 BHP turbo mini.
Did you have to change the position much when you where trying to get them in place (tacking then grinding it off again)? I am thinking of trying to get it marked out using wooden blocks or something. I imagine it's a bit fiddly.
I'll definitely be welding a little bit at a time as to keep the heat out of it.
Cheers,
Chris
#12
minisi35
-
- Members
-
- 723 posts
One Carb Or Two?
- Local Club: british mini club shropshire
Posted 27 September 2017 - 03:15 PM
Once the side mounts were bolted to the seat it was easier to centralise everything then tack welded the brackets onto the round tubing
I used some plastic water pipe to mock up the angles I needed to cut the tubing at
#13
mini_mentalist_chris
-
- Noobies
-
- 137 posts
Mini Mad
- Location: Barrow-in-Furness
- Local Club: S.L.M.O.C.
Posted 27 September 2017 - 07:57 PM
Cool, cheers dude. The pipe is a good idea!
#14
lsdweb
-
- Noobies
-
- 65 posts
Stage One Kit Fitted
- Location: Llanelli
Posted 17 October 2017 - 07:39 AM
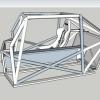
Here are mine. Welded across from sill to tunnel (modified)
Attached Files
-
 SeatRails.jpg 53.12K
8 downloads
SeatRails.jpg 53.12K
8 downloads
#15
mini_mentalist_chris
-
- Noobies
-
- 137 posts
Mini Mad
- Location: Barrow-in-Furness
- Local Club: S.L.M.O.C.
Posted 17 October 2017 - 11:17 AM
Here are mine. Welded across from sill to tunnel (modified)
Nice! Did you weld them in with the seat rails attached to get everything square?


1 user(s) are reading this topic
0 members, 1 guests, 0 anonymous users


