Jump to content


Photo
- - - - -

Project Prim


  • Please log in to reply
44 replies to this topic

#1 Mogman

Mogman

    Passed Test

  • Just Joined
  • PipPip
  • 34 posts
  • Location: Tavistock

Posted 30 September 2017 - 05:47 PM

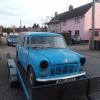
Hi We are a father and daughter duo who have purchased a 1983 mini city E in Primula Yellow, which will be my daughters first car.

we are commencing on a two year project to bring Prim up to a good standard.


history of the car.


3 previous owners, a lady ( Miss A Newton) from Kent had it till 1997, Alf Richard Collet from Bristol had it from 1997 to 2000,  Then Graham Mark Wilson from Bristol had it from 2000 till 2017 then we purchased it from a trader who had had it for 6 months. its only covered 39K miles from new and the engine was rebuilt around 2015 before going back on the road in 2016 after a 17 year sorn. the car has original interior and has not been messed around with at all.


Progress so far,


Two new front tyres,

Taken to garage for the respray and found the following:-


Prims had a prang, was around 1997 according to the paper work, and the front end is a little short and the repairs in the form of new wings, A panels, bonnet and front panel are all poor quality and been installed to a poor standard. 


Step one to purchase a load of panel as follows:-

Heritage wings x2, Heritage front panel, Heritage A Panel x2, Heritage bonnet, Heritage passenger door skin, two new door hinges and the driver side step panel.


The garage has booked a laser jig for the 24th Oct 2017 to realign the front once all the old panels have been removed and the will build back up, so all is straight and lines are in the right places.

The garage is then completing the body work and respraying the car in Primula Yellow as a fall back job so may take 6 months?


So in the next few weeks we will be striping the car of the interior and all bumpers, lights etc etc and removing the engine and gearbox to enable the garage to have a shell to start with. This saves money and by removing it all, we should have a good idea when it comes to putting everything back.


Some photos below of the current status of the car.


Wish us luck, we have already blown the budget and i'm sure that this is only the beginning!


IMG_1367_zpsu06alryc.jpg


IMG_1366_zpssddgl6rx.jpg


IMG_1364_zpszrnhw06p.jpg


IMG_1363_zpsxzaoiznp.jpg


IMG_1362_zpszpvwure8.jpg


Chris and Lily In Devon


#2 wingnut

wingnut

    Speeding Along Now

  • Members
  • PipPipPipPipPip
  • 462 posts
  • Location: bury st edmunds

Posted 01 October 2017 - 06:38 PM

Photos can be deceiving,that looks in really good nick.I had one of these back in the nineties.It was cinnabar red,in really good nick but very slow.You can't really beat them though,10 inch wheels and basic interior.I love it ,looking forward to more pictures of the build


#3 slidehammer

slidehammer

    One Carb Or Two?

  • Members
  • PipPipPipPipPipPipPip
  • 1,081 posts
  • Location: Surrey
  • Local Club: LSMOC

Posted 01 October 2017 - 06:43 PM

What a lovely unmolested Mini, very rare like that. Great project


#4 Marco1972

Marco1972

    One Carb Or Two?

  • Members
  • PipPipPipPipPipPipPip
  • 822 posts
  • Location: Birmingham

Posted 01 October 2017 - 06:55 PM


Looks a very nice project
I love these basic minis
Best of luck with it I’ll be following your progress

Mark

#5 g111mds

g111mds

    Speeding Along Now

  • Members
  • PipPipPipPipPip
  • 432 posts
  • Location: Edinburgh

Posted 03 October 2017 - 11:19 AM

I had a primrose mayfair a few years ago. lovely colour.


#6 Mogman

Mogman

    Passed Test

  • Just Joined
  • PipPip
  • 34 posts
  • Location: Tavistock

Posted 04 October 2017 - 10:08 PM

Thanks for the the positive comments, Will start posting progress next week, ordering the panel this week once we get all 5 quotes back, Signed up to see if the 7.5% discount with mini spares centre helps. and registered with DSN classics to see if this helps,at present, Bull motif mini spares are in first place.


I have no links to the above just a potential customer! 


#7 mattmiglia

mattmiglia

    Super Mini Mad

  • Members
  • PipPipPipPipPipPip
  • 515 posts
  • Location: West Midlands

Posted 14 October 2017 - 11:26 PM

Could still be hiding some horrors but looks a great car and nice its original. Look forward to seeing more updates

Edited by mattmiglia, 14 October 2017 - 11:26 PM.


#8 ga2davt

ga2davt

    Stage One Kit Fitted

  • Noobies
  • PipPipPip
  • 97 posts
  • Location: Brentwood, Essex

Posted 15 October 2017 - 07:52 AM

The car is fab.. again i love the round stuff ... steel wheels, steering wheel, central speedo...  I also love the original interior. If you ever get rid, please send them my way .. I can swap for 'improved' ones from mine and I fancy a 600 mile round trip in my 30 year old Mini ...


#9 Mogman

Mogman

    Passed Test

  • Just Joined
  • PipPip
  • 34 posts
  • Location: Tavistock

Posted 15 October 2017 - 07:34 PM

Prims in The Garage!


We have started the strip down and so far all is looking good, Only Issues Fuel tank was full of rust and sounded like a slush puppy, so new tank now on the list.

Started at the rear and working forward. We have another week to complete strip down, before Prims off on a trailer to the Body man. We have all the panel and the budget took a £732.00 hit. Started two lists, one list of parts needed, and another of jobs to do. Will post more photos later this week as we have moved on from the ones posted tonight. We have now removed the interior and stripped the engine which is now ready lift. Surprised how many steps there are to remove! 

By the end there will be more of Prim in boxes than on the car!

The seats are in the attic and will be returning to Prim. We love them, soooo 80's.


Spot Daughter sporting her new overall's two turn ups on the legs and one on the arms.


PIC_0011_zpsrngvgjfr.jpg


PIC_0012_zpslm9vryg3.jpg


PIC_0013_zpsqrkmsneh.jpg


PIC_0015_zpssbifu5h0.jpg


PIC_0016_zpsj62xeidu.jpg


PIC_0016_zpsj62xeidu.jpg


#10 Mogman

Mogman

    Passed Test

  • Just Joined
  • PipPip
  • 34 posts
  • Location: Tavistock

Posted 15 October 2017 - 07:37 PM

Sorry posted the same picture twice, Here the one showing the contents of the tank.


PIC_0014_zpshq4koqzx.jpg


#11 Mogman

Mogman

    Passed Test

  • Just Joined
  • PipPip
  • 34 posts
  • Location: Tavistock

Posted 20 October 2017 - 09:31 PM

More of Prim is in boxes!

Well we have spend three evening and part of Saturday stripping Prim and she is nearly there.

The car is being collected next Monday evening to go to Plymouth on Tuesday. the Jig is booked for a week tomorrow and then the garage are using Prim as a filler job which may take 6 Months or a few week if they get quiet.

Lily's not 15 till next February so we are in no rush and we still have the engine to paint and we want to refurbish the heater and paint lots of the part before refitting so plenty to do.

The garage has asked for a camera so will be able to post progress of the panel replacement and its only across the road from where i work so i will be keeping a close eye on progress. 

The car has revealed no great horrors so a great base for a project, there may be a little filler in the near side rear quarter panel but on the whole we are very pleased. here are  lots of photo's as pictures say a thousand words and i have tried to show the worst bits as so far the photo's have not shown the issues with the front end so here goes.


PIC_0003_zpspssf2wuk.jpg

PIC_0004_zps8bpspzj0.jpg

PIC_0005_zpsy0msayn3.jpg

PIC_0006_zpsnuvapn24.jpg

PIC_0006_zpsnuvapn24.jpg

PIC_0008_zpszx04zbzk.jpg

PIC_0009_zpsoyi2avse.jpg

PIC_0010_zpshbrowh5y.jpg

PIC_0010_zpshbrowh5y.jpg

PIC_0019_zps7p1eboov.jpg

PIC_0022_zpsygjxgoli.jpg

PIC_0033_zpsfpnnjqvg.jpg

PIC_0034_zpsnbbktvbo.jpg

PIC_0035_zpsgpoihneq.jpg

PIC_0025_zpslnwwxoe5.jpg

PIC_0026_zpsrwswfdbx.jpg

PIC_0027_zpsqlktnqfe.jpg

PIC_0030_zpsklj5crzs.jpg

PIC_0031_zpsnh13csqo.jpg

PIC_0032_zpsxntopuuh.jpg


#12 Mogman

Mogman

    Passed Test

  • Just Joined
  • PipPip
  • 34 posts
  • Location: Tavistock

Posted 23 October 2017 - 06:38 PM

Prim as left the building.


Well Prim is stripped and been taken tonight a few photo's of the final stage. Being drop off tomorrow at the garage to be stripped of the front wings, front panel and A panels, new driver door step and passenger door skin. then prepared for new paint. may be gone for 6 months or 6 weeks time will tell.


PIC_00041_zpsvuorr7h5.jpg


PIC_00042_zpsyqdyqbhp.jpg


PIC_00047_zpsnkjbescm.jpg


PIC_00049_zpsyo9fg3mz.jpg


PIC_00052_zpsijzyaflf.jpg


#13 Magneto

Magneto

    One Carb Or Two?

  • Members
  • PipPipPipPipPipPipPip
  • 889 posts
  • Location: Kansas City, USA
  • Local Club: KC MINI Club

Posted 24 October 2017 - 02:07 AM

Chris and Lily, so happy to see another father/daughter project. When my daughter was a sophomore in College, we spent the summer fixing up a VW Beetle for her to drive the rest of her college years. We rebuilt the motor, redid the seats, brakes and a number of other small jobs, then drove it all the way from San Diego to Savannah, Ga - over 5000 miles the way we went! It was a terrific bonding project for us and the lessons she learned working on her own car have served her well her whole life!


Can't wait to see more. While waiting for the body you have plenty of other parts to refurbish!


Have fun! 


Edited by Magneto, 24 October 2017 - 02:08 AM.


#14 Mogman

Mogman

    Passed Test

  • Just Joined
  • PipPip
  • 34 posts
  • Location: Tavistock

Posted 25 October 2017 - 09:04 PM

Thanks for the supporting words, We have a 1966 beetle which i did a done a minor restore on or just finished off really, 5000 miles is a real road trip that is close to 8 times the length of our country! I did have doubts she would like working on Prim, but she refuses to let me go out on my owns and like to be getting her hands dirty. I'm sure she will learn lots during the process.


Pop over to see Prim and the front end is off. The front end bump she has had looks like it took it the most on the off side and has pushed the floor in a little where the front sub frame mounts, so the Jig will be put to work this weekend, the scuttle panel under the windscreen looks like it crumbled a bit too.

He already started to replace sections of the inner wings and dress the panels.


IMG_1520_zpsyuf8zohc.jpg


IMG_1521_zpskey9mkil.jpg


IMG_1522_zpshdayy41i.jpg


IMG_1523_zpsfff9stz1.jpg


#15 Mogman

Mogman

    Passed Test

  • Just Joined
  • PipPip
  • 34 posts
  • Location: Tavistock

Posted 10 December 2017 - 08:11 PM

Prim's In Primer!!!!


Have not posted in an age!, Been on decorating duties before Christmas and its been cold, so Lily and I have not done anything other than de-grease the engine block and purchase more parts for prim!

The garage have been busy, the car has been jigged, and the front end has all been done and welded. Both doors have had new skins which have been bonded on and seal with seam tape like modern cars. We were only going to do one of the door skins but after see the rust hiding on the passenger side, ask him to do the drivers as well and it turn out this one was even worst! There was a dent which had been filled in the near side rear quarter panel, which he has knocked out., also the roof which had a few dents, in the end had 11! which he also knocked out. Also had to make a call to Heritage, as the front panel and near side wing where out on manufacture with the bottom edge over running by 3 MM and the curve to the bonnet not running true. They agreed they have always had an issue and did try moving the dolly's on the press once but this made it even worst. my man has cut and welded to suit but this has taken more time which results in more money. I have enclosed some photos of the issue below. The car is now sitting in epoxy primer so we can have a rest from spending money for up-to 6 Months. When we are ready the car will be but into white primmer and then top coated. see the progress below. its looking so straight now, may even be better that when it left the factory!


PIC_00061_zpszw65clht.jpg


PIC_00060_zpshonvjq4w.jpg


PIC_00067_zpshtcwlgzm.jpg


PIC_00069_zpsdesdk0kg.jpg


PIC_00074a_zpszbqn97j9.jpg


http

PIC_00079_zpsyihxtyvo.jpg


PIC_00080_zpsz1942yjk.jpg


PIC_00082_zpsfdwpoomb.jpg


PIC_00083_zps6q7wy3yv.jpg


PIC_00085_zpsfumxenjv.jpg


PIC_00087_zpsrgrfgzlw.jpg


PIC_00089_zpsltbbvadq.jpg


PIC_000101_zpsryzhrxi6.jpg


PIC_000103_zpstk0sdawu.jpg


PIC_000108_zps8jjgsgre.jpg


PIC_000110_zpsmimbwqzf.jpg


PIC_000111_zpsm8oremci.jpg


PIC_000114_zpsqkmz4cvu.jpg


The panel issue which we have now sorted 


IMG_1536_zpsqkariubj.jpg


IMG_1535_zpstfcdgtiv.jpg


IMG_1538_zpsxfnjmrra.jpg


Prim In Epoxy Primer


PIC_000119_zpsruil5mjx.jpg


PIC_000120_zpsqxuqiqrq.jpg


PIC_000126_zpswt3s7zxm.jpg


PIC_000130_zps9vq3xxjq.jpg


PIC_000132_zpshuzvklyc.jpg


PIC_000134_zps3ighkebj.jpg


PIC_000128_zpsz8axx7ej.jpg


PIC_000125_zpsxtxvquig.jpg


0 user(s) are reading this topic

0 members, 0 guests, 0 anonymous users