If you havent already you need to take those front damper mounts off, almost everyone has rust behind them. Coming on well though


Project Prim
Started by
Mogman
, Sep 30 2017 05:47 PM
44 replies to this topic
#16

mattmiglia
-
- Members
-

- 515 posts
Super Mini Mad
- Location: West Midlands
Posted 10 December 2017 - 09:22 PM
#17
Mogman
-
- Just Joined
-
- 34 posts
Passed Test
- Location: Tavistock
Posted 10 December 2017 - 10:57 PM
Thanks for the tip, Will check they have been removed and if not will wipe them off and see whats behind. We have a nice new set of shocks to fit back here in our garage.
Our first job when Prims comes back home will be the under side, Sub Frames prep and paint then suspensions. he has primed and stone chips the front wheel arches as we have asked them to be in Primula Yellow along with the rear arches.
#18
slidehammer
-

- Members
-
- 1,081 posts
One Carb Or Two?
- Location: Surrey
- Local Club: LSMOC
Posted 12 December 2017 - 05:05 PM
Looking really good, nice quality work.
#19
Vinay-RS
-

- Members
-
- 2,093 posts
Put's foolish ideas in peoples heads
- Location: Cape Town
Posted 19 December 2017 - 05:06 PM
Your Mini build is coming along really nicely! Great work :)
#20
Mogman
-
- Just Joined
-
- 34 posts
Passed Test
- Location: Tavistock
Posted 03 February 2018 - 08:05 PM
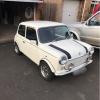
Prims turned Primula!
Well the garage have been busy the last few weeks, Pre-Christmas they add three coats of primer then sprayed the front wheel arches and the engine bay.


Then last week they added a further resin base coat and sprayed the top coat on the whole car, Just seam cover, rear boot hinges and rear wheel arches to go. She looks great, they are now leaving her to air dry for 2 weeks then cutting back and polishing. the car is transformed and looks like a new model just off the production line. maybe even better.
Photos again,


We are now planning for her return, But first we have a little car juggling to content with. We are planning on starting half a days work every two weeks to start with, after the half term. We can start the painting of the engine and other parts etc. Would like Prim back after Easter if possible, We can store her at my work until we are ready for her return. Progress as moved on a pace and Lily isn't 15 till next week!
#21
Haygate
-
- Noobies
-
- 115 posts
Mini Mad
- Location: Telford
Posted 04 February 2018 - 08:23 AM
Looking great.
#22
johnR
-

- Members
-
- 2,244 posts
Up Into Fourth
- Location: Dorset
Posted 04 February 2018 - 08:57 AM
coming on well - have you been restoring all the parts to go back on?
#23
Mogman
-
- Just Joined
-
- 34 posts
Passed Test
- Location: Tavistock
Posted 04 February 2018 - 08:45 PM
Not yet, We have been slowly purchasing the parts we need, which we listed on strip down. Also purchased a second hand correct front grill & bonnet badge etc as the ones fitted were the wrong ones. Now have a wheel brace and jack, still looking out for a handbook. The biggest parts still to get are the brake disc conversion for the front drums, and carpets. we were going to refit the carpet but now looking at her, we will need to splash the cash and get a new set. Its going to be a slow rebuild and I think as we un-box the parts, we will either refurbish or replace.
Lily wants s/steel bumpers in place of the Black one, which we have purchased, She not sure on the door handles Chrome or black? Keeping the black gutter trim and lower seam trim, The wheels we are going with Old English White in place of the stock silver on the standard 10" steels. Got a new old fuel tank, Ebay has its uses.
We have also purchased a wooden dash, Elf type and 52mm temperature gauge and 52mm rev counter to sit either side of the central speedo. anything we do will be easier changed back to stock. I always think you shouldn't be scared to make changed from stock as after all the car is yours and you will be using/enjoying it. but i'm also aware not to make changes which will not be simple to change back should your taste change.
#24
TheFabMini
-

- Members
-
- 459 posts
Speeding Along Now
- Location: Swaffham, Norfolk
Posted 11 February 2018 - 06:31 PM
looks great! i am very envious of that paint job as my primula mini is in desperate need of fresh paint
#25
minimissions
-

- Members
-
- 3,427 posts
Up Into Fourth
- Location: North West
- Local Club: M.M.O.C
Posted 13 February 2018 - 01:38 PM
Thats a great looking mini and she will make a great little first car, its so nice seeing an original mini that hasnt been messed with at all. Keep that one nice and safe and enjoy her.
#26
Mogman
-
- Just Joined
-
- 34 posts
Passed Test
- Location: Tavistock
Posted 01 September 2019 - 08:39 PM
Embassed it has been so long, Had a few changes, job being one which has resulted in less free time. and life getting in the way, Lily is now 16 coming on 17 so time to get on with it.. Prim as been with us since Nov 2018, The paint shop took an age to allow the paint to dry and then then re assemble things and polish her up. but very pleased with the results.
Dropped the rear sub frame this weekend and and started to strip, Half way now, and no real horror stories. Will need a few parts but stripped nice, only one sheared bolt!. The plan now is one night a week to push things, so we don't have a mad panic closer to Feb, when Lily is 17!.
Will be posting more from now one.
One question. There where three small Hessen mats like pads between the rear sub frame and the body, these seem to have held water and resulted in more surface rust where they had been, Are these needed? And if so is there a better material available a rubber may be? i didn't take a photo but can do.
#27
Mogman
-
- Just Joined
-
- 34 posts
Passed Test
- Location: Tavistock
Posted 02 September 2019 - 08:55 PM
Some Photo's


#28
Mogman
-
- Just Joined
-
- 34 posts
Passed Test
- Location: Tavistock
Posted 04 September 2019 - 07:29 PM
It was going so well,
Stripped the trailing arms off the sub frame and found a load of mud and under one and under the mud rot. We are now in for a new rear sub frame. Saving cleaning and painting the existing one, but now is it genuine close to £500.00 or powder coated £260.00 or standard £240.00. My feeling is to spend the money but the cost!
if it was Galv i would jump at it. Then the fixing kits, the rubber Donuts may as well be changed now, Knuuckle joints and one trailing arm shaft is very stiff. £££££.
Trail arm shafts looks like ours has a roller bearing each end so no reaming?
Heres some photo's


#29
Mogman
-
- Just Joined
-
- 34 posts
Passed Test
- Location: Tavistock
Posted 14 September 2019 - 09:17 AM
Well parts ordered and now here, ordered copper nickel brake pipe set as well and now just need the trailing arms reaming to start rebuilding, been soaking brackets in petrol to clean up ready for paint and re fitting, Good news is the drums brakes are all new so no money to spend here.
went heritage fixing kit and rear sub frame in the end, in for a penny in for pound!
photo's


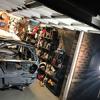
These are the fury pads which i found under the sub frame, two at the side and one on the front edge towards the front. not sure if they need to go back ?

#30
Mogman
-
- Just Joined
-
- 34 posts
Passed Test
- Location: Tavistock
Posted 14 September 2019 - 09:52 PM
Remove the front sub frame today and hankfully its sound! will replace the cones and bushes but thw tower bolts look new ish. have order the compresion tool tonight. so will start to strip this one down soon. jet washed off today .


0 user(s) are reading this topic
0 members, 0 guests, 0 anonymous users


