Jump to content


Photo

Duffy My 1965 Riley Elf


  • Please log in to reply
148 replies to this topic

#1 DUF2

DUF2

    Formally known as DUFfi

  • TMF+ Member
  • PipPipPipPipPip
  • 455 posts
  • Location: Swalwell
  • Local Club: Whickham & DMC

Posted 02 January 2018 - 12:17 PM

I bought this car at the end of August ‘17, I saw it advertised on eBay, it sat at £1600 for quite a while before going much higher on the day of the sale. It caught my eye, when it was at the lower price, I always fancied a classic car, looking at a Spridget after I retired in 2013. I did look at a couple but my better half was not too keen on them so let them go.
When I saved “Duffy” to my "watching" folder, the boss saw it and said that looks nice, discussing our maximum bid, so we ended up placing a bid and got the car! I placed a bid that was £1.75 higher than the next highest bidder!
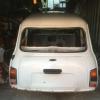
The car was bought unseen, I just ( rightly or wrongly) went off the pics on eBay, the car did look OK on the pics. It was MOT'd til Dec 17 and "taxed" until Feb 18.
I knew it was a non runner, the ad said the clutch release bearing had exploded, so I set off for Halifax a week later with a friend in a breakdown truck and an envelope stuffed with cash.
The car was brought out of the garage, yes it did look good for a 52 year old car. The car was loaded onto the back of the truck and we drove back to Tyneside, when unloading the car, I discovered it had no functioning handbrake!
Duffy was put straight into the garage, so I have no photos of the car, the only ones are off the ad.


Attached File  IMG_E0356.JPG   67.39K   5 downloads


 One thing I did notice was the car being rather low. When I measured the height at the front, it was 50mm lower than it should have been. It just needs the hydrolastic pumping up thought I!


The seller had also stated the car had a 1275 engine and disc brakes, these were improvements I would have probably made myself so I was a happy Chappy.

The car was jacked up to allow access for work on the clutch, I had a quick look and noticed this


IMG_0172_zpsmuxwxuph.jpg


the car had vented discs and four pot callipers!, albeit it a little crust looking, but nowt a good clean up wouldn't sort out.


IMG_0181_zpsogzupnm8.jpg


So disassembly of the clutch was started. When I removed the starter I discovered bits of broken ball bearing, which confirmed what the seller had said about the thrust bearing having exploded!
The clutch cover was removed, along with all the broken bits off the release bearing. I placed an order for a new clutch assembly and a flywheel puller. Whilst I was working with the car I realised I had not seen any hydrolastic pipes, the reason? It had been converted to dry suspension.


Edited by DUF2, 12 July 2022 - 05:54 PM.


#2 g111mds

g111mds

    Speeding Along Now

  • Members
  • PipPipPipPipPip
  • 432 posts
  • Location: Edinburgh

Posted 02 January 2018 - 12:22 PM

what's your plans? quick fix and use, or more of a restoration?


Edited by g111mds, 02 January 2018 - 12:23 PM.


#3 slidehammer

slidehammer

    One Carb Or Two?

  • Members
  • PipPipPipPipPipPipPip
  • 1,081 posts
  • Location: Surrey
  • Local Club: LSMOC

Posted 02 January 2018 - 01:23 PM

Good luck with your project. If the car has retained its Hydrolastic suspension (as a lot loss them over they years) then they tent to drop left to right I would be worth a check for any leaks and then if nothing get it pumped up as a start to see if it stays up. When they are too low it throws all the steers out as it alters the toe in.


#4 Vinay-RS

Vinay-RS

    Put's foolish ideas in peoples heads

  • Members
  • PipPipPipPipPipPipPipPipPip
  • 2,093 posts
  • Location: Cape Town

Posted 02 January 2018 - 02:17 PM

Nice project. Love the brake and engine upgrades.  


#5 DUF2

DUF2

    Formally known as DUFfi

  • TMF+ Member
  • PipPipPipPipPip
  • 455 posts
  • Location: Swalwell
  • Local Club: Whickham & DMC

Posted 02 January 2018 - 03:25 PM

I should add that this car is the 1st Mini (based car) I have ever owned in 52 years of motoring. My father bought a brand new Citron (Mr Bean Yellow) 850 in 1973, my younger brother owned a Mini a short while later. I also had the use of a Mini Van and later a Metro van for work use. I usually owned Fords having an Anglia and also an Escort, being involved with Rallying the Escort was quite well modified and I found Fords easy to work on, but I must admit to being rather inexperienced when it comes to working on a Mini.
I did a lot of work on my own cars including reshelling 3 cars in the late 70's early 80's Promotion at work saw me get a company car in '92, so working on cars at home stopped for a long time, until I bought the Elf!

When i had a good look around at this car I could see a lot of time & money had been spent on it by previous owners.


The car had been converted from hydrolastic to dry, it also now had a 1275 A+ engine, disc brakes and had also had the seats retrimmed in red leather.


I'm struggling trying to import photos I keep getting a message stating this file was too big to upload!

there must be an easy way to upload photos


Edited by DUF2, 02 January 2018 - 04:50 PM.


#6 DUF2

DUF2

    Formally known as DUFfi

  • TMF+ Member
  • PipPipPipPipPip
  • 455 posts
  • Location: Swalwell
  • Local Club: Whickham & DMC

Posted 02 January 2018 - 03:48 PM

Once the flywheel puller arrived, I attempted to pull off the flywheel


IMG_0185_zpsbyf2u3l1.jpg


But, this was not as easy as I'd thought the flywheel just would not budge!
Asked various websites for advice, heat, just keep tightening it, bray the tension screw, etc etc.
I no longer have oxy acetylene kit, that went year ago, the only thing I had was a plumbing blow lamp and a high temperature hot air paint stripper. I tried unsuccessfully to remove the flywheel, I even resorted to drilling a hole using a hole saw, in the inner wing so I could access the tension screw easier also to allow me to bray the screw.


IMG_0189_zpsifomqg0s.jpg


I have since welded up that split in the inner wing.


Edited by DUF2, 03 January 2018 - 03:38 PM.


#7 g111mds

g111mds

    Speeding Along Now

  • Members
  • PipPipPipPipPip
  • 432 posts
  • Location: Edinburgh

Posted 02 January 2018 - 03:51 PM

I use the more reply options viewing in full mode to then attach pictures from my phone or more usually iPad.

#8 Jared Mk3

Jared Mk3

    Has a small thing but it does make a difference

  • Members
  • PipPipPipPipPipPipPipPip
  • 1,974 posts
  • Location: Kokstad, South Africa
  • Local Club: MOCKZN

Posted 02 January 2018 - 04:35 PM

Keen to see how you get on with this - really like the 'booted' variants.


#9 DUF2

DUF2

    Formally known as DUFfi

  • TMF+ Member
  • PipPipPipPipPip
  • 455 posts
  • Location: Swalwell
  • Local Club: Whickham & DMC

Posted 02 January 2018 - 04:53 PM

Keen to see how you get on with this - really like the 'booted' variants.

So do I Jared, I would not have contemplated a basic Mini, I wanted something a little different which is why I went for the Elf


#10 DUF2

DUF2

    Formally known as DUFfi

  • TMF+ Member
  • PipPipPipPipPip
  • 455 posts
  • Location: Swalwell
  • Local Club: Whickham & DMC

Posted 02 January 2018 - 05:03 PM

what's your plans? quick fix and use, or more of a restoration?.

I was hoping for a relatively quick fix, I didn't want a restoration project.

I'm trying to write the story and include photos, but am struggling with the pics, they are all from my iphone, some go in OK others I get the message file too big!

I'm getting annoyed!!


#11 DUF2

DUF2

    Formally known as DUFfi

  • TMF+ Member
  • PipPipPipPipPip
  • 455 posts
  • Location: Swalwell
  • Local Club: Whickham & DMC

Posted 02 January 2018 - 05:31 PM

I'll try to post the photos later.


OK I eventually got the flywheel off and replaced the clutch.


IMG_0193_zpstk6smfjf.jpg


IMG_0194_zpsmdavw4fd.jpg

 you can still see bits of release bearing at the bottom of the housing!


The ring gear was worn so i had a new one fitted to the flywheel before putting it back in.


IMG_0201_zpsudjdn8jx.jpg


Once the clutch was in I was able to fire up the engine. Great now i knew the engine ran and oil pressure etc was fine.


I had spotted that the rubbers on the knuckle joints were split so I ordered some of those, also new handbrake cables.


My garage is not too wide so i have limited access down the side of the car! I stripped the offside rear brake to see why I had no handbrake, everything seemed OK and only wanted adjustment. and a new handbrake cable fitted. I then spotted the handbrake mounting was cracked, so I got out my new Gasless MIG welder to repair & reinforce the mounting. ( I'd bought the welder as i found a hole at the bottom of the inner wing, you can see it in the photo of the front Brake,)

I also replaced the knuckle joint on the offside rear. I had great difficulty getting the rubber donut off the trumpet but eventually succeeded.

So here was me thinking I'd finished with the rear offside brake.

I decided to replace the handbrake cable on the nearside, (expecting the nearside to be in the same condition), but no the wheel cylinder was pissing out!

Another thing was the car was fitted with those horrible Cosmic wheel spacers,


IMG_0177_zpstupmiuja.jpg


I thought I'd get rid of these, however the 12" minilites (needed to fit over the 8.4" calipers at the front) did not fit over the rear hubs! so I ordered new cylinders, shoes and new drums with the built in spacers.

Wheel cylinders, which size? well my car had 11/16 cylinders, these are to match the 4 pot calipers. 

Anyway new cylinders shoes & drums on the nearside and also the new knuckle joint were fitted to that side. This meant I had to go back to the offside to replace the cylinder, shoes & drums.


The hole at the bottom of the inner wing? well I plated that but had trouble chasing holes on the drivers floor pan so I have a section of floor to replace!

I mentioned in my first post about the car being low, so i have bought a pair of HiLos for the front, but think i will fit a couple of Smootharide donuts at the front, just to soften the ride a little.

So the project continues, and I thought all I had to do was fix the clutch!


Edited by DUF2, 03 January 2018 - 04:23 PM.


#12 DUF2

DUF2

    Formally known as DUFfi

  • TMF+ Member
  • PipPipPipPipPip
  • 455 posts
  • Location: Swalwell
  • Local Club: Whickham & DMC

Posted 02 January 2018 - 05:48 PM

Oh another thing, when I was replacing the clutch I thought I may as well replace the engine mountings, fixed the offside leaving the nearside to be done later when I'd moved to car over to create a bit more space.

When the cold weather arrived I thought I'd best drain the cooling system as I was not sure if there was any antifreeze in it. Whilst doing so i discovered the radiator was a bit loose, a nice new radiator had been fitted, but the rubber mountings had not been refitted! also as it was a new rad the fixings on the side were metric & someone had forced unf bolts into the captive nuts! I had to cut the bolts out as the captive nuts started turning!


Whilst i was on I thought I'd best change the alternator belt, but I could not get the belt off the bottom pulley. it turns out the car still had the original Elf engine mounting bracket and with a 1275 pulley there was insufficient space to get the belt between the pulley & the mount!!


IMG_0445_zpsb5iuzilp.jpg


I have had to grind away the bracket a little to allow belt replacement in the future without having to remove the engine mounting!!


IMG_0444_zpsvuqhh6fe.jpg


After grinding

IMG_0462_zps5pwrw8p4.jpg


bracket painted and ready to go back on.


Edited by DUF2, 03 January 2018 - 04:49 PM.


#13 DUF2

DUF2

    Formally known as DUFfi

  • TMF+ Member
  • PipPipPipPipPip
  • 455 posts
  • Location: Swalwell
  • Local Club: Whickham & DMC

Posted 02 January 2018 - 05:58 PM

In my previous post, I mentioned about the radiator and the wrong bolts fitted to it.

I only got one bolt  out of the rad cowl because only 1 metric bolt had been used. i had to cut out the other three as the captive nuts were spinning.

I used some M6 gutter nuts, the square ones and bonded them into the side of the rad. I redrilled the cowling so I can use all 8 tappings.


IMG_0463_zps5526vx4e.jpg


I had some allen headed bolts so I'm using those. The cardboard is there to protect the rad core whilst working on it.


Edited by DUF2, 03 January 2018 - 04:54 PM.


#14 jonlad

jonlad

    Speeding Along Now

  • TMF+ Member
  • PipPipPipPipPip
  • 313 posts
  • Location: Cheshire

Posted 02 January 2018 - 07:44 PM

Looks like a good project, and a bargain to boot especially with all the add on bits.


Good luck and keep at it!


#15 DUF2

DUF2

    Formally known as DUFfi

  • TMF+ Member
  • PipPipPipPipPip
  • 455 posts
  • Location: Swalwell
  • Local Club: Whickham & DMC

Posted 02 January 2018 - 08:54 PM

Looks like a good project, and a bargain to boot especially with all the add on bits.
 
Good luck and keep at it!


"a bargain to boot..." I don't believe I mentioned how much I paid for it! I did say it was sitting at £1600 for a while, but on the day it sold it was at £2650 when I put in a bid much higher than that.
I have seen cars going for more than I paid, have seen some ******* for less that I would never have bought, so I am comfortable with what it cost me (assuming I could recover my outlay should I ever sell it on.


0 user(s) are reading this topic

0 members, 0 guests, 0 anonymous users