Hi guys, yet another little project ive embarked on. This time its to make the centers of my wheels. Not a fan of the ones available so thought id print some. Below in the spoilers are explanations and everything else you wouldn't want or need to know. Can make the files available if people want them. Made the first design Saturday and its Sunday night now, printed 2 design iteration and 4 of the final product. Not bad...
Software
CAD - FreeCAD 0.16
Slicer - Slic3r
Printing software - Printrun1.6.0
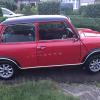
Existing wheel centers which ill be getting all my measurement from.
Spoiler
Existing wheel centers which ill be getting all my measurement from.
My measurements are as below.
Large Diameter surface - 56mm
Clip recess diameter - 51.75mm
Clip large diameter - 53.8mm
Clip ID - 46.4mm
First design
Spoiler
First design
Didnt print very well. The material became unstuck from the base and warped up. Causing the right hand side to blur out. Bad surface finish due to over extrusion and this warping. Fixed that in my next print.
Second Idea
Spoiler
Second Idea
This is the second idea. Minimalistic and easy. The text is "engraved" in black while the top surface will be red. My mini being red and black. 86 is its year. Printed very nicely and quite like the spiral pattern the slicer software made with the numbers.
"Mass" Production
Spoiler
"Mass" Production
As im sure many of you will know Minis have 4 wheels. So luckily i could fit all 4 on my build plate and print them simultaneously. Took a total of 3hr34m to print all 4 from scratch.
I kinda like the Skeletal effect.
How to attach it
Spoiler
How to attach it
Small problem with 3D printers, you cant print if there is nothing under the extruder. Well you can you just get a birds nest. at the moment the design is just a "puc" and has no way of staying on the alloy without glue. Not a fan of gluing them on however id like to hope id have someone on hand when i need to take the hubnuts off! Anyway. I experimented trying to "manually" 3D print some clips. Using a cheap shitty 3D pen. This is just a little extruder which is hand held. Good for little modifications but the results are near impossible to make look presentable. So prototyping only.Tried to make some clips but just wasn't feasible. As you can see from my shockingly bad attempt. The trick to using them is very much like welding. Get the base material warm so it bonds to the filler. Do this and again like welding the material will fail before the weld.
Final Completed Design
Spoiler
Final Completed Design
Combining both the design and me finally pulling my finger outta my arse to get the clip made i am now left with complete design. Used a few tools in FreeCAD ive never used before so i pretty proud! I wont print the complete design for now as i just cant bring my self to all the fun of using supports. As said previously you cant print when nothing is below the extruder. So the slicer software will generate a scaffold of plastic which is peeled from the final product.
awesome great to a see a 3d printer making mini parts, this maybe the only way to get some replacement parts in the future.
Well you can get flexible filament and saw a guy asking earlier about a NLA seal... could print it pretty easy... as to the material properties there continuously improving, One day i will print a new clock housing as mine is shot. NLA