My Mini is looking solid at the moment, and I wanted to weld something. So I decided to convert an old mk3 bootlid to the earlier mk1/2 style to keep me busy with the welder!
I know this has been done on the forum before but I wanted to make a post.
Ive been teaching myself how to weld/paint etc so its not perfect but thats why Im doing little projects like this;
I bought this bootlid on facebook locally for £20, good price I thought! Especially with the Mk2 badge.
 FB1F647D-4033-45D1-B894-2B2C5C9A146E.jpeg 66.78K
1 downloads
FB1F647D-4033-45D1-B894-2B2C5C9A146E.jpeg 66.78K
1 downloadsFirst thing to do was strip the it all down and weld the holes I wouldnt need anymore.
8E9C003A-6B9A-4256-81D0-724453C77BCE.jpeg 68.1K
3 downloads
24A8006D-7232-4FC6-B97D-6478C9150DDA.jpeg 44.4K
1 downloads
D2EE81A3-98FA-4982-AF9F-7102EBE5F4AB.jpeg 54.18K
5 downloadsNext was to mark out and cut the lower section ready for the new panel, as far as I remember there were 2 spotwelds that need to be drilled/ground out.
CFF95DD1-BF26-4872-B98C-4DEBB0E4A216.jpeg 61.61K
6 downloads
00F307FE-4F22-4315-BB5A-ECFB65F45562.jpeg 69.31K
4 downloads
69C75F58-21BD-41CD-A0EF-8624A06658D2.jpeg 69.04K
7 downloads
632F40C3-FEE7-4E7B-A580-E597FACEFC89.jpeg 63.13K
3 downloadsI cleaned up any rust, treated and painted with weld through primer. I clamped down the new panel and tacked down. Throughout the welding I took my time to prevent distortion as much as possible.
783EE9BA-49BA-4F78-9ED1-DD67BA948E9D.jpeg 57.85K
4 downloads
71829627-6826-4F33-A53C-0A26C625CFE7.jpeg 64.42K
9 downloads
4462001B-A864-49AA-AB43-E7E7924A6B8C.jpeg 60.83K
8 downloadsI used plenty of sealant in the back to keep the water out before folding it over.
8E2B348C-1C2B-4E53-AE6B-FD6122109710.jpeg 64.72K
4 downloadsAll ground down, the GB badge is bolted on so those 4 holes had to be welded before moving on.
68EA2C10-F5C4-4A42-9B0C-F4BBC1E653E6.jpeg 41.29K
3 downloads
D062AD43-6978-45CB-A212-4BAB8F553907.jpeg 71.77K
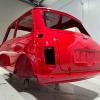
2 downloadsHad to test it with the numberplate and badge! 😂
4F91FAB2-9533-4239-A1C6-B04C8FC074BD.jpeg 64.59K
3 downloadsNow to (try to) make it smooth!
5476A19F-55B7-4C27-ABB3-4B3C8B139B80.jpeg 73.15K
1 downloads
E48EA89E-68F3-4A35-AF40-C2FB1BB01BF6.jpeg 69.86K
1 downloads
C26A1962-594A-4797-A2AB-05A8DEBD99EA.jpeg 44.74K
1 downloads
A45FD8EE-9D3C-44B9-B675-07E3ED4130B6.jpeg 69.46K
3 downloads