Jump to content


Photo
- - - - -

How To De-Rust A Block With Molasses

engine

  • Please log in to reply
16 replies to this topic

#1 nikollou

nikollou

    Passed Test

  • Noobies
  • PipPip
  • 31 posts
  • Location: Athens

Posted 29 May 2018 - 07:48 AM

Hi guys, 


I am currently in the engine building phase of my project car and I am getting ready to send the block to the machinist. Being in Greece for some reason I do not trust they will do a great job of cleaning it out so I wanted to do as much work as I could in advance. I read about molasses and thought I'd give it a try. I wanted to post up my process here (and the results in a couple weeks) for anyone considering the same in the future. 

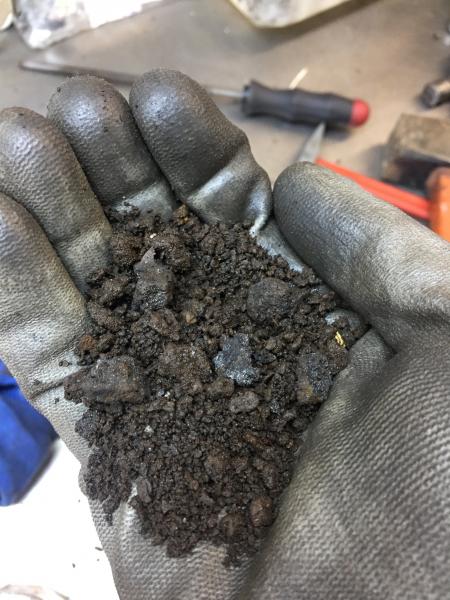
You will obviously need molasses (I bought 500gr for 2,3 euros at a bio food store) and not much more to do this. Whereas most people talk about dipping the block in a large enough tub to be submerged in the solution, I decided to block off the water jacket and just fill that up. The rust and crud is usually only within that space so there is no need to expose all the block to the solution. 

In order to make the jacket a sealed space you should do this BEFORE removing the freeze plugs. Obviously I had already removed mine emoohwell.gifso I made some DIY temporary freeze plugs on the lathe. I made sure they were a very tight fit and had to be hammered in. 

613659-3.jpg 

613659-4.jpg 

Once this is done you need to attach the water pump and find a way to block its exit. I made a plug and wrapped it with stretch tape which did the trick. 

613659-1.jpg 

Once the block is "sealed" you need to prep the solution. I read online various ratios, from 1:8 to 1:2 so I went somewhere between the two with a 1:5 ratio. FYI the volume in the 1275 block jacket is just about 1L so that gave me a reference of how much solution to prepare. 

613659-2.jpg 

It is usually recommended to leave the molasses in for two weeks but I am in a hurry so I plan to check it in one week time and if I'm not happy then leaver it for another week. I also plan to tackle the cylinder head in a similar fashion tonight so I will post up my approach. 

Will keep you posted. 
Nik


#2 gazza82

gazza82

    Up Into Fourth

  • Members
  • PipPipPipPipPipPipPipPipPip
  • 2,917 posts
  • Location: Bucks
  • Local Club: TMF+

Posted 29 May 2018 - 11:38 AM

Most UK based engineering firms have mild-acid baths for large items like this but an interesting method ..


#3 whistler

whistler

    Camshaft & Stage Two Head

  • TMF+ Member
  • PipPipPipPipPipPipPipPip
  • 1,706 posts
  • Location: Cardiff

Posted 29 May 2018 - 12:54 PM

I tried that last year but didn't have much success. I put the block in a tank with molasses. Had better results from the electrolytic method, using a 12v battery and soda solution. You could see the rust moving through the solution to the anode (old spade head). Very good results.

#4 nikollou

nikollou

    Passed Test

  • Noobies
  • PipPip
  • 31 posts
  • Location: Athens

Posted 29 May 2018 - 01:00 PM

I tried that last year but didn't have much success. I put the block in a tank with molasses. Had better results from the electrolytic method, using a 12v battery and soda solution. You could see the rust moving through the solution to the anode (old spade head). Very good results.


Interesting (and slightly concerning) feedback right there whistler! I hope I don't just waste a week of my time on this idea...


Do you remember the ratio you used in the solution and the time spent in the tank (approximately)?


#5 whistler

whistler

    Camshaft & Stage Two Head

  • TMF+ Member
  • PipPipPipPipPipPipPipPip
  • 1,706 posts
  • Location: Cardiff

Posted 29 May 2018 - 04:17 PM

I tried that last year but didn't have much success. I put the block in a tank with molasses. Had better results from the electrolytic method, using a 12v battery and soda solution. You could see the rust moving through the solution to the anode (old spade head). Very good results.

 
Interesting (and slightly concerning) feedback right there whistler! I hope I don't just waste a week of my time on this idea...
 
Do you remember the ratio you used in the solution and the time spent in the tank (approximately)?

No I don't sorry. I picked it up off a youtube video from the U.S. I do remember that you have to be careful which soda you use as there's bicarbonated soda and washing soda. One works and the other doesn't. I used an upturned cold water plastic tank out of my loft which was the perfect size and a spade as the anode. If you can connect up the battery jump leads to the bit of anode sticking out of the soup mix then that's better. I had a battery charger connected to the battery for my setup.

Edited by whistler, 29 May 2018 - 04:18 PM.


#6 Spider

Spider

    Moved Into The Garage

  • Admin
  • PipPipPipPipPipPipPipPipPipPipPip
  • 13,923 posts
  • Location: NSW
  • Local Club: South Australian Moke Club

Posted 29 May 2018 - 08:00 PM

Thanks for posting up your project here.


Molasses works very well, but realistically, it will take around 3 - 4 weeks, I don't know of any short cuts using it.


You can try a variety of other solutions that can be faster, but usually more costly.


CLR will work but even that will take 1 - 2 weeks.


Citric or Acetic Acid will likley work the fastest.


Some people have had good success with Vinegar, but so much of that obtained from the supermarkets etc these days is watered down with other chemicals or water itself, it's a bit hit and miss.


#7 nikollou

nikollou

    Passed Test

  • Noobies
  • PipPip
  • 31 posts
  • Location: Athens

Posted 30 May 2018 - 06:11 AM

Thanks for posting up your project here.


Molasses works very well, but realistically, it will take around 3 - 4 weeks, I don't know of any short cuts using it.


You can try a variety of other solutions that can be faster, but usually more costly.


CLR will work but even that will take 1 - 2 weeks.


Citric or Acetic Acid will likley work the fastest.


Some people have had good success with Vinegar, but so much of that obtained from the supermarkets etc these days is watered down with other chemicals or water itself, it's a bit hit and miss.


Hi Moke Spider and thanks for the reply!


I did some searching online and found both citric acid and acetic acid for good prices so it is definitely a viable option. Do you know which of the two would be more powerful? And how long should I leave them in the engine block/cyl head?


I think I will give the molasses a week just out of curiosity and for the sake of a test and if I am not happy with the progress I'll then switch to the acids. 


#8 nikollou

nikollou

    Passed Test

  • Noobies
  • PipPip
  • 31 posts
  • Location: Athens

Posted 30 May 2018 - 06:20 AM

As promised last night I tackled the cylinder head in a similar fashion.


As you can see from the photos the water jacket was pretty fouled up so a good clean is definitely due!


Attached File  IMG_6508.jpg   43.27K   0 downloads

Attached File  IMG_6509.jpg   37.61K   1 downloads


I decided it was easier to flip the cylinder head since it would mean I have less holes to plug. The hardest one was sealing the large opening for the thermostat, which I tackled by creating a metal plate that I used to sandwich a layer of PVC plastic I had laying around. I did a first test and the seal wasn't 100% tight, so I added a bit of silicone. 


Attached File  IMG_6510.jpg   61.37K   1 downloads


Other than that I had to simply install the water temp sensor and plug the exit for the heater using a generic plastic plug.

The head was now sealed and I proceeded to fill it up with a 1:5 ratio of molasses as per the block. FYI the aproximate volume of the cyl head was 650ml.


Attached File  IMG_6517.jpg   72.19K   4 downloads


I'll send updated pictures in a week!


Nik


#9 timmy850

timmy850

    Up Into Fourth

  • TMF+ Member
  • PipPipPipPipPipPipPipPipPip
  • 2,996 posts
  • Location: NSW, Australia
  • Local Club: MITG

Posted 30 May 2018 - 06:23 AM

I've used cheap white vinegar (acetic acid) form the supermarkets in the past and submerged the whole head. I left it for a few days 

14150057490_118931680f_b.jpg
This is after a soak and a quick wipe over
14340250794_792c19ae93_b.jpg


Here's another photo
14150019269_472ece745b_b.jpg

14154356368_e0d026a5ce_b.jpg


#10 nikollou

nikollou

    Passed Test

  • Noobies
  • PipPip
  • 31 posts
  • Location: Athens

Posted 30 May 2018 - 06:55 AM

I've used cheap white vinegar (acetic acid) form the supermarkets in the past and submerged the whole head. I left it for a few days 

14150057490_118931680f_b.jpg
This is after a soak and a quick wipe over
14340250794_792c19ae93_b.jpg


Here's another photo
14150019269_472ece745b_b.jpg

14154356368_e0d026a5ce_b.jpg


Wow that is some serious amount of rust on that cylinder head! Did you find it at the bottom of the sea?


These are some great results so I definitely know I have a  plan B now if the molasses aren't as fast or effective.


I found some 80% acidic acid which costs 5,5 euros for 1L which is a good price I think. Assuming I need 1,5L approximately for the block and head I can get the whole engine treated for just about 10 euros.


#11 Dusky

Dusky

    Crazy About Mini's

  • Members
  • PipPipPipPipPipPipPipPipPipPip
  • 5,322 posts
  • Location: Belgium

Posted 30 May 2018 - 10:12 AM

http://www.theminifo...liper-cleaning/

My citric acid cleaned brake calipers.
Ive used vinegar with succes in the past too,but the fresh lemon smell of citric acid is a huge bonus ;)

#12 nikollou

nikollou

    Passed Test

  • Noobies
  • PipPip
  • 31 posts
  • Location: Athens

Posted 18 September 2018 - 12:55 PM

Even though it has been a few months since I posted on this issue, I wanted to send a final update since I ran into a pretty major issue that I wasn't aware of and this might serve as a warning and also a how-to for fellow mini owners.


So carrying on from where I left off after the successful bath in Molasses I washed out the block and was getting ready to send it to the machine shop. 

THANKFULLY I took one last look down inside the narrow (rear of the engine) side of the water jacket and I discovered a massive buildup of "something".


Attached File  IMG_6648.jpg   25.45K   3 downloads


It turns out that for some reason there must have been a significant amount of rust particles floating around the cooling system, which over time started to collect at the narrow points of the water passage. Looking down the left opening for the freeze plug you can see the huge buildup right where cylinder 2 extends into the water jacket. Due to its close proximity to the opening I was able to smash through this using an appropriately narrow rod that I sharpened and a hammer. 


With that out of the way I realised that cylinder 3 had about 2cm of buildup and cylinder 4 had another 4-5cm as well. (the lit deposit on the photo below is cyl. 4)


Attached File  IMG_6653.jpg   22.79K   2 downloads


Over the course of many months, days and hours and after a lot of frustration and disappointment, eventually I managed to get all the crud out which amounted volumetrically to about half a cup!!!   :(


A few points to note and a list of methods tools I used:


1) I considered using a chemical approach, but keep in mind that the block already spent 2 weeks in molasses and that did absolutely nothing to remove the deposits. The crud of cylinders 2-4 had solidified much more than that of cylinder one, turning essentially into solid steel, with the respective hardness and strength you would expect! 

2) Being able to see in these areas is tough. The best method I found was to shine down from the face of the block through the water holes and look through the water jacket opening.

3) I used a combination of hammering with sharpened rods as well as a drill I welded to a long rod in order to work through all the crud. The hardness of the material was shocking and the most effective method in the end was to create a small "pilot hole" with the drill and then hammer a ultra-sharp rod through that hole which forced the crud to expand and break apart. I kid you not, this stuff was barely softer than proper steel and the whole process took a very long time!

4) I found it useful to also hammer with the rod through the water holes on the top of the block as it gave me access behind the deposits. 


Attached File  IMG_6654.jpg   48.7K   1 downloads

Attached File  IMG_6996.jpg   82.98K   0 downloads

Attached File  IMG_6656.jpg   54.36K   1 downloads


So has anyone else encountered something similar to this?


I was very frustrated to find out how bad my jacket was and at several times I felt I was gonna have to buy a new block, but eventually I made it and I'm happy I will have a block with proper circulation at the back of the water jacket!


Keep wrenching!


#13 Rorf

Rorf

    One Carb Or Two?

  • Members
  • PipPipPipPipPipPipPip
  • 859 posts
  • Location: Cape Town

Posted 18 September 2018 - 06:14 PM

Looks like it was a poor casting to start with and probably was never cleaned up well at manufacture. Looking thru the thermostat hole you can still see the cast flashings. Rust doesn't look like to be an issue as all the small holes in the block and head look relatively clean.


Still once you have the engine built you should never suffer with over heating issues - just use a good coolant and change it every 3 years. Enjoy the build.


#14 DeadSquare

DeadSquare

    Up Into Fourth

  • Members
  • PipPipPipPipPipPipPipPipPip
  • 2,765 posts
  • Location: Herefordshire
  • Local Club: Unipower GT Owners Club

Posted 19 September 2018 - 12:24 AM

post-114615-0-14067100-1537275133.jpg


So has anyone else encountered something similar to this?


That is not rust.


That is caused because the casting sand was not "packed" in the mold and the liquid iron seeped into the soft sand.


It was a badly "packed" mold, where loose sand was washed along by the in-flowing iron and formed that stuff, that caused a weakness in a casting, which resulted in the collapse of the Tay railway bridge in 1897.


#15 nikollou

nikollou

    Passed Test

  • Noobies
  • PipPip
  • 31 posts
  • Location: Athens

Posted 19 September 2018 - 07:08 AM

Wow thanks for the insight, I would have never thought that this was a result of the casting process! Who knew such issues plagued BMC's factories at the time...  ;-)  


If it was liquid iron that fused with sand, that would also account for its extreme hardness..!


Glad to have the block up to spec with "normal" ones now..!
Onto the next phase of the build..


Also tagged with one or more of these keywords: engine

0 user(s) are reading this topic

0 members, 0 guests, 0 anonymous users