Jump to content


Photo
- - - - -

Engine Strip And Rebuild


  • Please log in to reply
18 replies to this topic

#1 1275poorlyproject

1275poorlyproject

    Learner Driver

  • Noobies
  • PipPip
  • 23 posts
  • Location: Leicestershire
  • Local Club: That would be nice

Posted 16 July 2018 - 01:24 PM

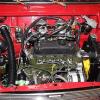
Metro 1275 engine that i want to strip and rebuild

Is there an off the shelf kit that replaces all the potential high wear components,just to make life a little simpler?


Or,am i better off getting the little bugger running an d finding a decent mechanic? I'd prefer to do as much as I can,will need help once i'm out of my depth


Edited by 1275poorlyproject, 16 July 2018 - 01:41 PM.


#2 nicklouse

nicklouse

    Moved Into The Garage

  • TMF+ Member
  • PipPipPipPipPipPipPipPipPipPipPip
  • 17,944 posts
  • Location: Not Yorkshire
  • Local Club: Anonyme Miniholiker

Posted 16 July 2018 - 01:41 PM

not really as it depends on what you need to do to rectify the wear.


it is not just plug and play.


if the crank needs a grind on the big ends or the mains or both that will determine what bearings you need. but that also depends on what the current state is.


then there is the bores. will they need a rebore to the next size up or......


the only thing you can be sure off you will need a gasket set.


#3 DeadSquare

DeadSquare

    Up Into Fourth

  • Members
  • PipPipPipPipPipPipPipPipPip
  • 2,765 posts
  • Location: Herefordshire
  • Local Club: Unipower GT Owners Club

Posted 16 July 2018 - 01:45 PM

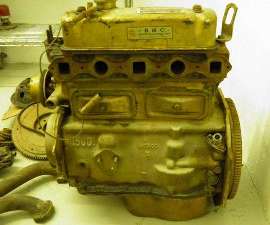
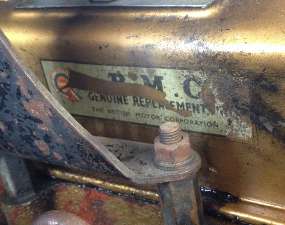
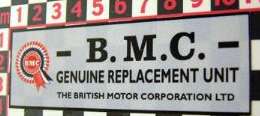
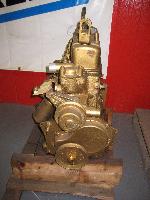
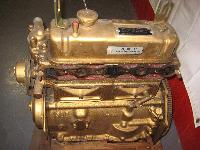
It used to be called "A Gold Seal Replacement Engine"


BMC, Gold Seal Engines - BE-100A

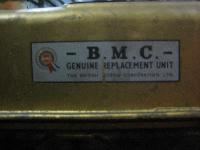
gold_seal_engine_01s.jpg gold_seal_engine_02s.jpg

gold_seal_engine_03.jpg A BMC Gold Seal Engine was a factory Reconditioned replacement engine (painted gold). There were also BMC Silver Seal engines (painted silver). Notice in the picture the sticker on side of the valve cover.

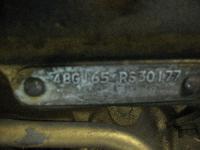
48G is a 'B' series Gold Seal recon unit. The 'A' series was 8G, and the 'C' series 68G. (All pre-1956 reconditioned engines were prefixed 8G).

The following is an excerpt from Practical Classics, February 1984, by Chris Graham. It refers to the engines then being supplied by Unipart.

Gold and Silver Seal engines differ in two ways. Gold Seal engines are (were) applicable to vehicles up to five years old and contain a higher percentage of new parts. Silver Seal engines apply to vehicles over five years old and the lower percentage of new parts in these engines reflects the much greater availability of fairly good used parts for these slightly older engines. The sole exception to the 'five year old' rule is the MGB for which Gold Seal units were available rather than Silver Seal.

The same standards of re-manufacture apply to both types of engine except that the Silver Seal specification does not include the water pump, thermostat and thermostat housing and sparking plugs, but does include the oil pump and filter and crankshaft pulley. The Gold Seal specification includes all of these items and both types of engine will have been very thoroughly over-hauled. This work consists of stripping and thoroughly cleaning all internal parts, followed by close examination for wear, hairline cracks etc. Cylinder heads are checked and tested for compression. Crankshafts and camshafts are measured, re-profiled or reground to the same tolerances as a new engine and balanced. The maximum amount of metal which will be removed is 0.020", and any part which cannot be reconditioned within this limit will be discarded and replaced, often by a brand new component. After assembly every engine is set up, balanced, and "run for thirty minutes under power" (according to Unipart) during which time it is subject to inspection and testing for oil pressure, power output, smoothness of running and noise levels.

Referring to the greater availability of used parts for slightly older engines and the lower percentage of new parts used in Silver Seal engines. This is not to say that Silver Seal engines are in any sense a second class product. The same standards apply to both types of engine but in achieving those standards several engines may be stripped to provide parts which are capable of being reconditioned for a Silver Seal engines whereas fewer engines are available from vehicles up to five years old. Unipart aims to offer the same high standard in Silver Seal replacement engines and gearboxes but to do so at a lower cost to the customer. Gold Seal engines come with a 12 month unlimited mileage warranty, with Silver Seal the limits are 12 months or 12,000 miles. Both warranties state that if replacement or repair of the unit becomes necessary due to a manufacturing or material defect the unit will be replaced free of charge and the "unexpected" (unused or not expired) part of the original warranty will then apply.

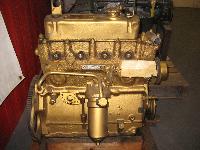
This one came up on eBay as new/unused, New Old Stock gold seal engine in March 2016.
gold_seal_engine_04s.jpg gold_seal_engine_05s.jpg gold_seal_engine_06s.jpg gold_seal_engine_07s.jpg gold_seal_engine_08s.jpg

MGAguru.com   MGAguru.com

#4 1275poorlyproject

1275poorlyproject

    Learner Driver

  • Noobies
  • PipPip
  • 23 posts
  • Location: Leicestershire
  • Local Club: That would be nice

Posted 16 July 2018 - 01:56 PM

Dead thanks,but i'm looking to do the work myself,followed by a lot of pictures stating 'why's this not fit' or 'is this knackered'  :D


#5 Cooperman

Cooperman

    Uncle Cooperman, Voted Mr TMF 2011

  • TMF+ Member
  • PipPipPipPipPipPipPipPipPipPipPip
  • 23,039 posts
  • Location: Cambs.
  • Local Club: MCR, HAMOC, Chelmsford M.C.

Posted 16 July 2018 - 01:56 PM

There is absolutely no reason why you can't do the complete job yourself, probably with some advice and assistance from those of us on here who regularly rebuild A-Series engines.

You will need a few extra tools probably, but the cost of them will be far, far less than paying someone to do the job for you.

Tools include a really good quality imperial socket set, a Dial Test Indicator (DTI), feeler gauges, a torque wrench with settings from 35 ft. lbs to 150 ft. lbs., a good quality flywheel puller (not a cheap one), a full set of open-ended and ring spanners in inch sizes, a pin punch set, a chisel, a set of screwdrivers, a hammer and a copper-faced mallet. You will need an engine crane, but you may be able to borrow one for a short while. I'm sure I have missed a few things out, but some other nice person wil be along shortly to fill in any gaps  ;D .

Then remove the engine/gearbox, strip the block assemble from the gearbox and strip the engine. We can give you the sequence of tasks once the engine and gearbox are sitting on the bench and you have washed it down prior to stripping. Some will insist that you have an engine stand, but the Mini engine is not heavy and it is not difficult to build it without, so long as you have a strong bench in a clean area.

Doing this yourself will enable you to learn a lot and is very satisfying,


#6 unburntfuelinthemorning

unburntfuelinthemorning

    Camshaft & Stage Two Head

  • TMF+ Member
  • PipPipPipPipPipPipPipPip
  • 1,915 posts
  • Location: Bedfordshire

Posted 16 July 2018 - 02:07 PM

A Haynes manual is invaluable - one of the older ones from Ebay, not the new type.


#7 gazza82

gazza82

    Up Into Fourth

  • Members
  • PipPipPipPipPipPipPipPipPip
  • 2,917 posts
  • Location: Bucks
  • Local Club: TMF+

Posted 16 July 2018 - 02:16 PM

Just to point out that all the nuts and bolts are imperial ... so no metric spanners, etc

#8 Cooperman

Cooperman

    Uncle Cooperman, Voted Mr TMF 2011

  • TMF+ Member
  • PipPipPipPipPipPipPipPipPipPipPip
  • 23,039 posts
  • Location: Cambs.
  • Local Club: MCR, HAMOC, Chelmsford M.C.

Posted 16 July 2018 - 02:23 PM

In terms of workshop manuals, the original BMC Workshop Manual is a great thing. You can find them on ebay for reasonable prices.

There is also an Illustrated Parts Catalogue which Mini Spares might still do.

But the best thing is the amazing amount of help and expertise available on here.


#9 Carlos W

Carlos W

    Mine is purple, but I have been told that's normal

  • TMF+ Member
  • PipPipPipPipPipPipPipPipPipPipPip
  • 10,110 posts
  • Location: Sittingbourne, Kent

Posted 16 July 2018 - 02:37 PM

You need to make sure everything is clean, operating theatre clean.

#10 ukcooper

ukcooper

    Camshaft & Stage Two Head

  • Members
  • PipPipPipPipPipPipPipPip
  • 1,625 posts
  • Location: Stoke on Trent

Posted 16 July 2018 - 03:01 PM

1 Leicestershire you is in , so you have med for machining if you need out, ball ache 1 done
2 ya need a shed garage for long term with power lighting used to strip and rebuild said engine
3 Imperial tools taps die's sockets ect
4 Cleanliness is godliness every thing needs to be spotless and checked and cleaned
5 you will buy extra parts as you will learn on you way the path is easy but not smooth
6 for ******* sake ask if ya get stuck cause just so is a no no no and a no
7 don't forget the gearbox guesswork's or ya self
8 replace everything ya can no old bits
9 do the cam change while it all in peace's

as far a I know there aint a standard kit , but look up tooling prices and machining prices see Philturbo about a head but that can be done last when you got all the specs

#11 DeadSquare

DeadSquare

    Up Into Fourth

  • Members
  • PipPipPipPipPipPipPipPipPip
  • 2,765 posts
  • Location: Herefordshire
  • Local Club: Unipower GT Owners Club

Posted 16 July 2018 - 03:52 PM

There is absolutely no reason why you can't do the complete job yourself, probably with some advice and assistance from those of us on here who regularly rebuild A-Series engines.

You will need a few extra tools probably, but the cost of them will be far, far less than paying someone to do the job for you.

Tools include a really good quality imperial socket set, a Dial Test Indicator (DTI), feeler gauges, a torque wrench with settings from 35 ft. lbs to 150 ft. lbs., a good quality flywheel puller (not a cheap one), a full set of open-ended and ring spanners in inch sizes, a pin punch set, a chisel, a set of screwdrivers, a hammer and a copper-faced mallet. You will need an engine crane, but you may be able to borrow one for a short while. I'm sure I have missed a few things out, but some other nice person wil be along shortly to fill in any gaps  ;D .

Then remove the engine/gearbox, strip the block assemble from the gearbox and strip the engine. We can give you the sequence of tasks once the engine and gearbox are sitting on the bench and you have washed it down prior to stripping. Some will insist that you have an engine stand, but the Mini engine is not heavy and it is not difficult to build it without, so long as you have a strong bench in a clean area.

Doing this yourself will enable you to learn a lot and is very satisfying,


And a set of number punches for con rods/big ends, plus masking tape and marker pen for push rods/cam followers, valves etc: and any bolts that you remove and wipe clean.


#12 gazza82

gazza82

    Up Into Fourth

  • Members
  • PipPipPipPipPipPipPipPipPip
  • 2,917 posts
  • Location: Bucks
  • Local Club: TMF+

Posted 16 July 2018 - 04:25 PM

http://www.minispare...Books.aspx?0101


http://www.minispare...es/default.aspx


#13 1275poorlyproject

1275poorlyproject

    Learner Driver

  • Noobies
  • PipPip
  • 23 posts
  • Location: Leicestershire
  • Local Club: That would be nice

Posted 16 July 2018 - 04:57 PM

Guys thanks for all the great feedback, certainly be tool shopping soon,have an original Haynes,which will work well alongside Andy mini mads' engine rebuild posts,without starting a topic,i'll try and post some pics as i go,could be worth other newbies seeing poor/used engine components so they can see their own potential issue areas

Thanks again for the assistance,i'll most definitely be calling on a few of you in the coming months

David 


Edited by 1275poorlyproject, 16 July 2018 - 04:58 PM.


#14 MiniBGT

MiniBGT

    Stage One Kit Fitted

  • Noobies
  • PipPipPip
  • 96 posts
  • Location: Berkshire

Posted 17 July 2018 - 07:12 AM

Although this DVD is primarily about building a competition engine it is a very useful guide for how to take a Mini engine apart and put it back together.


https://www.amazon.c...0/dp/B002HRYFSM


#15 Cooperman

Cooperman

    Uncle Cooperman, Voted Mr TMF 2011

  • TMF+ Member
  • PipPipPipPipPipPipPipPipPipPipPip
  • 23,039 posts
  • Location: Cambs.
  • Local Club: MCR, HAMOC, Chelmsford M.C.

Posted 17 July 2018 - 09:18 AM

Guys thanks for all the great feedback, certainly be tool shopping soon,have an original Haynes,which will work well alongside Andy mini mads' engine rebuild posts,without starting a topic,i'll try and post some pics as i go,could be worth other newbies seeing poor/used engine components so they can see their own potential issue areas
Thanks again for the assistance,i'll most definitely be calling on a few of you in the coming months
David


Feel free to ask in this thread or by PM when you get to start the job. The first thing is a strip-down sequence to work to.


0 user(s) are reading this topic

0 members, 0 guests, 0 anonymous users