
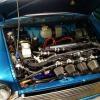
Look at the guys photo - the only way to ‘disconnect’ the ballast wire is with a pair of cutters.


Best Answer Cooperman , 06 August 2018 - 01:59 PM
The 'effing pink and white' wire is a real pita. When it overheats and fails it takes a good portion of the front loom with it. The last time I had to repair this damage it took me over 6 hours and had to buy a load of correct colour cable.
Best thing is to cut the pink/white cable at each end and replace it with a white cable, then fit a 12 volt coil.
That removes the risk entirely.
Go to the full post 
24 replies to this topic
#16

GraemeC
-

- TMF+ Member
-

- 7,314 posts
Crazy About Mini's
- Location: Carnforth
Posted 06 August 2018 - 08:55 PM
#17
Cooperman
-
- TMF+ Member
-
- 23,039 posts
Uncle Cooperman, Voted Mr TMF 2011
- Location: Cambs.
- Local Club: MCR, HAMOC, Chelmsford M.C.
Posted 06 August 2018 - 09:02 PM
That's what I said. Cut the pink/white cable out. I just run a new cable as it is so easy to do. It takes about 10 minutes. Use crimp-on insulated bullet terminals.
#18
unburntfuelinthemorning
-

- TMF+ Member
-
- 1,915 posts
Camshaft & Stage Two Head
- Location: Bedfordshire
Posted 06 August 2018 - 09:09 PM
Look, I've no problem with cutting the ballast wire out of the wiring loom. It's the best thing to do if it's not required. I'm just saying that there MIGHT be an existing wire built into the loom which was intended to be used as an ignition live wire on models fitted without a ballast ignition system which is already connected to the non-fused ignition live circuit which could be used rather than adding a new ignition wire. I've shown my reason for suggesting this. Yes it's easy to run a new ignition wire but IF there is one already there wrapped up in the existing loom why not try and find it and use it? And if you don't want to do that then that is fine also.
#19
GraemeC
-
- TMF+ Member
-
- 7,314 posts
Crazy About Mini's
- Location: Carnforth
Posted 06 August 2018 - 09:27 PM
That's what I said. Cut the pink/white cable out. I just run a new cable as it is so easy to do. It takes about 10 minutes. Use crimp-on insulated bullet terminals.
It’s what most of us have said from the beginning.
However, I think blades (female or male to suit coil and female for fuse box) would be more use than bullets.
#20
unburntfuelinthemorning
-
- TMF+ Member
-
- 1,915 posts
Camshaft & Stage Two Head
- Location: Bedfordshire
Posted 06 August 2018 - 09:35 PM
That's what I said. Cut the pink/white cable out. I just run a new cable as it is so easy to do. It takes about 10 minutes. Use crimp-on insulated bullet terminals.
It’s what most of us have said from the beginning.
However, I think blades (female or male to suit coil and female for fuse box) would be more use than bullets.
I'm not even saying any of you are wrong! Chelsea_Pete please accept my apologies for the confusion I seem to have caused on this thread.
#21
Steve8274
-

- Members
-
- 580 posts
Super Mini Mad
- Location: Wigan (north west)
Posted 06 August 2018 - 10:06 PM
Sorry to jump in on this thread but I have the same pink/white wire in my brand new loom.
Can I just not connect the ballast wires to coil and run a new white 12v wire to new coil. Obviously I would cover and secure the ends. Or does it need cutting out completely. Just don’t fancy unraveling new loom tape
Can I just not connect the ballast wires to coil and run a new white 12v wire to new coil. Obviously I would cover and secure the ends. Or does it need cutting out completely. Just don’t fancy unraveling new loom tape
#22
Chelsea_Pete
-
- Noobies
-
- 63 posts
Stage One Kit Fitted
- Location: New Forest
- Local Club: London & Surrey MOC
Posted 06 August 2018 - 10:42 PM
I agree with the above method of taking a live feed from the same side of the fusebox at the connection where the white wires connect will work nicely.
To quote Haynes though:
"To determine if a vehicle is equipped with a ballasted ignition system, check for the presence of a supplementary wiring harness, incorporating the white/pink ballast resistor lead, between the fuse block and the ignition LT terminal.
"The ballast resistor lead replaces the original coil feed. The original lead is colour-coded white and is retained in the harness to accomodate vehicles not fitted with a ballasted system. Do not connect this white lead to the ignition coil, it must remain taped to the harness."
Now this may be ******* but I thought it would be worth a look as it would provide an easy ready made solution to the problem without adding more wires - simply disconnect the white/pink wire and connect the white one.
Yes, I see. Well as all advised I'll be removing the ballast wire tomorrow and switching to standard, as for the Haynes advice re the 'original white feed', all that is in my loom are those 3 whites into the white/pink, nothing down at the front end, so I assume its referring to the short length of white that runs to the fusebox. I'll disconnect and wrap them all up safe in the loom in case of a future conversion back to ballast, then as suggested run a new wire from that terminal and see how it goes, cheers everyone
#23
Chelsea_Pete
-
- Noobies
-
- 63 posts
Stage One Kit Fitted
- Location: New Forest
- Local Club: London & Surrey MOC
Posted 07 August 2018 - 11:01 AM
So I cut out the ballast wire and connected a new feed straight from the fusebox terminal where one of the 3 white wires had connected, and no spark. So Im guessing those other 2 whites that connected with the pink ballast are needed, but where do I wire them to? (for non-ballast/standard coil setup)
Currently I've rewired the 3-into-1 ballast wire so the ballast feed is now outside of the loom, in case of the melting described yesterday, but this setup isnt right for a 12v coil right? Currently is only reading 5v when running
#24
cal844
-

- Members
-
- 9,488 posts
Crazy About Mini's
- Location: Ballingry, Fife
- Local Club: TFMOC
Posted 07 August 2018 - 11:30 AM
replace the ballast with a 12 v wire and you'll get a sparkSo I cut out the ballast wire and connected a new feed straight from the fusebox terminal where one of the 3 white wires had connected, and no spark. So Im guessing those other 2 whites that connected with the pink ballast are needed, but where do I wire them to? (for non-ballast/standard coil setup)
Currently I've rewired the 3-into-1 ballast wire so the ballast feed is now outside of the loom, in case of the melting described yesterday, but this setup isnt right for a 12v coil right? Currently is only reading 5v when running
#25
Chelsea_Pete
-
- Noobies
-
- 63 posts
Stage One Kit Fitted
- Location: New Forest
- Local Club: London & Surrey MOC
Posted 07 August 2018 - 05:01 PM
replace the ballast with a 12 v wire and you'll get a sparkSo I cut out the ballast wire and connected a new feed straight from the fusebox terminal where one of the 3 white wires had connected, and no spark. So Im guessing those other 2 whites that connected with the pink ballast are needed, but where do I wire them to? (for non-ballast/standard coil setup)
Currently I've rewired the 3-into-1 ballast wire so the ballast feed is now outside of the loom, in case of the melting described yesterday, but this setup isnt right for a 12v coil right? Currently is only reading 5v when running
Ok, will do, so replace the ballast with a standard cable at the same point it was crimped to the 3 whites? (as straight to the fuse terminal = no spark)


Also tagged with one or more of these keywords: electrical
Mini Technical Sections →
Problems, Questions and Technical →
Misfire - Ignition Fault Or Fuel Problem?Started by derekaka2sheds , 01 Apr 2024 |
|
|
||
Mini Technical Sections →
Problems, Questions and Technical →
Mini Spi Charging IssueStarted by Dutch_MiniSPI , 27 Mar 2024 |
|

|
||
Mini Technical Sections →
Problems, Questions and Technical →
Main Dipped Beam Not Working - Just Before Mot :-(Started by Park , 24 Mar 2024 |
|
|
||
Mini Technical Sections →
Problems, Questions and Technical →
Speeduino EcuStarted by cooperpooper , 09 Mar 2024 |
|

|
||
Mini Technical Sections →
Problems, Questions and Technical →
Smiths Electronic Speedo Accuracy?Started by chuee , 01 Mar 2024 |
|
|
1 user(s) are reading this topic
0 members, 1 guests, 0 anonymous users


