Jump to content


Photo
- - - - -

Mini Will Only Run If Coil Ht Lead Propped Near Distributor

electrical

Best Answer ianhelsby , 09 February 2019 - 04:08 PM

I wired the new coil up but still no dice. It does have more bant than the old coil as felt when a jolt shot from one hand through to the other.


For a last ditch effort I ordered a new rotor arm and voila! The mini now runs! You can actually take the choke off as soon as it's running. Previously we'd have to drive it 1/2 a mile before it had warmed enough to idle without tickling the throttle. I plan on resetting the carburettor as I think it should run a bit leaner than before. The old plugs were black even though we turn the choke off as soon as possible.


Photo of the old rotor:

I hadn't looked underneath carefully enough. The crack running from arm to clip is quite obvious. It can just about be seen in the photo on post 4, bottom right of the rotor arm.


and to show how much the old one had worn down when compared to a new one:


I had checked the timing as part of the diagnosis. It's set fine, rotor arm at 2 oclock when both inlet and exhaust rockers of cylinder 1 can be wiggled.

Go to the full post


  • Please log in to reply
15 replies to this topic

#1 ianhelsby

ianhelsby

    Just On Tickover

  • Noobies
  • Pip
  • 5 posts
  • Location: Wigan

Posted 04 February 2019 - 02:50 PM

HI,

I recently replaced the lower radiator hose on my 1986 Mini 998cc and now the engine won't start!

I have been able to get the car running if while a helper mans the ignition switch I place the centre HT lead of the distributor cap near it's socket and arc into the cap. See video:

As soon as you place the lead into the the distributor cap the engine dies.


It's been fitted with an electronic ignition, red wire to white ignition wire, black to coil negative.

Coil reads 1.5Ohms between + and -.

With ignition on, if I place a multimeter across - and + of the coil it reads 5.1V, between + and engine body it's 6.5V.

I've tried connecting a 12v supply to the + of the coil but no change. The car cranks without any coughing.

It's getting fuel and air. New plugs and battery fitted. I've mixed and matched the leads I have to see if any of those are at fault but to no avail.

The distributor cap is new. The old one had some damage to the leading edge of each post. Symptoms remain.


I tried disconnecting the HT lead from the distributor cap as previous checks on spark at the plugs, and spark at the plug HT lead had come back positive.


Attached File  
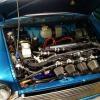
20190204_142435 smaller.jpg   90.26K   3 downloads


I'd like to find out what's happening before replacing parts until the problem goes away.


Friends have suggested "It must be a ground fault!" except I fail to see where or how the grounding is ocurring.


#2 cal844

cal844

    Crazy About Mini's

  • Members
  • PipPipPipPipPipPipPipPipPipPip
  • 9,486 posts
  • Location: Ballingry, Fife
  • Local Club: TFMOC

Posted 04 February 2019 - 04:29 PM

Does the car have a pink/white and yellow/white at coil+? For electronic ignition you need a 12v feed to the coil, anything less than 10 volts and it shouldn't run.

#3 Ethel

Ethel

    ..is NOT a girl!

  • TMF Team
  • PipPipPipPipPipPipPipPipPipPipPip
  • 25,409 posts
  • Local Club: none

Posted 04 February 2019 - 04:34 PM

I'd expect 1.5 ohms from a ballast ignition coil, does it have a ballasted supply? I don't know anything about the requirements of your electronic module, but I can imagine lack of total resistance on the switched (-ve) terminal could cause it problems with the voltage being too close to the supply (+ve) side.


Not sure what's going on with the ht lead - I guess you've increased the impedance on the secondary winding, that may help with the incorrect operation of the primary. 


Seen Cal's reply: If I'm right about the coil your module will see more, not less, voltage.


Provided it has it's own 12v supply, it should work with a 3ohm (12v unballasted) or a 1.5ohm coil fed via the extra 1.5ohms in the ballast (pink wire resistor wire).


Where do the 2 black 'n whites still on the -ve terminal go? At least one of them is surplus to requirements. You could lose both to eliminate potential earthing woes.


The yellow on the +ve indicate the car was atleast originally equipped with ballast ignition - it could be omitted too if it no longer is


Find that pink 'n white wire


#4 ianhelsby

ianhelsby

    Just On Tickover

  • Noobies
  • Pip
  • 5 posts
  • Location: Wigan

Posted 04 February 2019 - 06:14 PM

Hi,

The two wires to coil positive are the white pink stripe and white yellow stripe. Haynes manual confirms these colours as coming from the ballast wire and starter solenoid wire. We've been driving the mini for the last year and a bit in it's current setup. I've attempted a direct 12v feed to the coil positive which yielded the same results. No attempt at running.


Spark at the plugs:


Trying to show how the engine will only run with spark at distributor cap and not when seated properly.


Attached File  20190204_165815.jpg   32.31K   4 downloads


The Haynes manual says one white with black stripe is for the tacho, and the other goes to the distributor. I'll have to find the other end of the distributor one as it's not obvious. I wonder why the tacho would need a power source if it's mechanical.


I've disconnected the white with pink stripe wire from the coil and measured it's resistance. 7.2 Ohms from the end at the fuse box and the now coil end.


#5 hhhh

hhhh

    Speeding Along Now

  • Members
  • PipPipPipPipPip
  • 422 posts

Posted 04 February 2019 - 06:58 PM

Typically, when you create a gap in the secondary circuit, like by holding the coil wire away from the cap, you're forcing a higher voltage to be developed in the coil which is then sufficient to jump an overly large gap elsewhere, or a fouled plug. The carbon contact in the cap may be stuck in.


Edited by hhhh, 04 February 2019 - 07:05 PM.


#6 Ethel

Ethel

    ..is NOT a girl!

  • TMF Team
  • PipPipPipPipPipPipPipPipPipPipPip
  • 25,409 posts
  • Local Club: none

Posted 04 February 2019 - 07:29 PM

Could be on to something there HHHH, that rotor arm looks badly pitted in the right place.

The coil issue will need sorting still. Even if it runs it'll overheat with the extra current.

Double check the ballast resistance, clean and inspect the connectors, if it dodgy it'd be best to get a 3ohm coil.

The rev counter is powered, but that wire just senses when the ignition fires.

#7 ianhelsby

ianhelsby

    Just On Tickover

  • Noobies
  • Pip
  • 5 posts
  • Location: Wigan

Posted 04 February 2019 - 07:47 PM

I'll double check the carbon rod. As seen in the rotor arm there is a black circle where the rod meets. This had been cleaned off before fitting the new cap. There isn't much of a divet where the rod meets the brass. Symptoms are the same as with the old cap. One thing I have noticed is the leading edge of the rotor arm appears worn, albeit not enough to cause the trouble.


I failed to mention that the video showing sparks at the plugs is with the HT lead fully seated into the distributor cap.


I did think the coil was warmer than ambient even with the short 30 second run time.


On another note which I had previously discounted as a seperate issue. The car would lose power if you tried to accelerate to quickly. I'd have to gradually increase the throttle. This only came about in the last couple of months before taking it off the road to change the radiator hose.


#8 cal844

cal844

    Crazy About Mini's

  • Members
  • PipPipPipPipPipPipPipPipPipPip
  • 9,486 posts
  • Location: Ballingry, Fife
  • Local Club: TFMOC

Posted 04 February 2019 - 09:40 PM

Get a 12 volt coil, remove the white/pink and white/yellow wires from the loom.

Replace the White/pink with a section of 12v wire, direct from the white wire at the fusebox

Then wire the dizzy as required.

Double check your timing as it does sound like it could be out.

#9 ianhelsby

ianhelsby

    Just On Tickover

  • Noobies
  • Pip
  • 5 posts
  • Location: Wigan

Posted 05 February 2019 - 02:15 PM

Excellent.

Would the Lucas DLB198 be sufficient? Presumably if I'm disconnecting the ballast and wiring direct to the white 12v supply then I'd need a standard or non-ballast coil.

Do you have any preference in brand of coil?


Ta


#10 Mini ManannĂ¡n

Mini ManannĂ¡n

    Well I'll be buggered if I can find it

  • Members
  • PipPipPipPipPipPipPipPipPip
  • 2,825 posts
  • Location: Middle of the Irish Sea
  • Local Club: man Estate

Posted 05 February 2019 - 03:25 PM

Excellent.

Would the Lucas DLB198 be sufficient? 


That'll be fine, I'm fairly sure I've had the same on my car the last couple of years.  Just make sure you buy one from a reputable dealer.


#11 Cooperman

Cooperman

    Uncle Cooperman, Voted Mr TMF 2011

  • TMF+ Member
  • PipPipPipPipPipPipPipPipPipPipPip
  • 23,036 posts
  • Location: Cambs.
  • Local Club: MCR, HAMOC, Chelmsford M.C.

Posted 05 February 2019 - 05:44 PM

Good advice above. Just get that 'effing' pink/white wire out of circuit before it melts and literally destroys the front loom. It's a long and nasty job to repair a front loom damaged by that damn wire, as I well know!


#12 cal844

cal844

    Crazy About Mini's

  • Members
  • PipPipPipPipPipPipPipPipPipPip
  • 9,486 posts
  • Location: Ballingry, Fife
  • Local Club: TFMOC

Posted 05 February 2019 - 05:57 PM

Good advice above. Just get that 'effing' pink/white wire out of circuit before it melts and literally destroys the front loom. It's a long and nasty job to repair a front loom damaged by that damn wire, as I well know!


I had nothing but issues on a friend's mini,

It would struggle to run, once started. Turns out the fuse box end of the ballast wire had corroded so that there was hardly any connection left.


It ended up melting the insulation on the ballast and the plastic loom wrap.... Very lucky not to damage the rest of the loom

#13 ianhelsby

ianhelsby

    Just On Tickover

  • Noobies
  • Pip
  • 5 posts
  • Location: Wigan

Posted 09 February 2019 - 04:08 PM   Best Answer

I wired the new coil up but still no dice. It does have more bant than the old coil as felt when a jolt shot from one hand through to the other.


For a last ditch effort I ordered a new rotor arm and voila! The mini now runs! You can actually take the choke off as soon as it's running. Previously we'd have to drive it 1/2 a mile before it had warmed enough to idle without tickling the throttle. I plan on resetting the carburettor as I think it should run a bit leaner than before. The old plugs were black even though we turn the choke off as soon as possible.


Photo of the old rotor:

Attached File  20190209_141751.jpg   23.74K   1 downloads

I hadn't looked underneath carefully enough. The crack running from arm to clip is quite obvious. It can just about be seen in the photo on post 4, bottom right of the rotor arm.


and to show how much the old one had worn down when compared to a new one:

Attached File  20190209_141839.jpg   31.26K   1 downloads


I had checked the timing as part of the diagnosis. It's set fine, rotor arm at 2 oclock when both inlet and exhaust rockers of cylinder 1 can be wiggled.


Edited by ianhelsby, 09 February 2019 - 05:45 PM.


#14 hhhh

hhhh

    Speeding Along Now

  • Members
  • PipPipPipPipPip
  • 422 posts

Posted 09 February 2019 - 04:32 PM

That crack in the rotor shouldn't matter much, if at all unless it was full of carbon and formed a grounding route all the way down to the points plate. Also, if the rotor was the solution to the problem, why does the "best answer" not include mention of the rotor?


#15 jime17

jime17

    One Carb Or Two?

  • Members
  • PipPipPipPipPipPipPip
  • 948 posts
  • Location: Bury lancs via E. London
  • Local Club: None

Posted 09 February 2019 - 08:18 PM

If you can push the choke in as soon as you start then it's running too rich.

Edited by jime17, 09 February 2019 - 08:18 PM.


Also tagged with one or more of these keywords: electrical

1 user(s) are reading this topic

0 members, 1 guests, 0 anonymous users