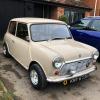


I ordered a new interior for our 96 SPI from Optimise. So far the quality has been top notch and the bespoke work they did was great. They were easy to work with and the custom work was exactly what I wanted. Only complaints was how much shipping was to get it across the pond. Not Optimises fault but it still hurt the pocket book.
We ordered:
Seat covers front and back
Door cards
Door cappings
Boot liner
Gear and hand brake gaiters
Headliner
 20190325_184427.jpg 44.5K
3 downloads
20190325_184427.jpg 44.5K
3 downloads
20190331_125043.jpg 59.08K
3 downloads
Day 1 Boot liner and a new carbon fiber boot. I will take more photos next time.
20190407_135100.jpg 64.08K
4 downloads
20190407_135111.jpg 58.51K
3 downloads