Jump to content


Photo

First Mini Restoration - Advice Needed!


  • Please log in to reply
7 replies to this topic

#1 Slightlybald

Slightlybald
  • Noobies
  • 0 posts
  • Location: York

Posted 22 September 2019 - 08:56 AM

Hi,


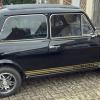
I'm restoring a 1989 mini Mayfair.  It's a project with my 15 year old son, with the idea being that it will be ready for his 17th birthday.  Great father/son time, but also I'm hoping that if he's had to work on building his car, he will be more responsible when he finally gets on the road.


I've never restored a car before and we are learning as we go.  I've got two problems and am hoping someone on this forum might be able to help with some advice.


Electrics - the car has been mucked about with over the years and the wiring harness is a bit of a mess.  It works (or it did before I started taking the car apart!), but as I'm taking the car back to almost a bare shell and we are doing a colour change, I figure I may as well replace the harness.  But... I can't find a harness that actually comes with labels / understandable instructions.  So I'm thinking I might cheat and outsource this bit to an auto-electrician.  Any recommendations / suggestions out there? We're based in Yorkshire.


Driveshafts - I've nearly got the engine out, but can't see how to disconnect the drive shafts.  Haynes is useless in this respect.  Anyone got any vids or other guidance that might be understandable by a novice?


Thanks in advance.


#2 bpirie1000

bpirie1000

    Up Into Fourth

  • TMF+ Member
  • PipPipPipPipPipPipPipPipPip
  • 2,118 posts
  • Location: Aberdeenshire
  • Local Club: Amoc

Posted 22 September 2019 - 09:37 AM

Wiring loom really need to get a Haynes manual and get stuck in. Really is simple when you get into it.. and label EVERYTHING when you strip the car out.

Drive shaft wise, pump and firmly press brake pedal then slacken hub nut. Split the ball joints. Hub will then be free.Gently tap out the drive shaft. Jobs a good un.

If it is pot joint your looking to get out. Remember to drain the oil and then apply equal force to each side. Or buy the special tool.

Enjoy...

#3 Ethel

Ethel

    ..is NOT a girl!

  • TMF Team
  • PipPipPipPipPipPipPipPipPipPipPip
  • 25,409 posts
  • Local Club: none

Posted 22 September 2019 - 09:41 AM

Have you drained the oil?


The inner joints can be levered and/or wedged out of the gearbox. There is a forked tool, but you can improvise. It will help to pop the upper suspension ball joints too.


https://youtu.be/OBgKFtLxk00?t=164


You get a clear view in that one. I prefer to wedge & lever off of the bolt heads that hold the side cover on.


If you intend to reuse the joints try and avoid pulling them apart as they do in some other Youtube vids.


As above the loom isn't as difficult as you imagine, take photos or a video to help your memory on how it's weaved around the body. Lay the new one out so you can visualise what goes where. The connector blocks give the game away on what fits what where, but there's also the wire colours for confirmation. 


As a plus, if you do it yourself the knowledge gained pays off in fault finding those future electrical problems - it's a Mini remember!


#4 Mcmini85

Mcmini85
  • Noobies
  • 0 posts
  • Location: Sheffield

Posted 22 September 2019 - 09:42 AM

Hi ive just removed mine all i did is put in vice and used a punch to remove them there is videos on YouTube

https://youtu.be/HnIBgbr-CBg

And for the wiring i would label the one you have now and match it up to the new one as you good

#5 Chris1275gt

Chris1275gt

    One Carb Or Two?

  • TMF+ Member
  • PipPipPipPipPipPipPip
  • 796 posts
  • Location: Reading

Posted 22 September 2019 - 09:53 AM

Hi
I changed the wiring loom on my 75 gt when I first got, what seemed an unfathomable tangled nest of wires, having never done any work on a car before found it all pretty straightforward make sure you have the correct wiring diagram. I started at the front with the alternator and worked backwards and as you go along it all becomes quite evident as it unravels. Take pictures of the existing and label everything. I also got the multimeter out on the new loom and sorted out where a wire started and then where it came back out of the loom.

#6 Slightlybald

Slightlybald
  • Noobies
  • 0 posts
  • Location: York

Posted 28 September 2019 - 03:53 PM

Thanks for all the advice guys.  Really appreciate it.  I've decided to press ahead with the new loom - really want this car to be nice (and as reliable as it can be, although I've owned classic cars before so I have realistic expectations).


Cheers


#7 jabos7

jabos7

    Stage One Kit Fitted

  • Noobies
  • PipPipPip
  • 89 posts
  • Location: Hagerstown, MD

Posted 12 October 2019 - 12:18 AM

Be sure to hang on to the old loom and reassemble as much as you can after you've labelled everything and pulled it free. 

I just hung mine up on a couple hooks in the garage.  Then with the new fresh colors on the new loom and a decent wiring

diagram the old loom will help verify certain connections/fuses/etc.

You may even find previous errors and save yourself time down the line.   I also recommend light jazz or classical as a mind aid.....ha!


Good luck, keep it fun ---J


#8 jaysmini1983

jaysmini1983

    Mini Mad

  • Members
  • PipPipPipPip
  • 217 posts
  • Location: bristol
  • Local Club: West Country Mini's

Posted 16 October 2019 - 11:31 AM

When i replaced most of mine, i used my iphone took pictures then editted the pic and just wrote onto the phone and resaved the image with the words on the pic. hope that makes sense. 

also if you havnt done the pot joint, just undo the top balljoint, leaver disc/drum out and cut pot joint gaiter ziptie/band and that will be enough room to remove the bearing from the pots. leaving the pots in the gearbox.No need to drain oil then until needed. 


0 user(s) are reading this topic

0 members, 0 guests, 0 anonymous users