Jump to content


Photo
- - - - -

Sonscar Sill Replacement


  • Please log in to reply
51 replies to this topic

#16 sonscar

sonscar

    Up Into Fourth

  • Members
  • PipPipPipPipPipPipPipPipPip
  • 2,720 posts
  • Location: crowle
  • Local Club: none

Posted 20 November 2019 - 01:53 PM

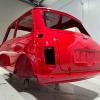
So today both sides have been fitted with new inner and outer sills.Now the difficult task faces me,my metalworking skills are passable but my bodywork skills are laughable.All my cars end up looking like the "before" shot.People have said to my face "it's not very good is it?"to which I asked "where's yours?.It's wet,dark,cold,salty.November etc.Some pics..

Attached File  002.JPG   39.76K   0 downloadsAttached File  003.JPG   50.49K   0 downloadsAttached File  005.JPG   31.67K   0 downloadsAttached File  006.JPG   34.95K   0 downloads


#17 mercenary62

mercenary62

    Speeding Along Now

  • Members
  • PipPipPipPipPip
  • 359 posts
  • Location: some where in the 70s
  • Local Club: mini clan

Posted 20 November 2019 - 07:50 PM

your doin a great job , the key is to have a go at saving another mini,never mind what other folks say ,keep at it and the pics coming 


#18 sonscar

sonscar

    Up Into Fourth

  • Members
  • PipPipPipPipPipPipPipPipPip
  • 2,720 posts
  • Location: crowle
  • Local Club: none

Posted 28 November 2019 - 04:23 PM

Sills fitted and epoxy primed I have derusted and treated the arches which were under the plastic extensions.I then got distracted so as to not do any bodywork.I am very poor at painting and the weather is not helping.I sourced and connected two electric oil filled panel radiatiors which will only be used sparingly as required.Next I knocked two holes in the garage wall,one for fresh air for the compressor fan and one for the air filter so I could relocate it outside.Fired up by this I sought more distraction and made a ghetto air cooling/drying system for my painting and breathing air.Does it work?who knows but others have done similar and seem to think so.New air fed mask and breathing filters on their way mean that soon I will have to do some bodywork.What a ramble!Steve..Attached File  002.JPG   38.21K   3 downloadsAttached File  005.JPG   69.12K   3 downloads


#19 sonscar

sonscar

    Up Into Fourth

  • Members
  • PipPipPipPipPipPipPipPipPip
  • 2,720 posts
  • Location: crowle
  • Local Club: none

Posted 06 December 2019 - 09:35 AM

Filled sanded and epoxy primed,will try to paint later today,As it is BRG clear over base I am attempting to "blow in" the repairs.As I am poor at bodywork this will be a challenge.Steve..Attached File  002.JPG   40.4K   1 downloadsAttached File  003.JPG   35.01K   0 downloadsAttached File  006.JPG   30.99K   2 downloadsAttached File  007.JPG   41.32K   3 downloads


#20 Cooperman

Cooperman

    Uncle Cooperman, Voted Mr TMF 2011

  • TMF+ Member
  • PipPipPipPipPipPipPipPipPipPipPip
  • 23,036 posts
  • Location: Cambs.
  • Local Club: MCR, HAMOC, Chelmsford M.C.

Posted 07 December 2019 - 04:08 PM

Too late for this resto, but M-Machine do an excellent sill sub-assembly. It comprises inner sill, outer sill, jacking point and a part floor pan, about 8" wide. All the welds are correct and as-original and I have found it easy to fit. If repairs are needed at either end of the sub-assembly, this part makes it easy to do.

The price makes it a very sensible way to go as it saves hours of work,


#21 sonscar

sonscar

    Up Into Fourth

  • Members
  • PipPipPipPipPipPipPipPipPip
  • 2,720 posts
  • Location: crowle
  • Local Club: none

Posted 08 December 2019 - 01:53 PM

I did consider that but I felt that my skills were not up to the task of doing it "all in one".Now I have fitted them seperately I would seriously consider the all in one solution if there were to be a next time.Thanks for the interest,I only intended it to be a repair but today I could not resist rubbing down the front seat fixings,project creep may be starting unless I can reign it in.Steve..


#22 sonscar

sonscar

    Up Into Fourth

  • Members
  • PipPipPipPipPipPipPipPipPip
  • 2,720 posts
  • Location: crowle
  • Local Club: none

Posted 10 December 2019 - 12:57 PM

Did my usually poor job of painting probably will not bother compounding/polishing as the whole car really needs a repaint.At least it is all green.The cost of doing this has been approx £300,this not including a welding gas refill and new filters for breathing mask.Dear hobby eh?Some poor pictures of the completed job.

Attached File  002.JPG   62.76K   1 downloadsAttached File  006.JPG   48.65K   1 downloadsAttached File  012.JPG   51.14K   1 downloadsAttached File  014.JPG   50.77K   0 downloads


#23 sonscar

sonscar

    Up Into Fourth

  • Members
  • PipPipPipPipPipPipPipPipPip
  • 2,720 posts
  • Location: crowle
  • Local Club: none

Posted 13 December 2019 - 10:31 AM

Time to reassemble,surprise.The seams behind the finishers are rusty.

Attached File  007.JPG   21.11K   0 downloadsAttached File  009.JPG   30.47K   2 downloadsAttached File  010.JPG   32.59K   0 downloads


#24 sonikk4

sonikk4

    Twisted Paint Polisher!!!

  • Admin
  • PipPipPipPipPipPipPipPipPipPipPip
  • 15,885 posts
  • Name: Neil
  • Location: Oxfordshire

Posted 13 December 2019 - 11:20 AM

Finishers are a pain due to the fact very few people put any sort of protection inside them. Also when the clips are fitted to the seams a lot of the time nothing is put on them to add a level of protection.


Best thing to do is check the inside of the finishers for corrosion. IF its light then you can clean it up, treat it, and then paint. IF however they are bad then buy some replacements. Before you paint any replacements you need to check them for fit. You made need to tweak them around.


Now with that done thoroughly paint on the inside. Now before you fit them add a layer of Waxoyl or similar along the whole length apart from the very top 1/2". You need this clean to add a small amount of sealant to help prevent water ingress.


#25 Bobbins

Bobbins

    One Carb Or Two?

  • Members
  • PipPipPipPipPipPipPip
  • 1,344 posts
  • Location: Chester

Posted 13 December 2019 - 12:38 PM

Finishers are a pain due to the fact very few people put any sort of protection inside them. Also when the clips are fitted to the seams a lot of the time nothing is put on them to add a level of protection.


Best thing to do is check the inside of the finishers for corrosion. IF its light then you can clean it up, treat it, and then paint. IF however they are bad then buy some replacements. Before you paint any replacements you need to check them for fit. You made need to tweak them around.


Now with that done thoroughly paint on the inside. Now before you fit them add a layer of Waxoyl or similar along the whole length apart from the very top 1/2". You need this clean to add a small amount of sealant to help prevent water ingress.


Is the preferred method of fitment to stick to the horrible o/e clips or are there better ways such as Tigerseal or similar?


#26 sonscar

sonscar

    Up Into Fourth

  • Members
  • PipPipPipPipPipPipPipPipPip
  • 2,720 posts
  • Location: crowle
  • Local Club: none

Posted 13 December 2019 - 01:03 PM

mine were fitted with stainless steel clips,which were in very good condition.Inside the finishers looks surprisingly good and the seam has cleaned up relatively well.About the fit,the rears are good,one front is ok the other front has always wanted to spring off,now is probably the time to fix this.Steve..


#27 sonikk4

sonikk4

    Twisted Paint Polisher!!!

  • Admin
  • PipPipPipPipPipPipPipPipPipPipPip
  • 15,885 posts
  • Name: Neil
  • Location: Oxfordshire

Posted 13 December 2019 - 01:23 PM


Finishers are a pain due to the fact very few people put any sort of protection inside them. Also when the clips are fitted to the seams a lot of the time nothing is put on them to add a level of protection.


Best thing to do is check the inside of the finishers for corrosion. IF its light then you can clean it up, treat it, and then paint. IF however they are bad then buy some replacements. Before you paint any replacements you need to check them for fit. You made need to tweak them around.


Now with that done thoroughly paint on the inside. Now before you fit them add a layer of Waxoyl or similar along the whole length apart from the very top 1/2". You need this clean to add a small amount of sealant to help prevent water ingress.


Is the preferred method of fitment to stick to the horrible o/e clips or are there better ways such as Tigerseal or similar?


There is no reason why you could not use Tigerseal or similar, BUT the fit would need to be perfect otherwise unless you can keep the finisher in place it will try and spring away from the seam while the sealant hardens off enough to retain the finisher .


The O/E clips do work well but like i mentioned you need to add some extra protection to prevent the onset of corrosion.


#28 sonscar

sonscar

    Up Into Fourth

  • Members
  • PipPipPipPipPipPipPipPipPip
  • 2,720 posts
  • Location: crowle
  • Local Club: none

Posted 14 December 2019 - 03:23 PM

Memory is a funny thing especially as I am getting older.Although not wanting to restore this car I find it difficult to refix things that are faulty but relatively easily(and cheaply) improved.The drivers seat is torn and has been for some while.As it was out I decided to attempt a repair,it was soon obvious that someone had been here before as the clips had been fitted in more than one place.When the cover was off I recognised the  scabby bit of carpet on top of the springs,it matched the carpet in my MGB;I was the previous visitor but I had no recollection.Bit of sewing later and seat refitted.It took several attempts to fit the seatbelts as I thought I would remember how they went but was sadly disapointed.

Attached File  003.JPG   75.69K   0 downloadsAttached File  004.JPG   71.44K   0 downloadsAttached File  007.JPG   50.21K   0 downloads

thanks for looking.Steve..


#29 sonscar

sonscar

    Up Into Fourth

  • Members
  • PipPipPipPipPipPipPipPipPip
  • 2,720 posts
  • Location: crowle
  • Local Club: none

Posted 03 January 2020 - 09:05 AM

Project creep had ocurred as I knew it would.The mechanics are tired and the underbonnet very scruffy.I am removing the engine and subframe to tart them up and repair the rack and CV boots and subframe mounts and radiator and and there is bound to be more.Thanks for looking,Steve..

Attached File  001.JPG   69.7K   0 downloadsAttached File  002.JPG   64.43K   0 downloadsAttached File  003.JPG   65.05K   0 downloadsAttached File  004.JPG   65.77K   0 downloadsAttached File  006.JPG   60.66K   0 downloads


#30 sonscar

sonscar

    Up Into Fourth

  • Members
  • PipPipPipPipPipPipPipPipPip
  • 2,720 posts
  • Location: crowle
  • Local Club: none

Posted 07 January 2020 - 09:40 AM

So they are out,engine first then subframe.

Attached File  001.JPG   80.62K   1 downloadsAttached File  003.JPG   96.32K   0 downloadsAttached File  007.JPG   46.17K   0 downloadsAttached File  008.JPG   71.98K   0 downloads


0 user(s) are reading this topic

0 members, 0 guests, 0 anonymous users