Jump to content


Photo

Rear Subframe Repair


  • Please log in to reply
102 replies to this topic

#1 gaspen

gaspen

    Super Mini Mad

  • TMF+ Member
  • PipPipPipPipPipPip
  • 687 posts
  • Location: Budapest

Posted 14 January 2020 - 06:29 PM

Hello


 First of all : I do read lot's of topics and post about the rear subframe. Some says that buy a new one but not aftermarket. Others say the heritage subframe are no better. Moreover they're expensive.  So I decided to take a chance on repair the original on my car because I've got nothin to lose. Please don't dissuade me :)


 I'd like to chat people who made this work earlier and willing to share they experiences.


My plan is to keep the front and rear beams, I take them to sandblasting. The longitudinally beams will be re-manufactured with the help of templates that I made to the shape of the olda ones.


And here is what I have :


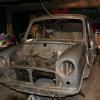
A jig which holds the subframe at the four mounting places


Attached File  sf1.jpg   78.6K   13 downloads


Left side dismantled


Attached File  sf2.jpg   85.16K   12 downloads


One of the longitudinally beams


Attached File  sf3.jpg   68.82K   10 downloads


A template for the beam. It is the first prototype :) I made a more precise already


Attached File  sf4.jpg   67.41K   7 downloads


#2 I hate Brian

I hate Brian

    One Carb Or Two?

  • Members
  • PipPipPipPipPipPipPip
  • 770 posts
  • Location: nottingham

Posted 15 January 2020 - 06:52 AM

Good luck with the rebuild I'm intrigued to watch how this progresses  :D


#3 pete l

pete l

    One Carb Or Two?

  • Members
  • PipPipPipPipPipPipPip
  • 1,358 posts
  • Location: East of France

Posted 15 January 2020 - 09:33 AM

Me too


#4 Homersimpson

Homersimpson

    One Carb Or Two?

  • Members
  • PipPipPipPipPipPipPip
  • 802 posts
  • Location: Redditch

Posted 15 January 2020 - 07:11 PM

I have always wondered why we restore all other parts of a car by welding but the rear subframe always seems to just be replaced.

There were some panels for the lower bit but I haven't seen one for years.

#5 sonscar

sonscar

    Up Into Fourth

  • Members
  • PipPipPipPipPipPipPipPipPip
  • 2,721 posts
  • Location: crowle
  • Local Club: none

Posted 15 January 2020 - 07:34 PM

Over the years it has alternated between OK for Mot, not OK for Mot coupled with I suspect that mostly there is little to repair in some cases.At this time welded repairs that look as strong as original are allowed.Go for it,Steve..

#6 muzzy

muzzy

    Passed Test

  • Noobies
  • PipPip
  • 33 posts
  • Location: derbyshire,creswell.

Posted 15 January 2020 - 07:53 PM

looking forward to following this.what thickness or gauge of metal are you going to use.


#7 greenwheels

greenwheels

    Super Mini Mad

  • Members
  • PipPipPipPipPipPip
  • 672 posts
  • Location: Gloucestershire
  • Local Club: Mini Fixers

Posted 16 January 2020 - 08:28 AM

It would be good if you could publish here the templates you have gone to some trouble to create accurately.


#8 gaspen

gaspen

    Super Mini Mad

  • TMF+ Member
  • PipPipPipPipPipPip
  • 687 posts
  • Location: Budapest

Posted 16 January 2020 - 08:32 AM

Thanks for your support ?

I'm going to use 1.5mm sheet metal. It is the thickness of the removed panels.

#9 gaspen

gaspen

    Super Mini Mad

  • TMF+ Member
  • PipPipPipPipPipPip
  • 687 posts
  • Location: Budapest

Posted 16 January 2020 - 04:57 PM


It would be good if you could publish here the templates you have gone to some trouble to create accurately.


The templates for the long-ribs made from plywood. Edges are rounded with a router, allowing the metal to bend nicely. I made only two : one for the outer and one for the inner rib. Now I am satisfied with them, I'll see how they fit int the frame.


Left or right depends on which direction I willl hammering the sheet. 


Attached File  sf5.jpg   45.21K   2 downloads


One of the few "problems" I will facing the conical parts of the rib which support the rubber-cone plate. On one hand those aren't uniform. The outer is "deeper" because the cone plate is offset towards the wheel. On the other hand I made the templates for using them creating both sides. So I did not formed the cone shaped cavity. Maybe I'll make two templates for that cones, and I'll form after the outer edges are finished.


Attached File  sf6.jpg   49.99K   4 downloads


Here you can see the offset : 


Attached File  sf10.png   172.21K   3 downloads


#10 Norway Thomas

Norway Thomas

    Learner Driver

  • Just Joined
  • PipPip
  • 18 posts
  • Location: Fiskarstrand
  • Local Club: Norsk Mini Cooper Club.

Posted 16 January 2020 - 06:45 PM

This all looks pretty impressive and I think you will suceed with flying colours.

A smart idea to make a jig before you start and then those templates...

Well done if you don't mind me saying.


#11 Magneto

Magneto

    One Carb Or Two?

  • Members
  • PipPipPipPipPipPipPip
  • 889 posts
  • Location: Kansas City, USA
  • Local Club: KC MINI Club

Posted 16 January 2020 - 07:29 PM

Those peices don't look too bad in the pics, maybe just replace/repair the bad spots instead ot trying to makle the whole plate?


#12 MacGyver

MacGyver

    One Carb Or Two?

  • TMF+ Member
  • PipPipPipPipPipPipPip
  • 1,027 posts
  • Location: Fribourg

Posted 16 January 2020 - 07:37 PM

You could make a second outside panel to hold the flat bit, have the cut out on one and the dent on the other. Start by the dent so it can pull metal in, then the edges. Maybe let the edges be a little bit too big to allow the metal to 'shrink' as you make the dent in the middle...

I'm contemplating something similar, but I'm modifying the front and rear beams to allow for a custom exhaust system.
Good luck!

Ben

Edited by MacGyver, 16 January 2020 - 07:38 PM.


#13 gaspen

gaspen

    Super Mini Mad

  • TMF+ Member
  • PipPipPipPipPipPip
  • 687 posts
  • Location: Budapest

Posted 16 January 2020 - 08:00 PM

You could make a second outside panel to hold the flat bit, have the cut out on one and the dent on the other. Start by the dent so it can pull metal in, then the edges. Maybe let the edges be a little bit too big to allow the metal to 'shrink' as you make the dent in the middle...

I'm contemplating something similar, but I'm modifying the front and rear beams to allow for a custom exhaust system.
Good luck!

Ben


Could you post some pictures about your subframe ? 


#14 gaspen

gaspen

    Super Mini Mad

  • TMF+ Member
  • PipPipPipPipPipPip
  • 687 posts
  • Location: Budapest

Posted 16 January 2020 - 08:03 PM

Those peices don't look too bad in the pics, maybe just replace/repair the bad spots instead ot trying to makle the whole plate?


You can see all the pictures in my gallery. There is rust almost everywhere. It does not make sense to "patch" that holes.


https://photos.app.g...uF8o6md6VgY5Fo7


Edited by gaspen, 16 January 2020 - 08:04 PM.


#15 MacGyver

MacGyver

    One Carb Or Two?

  • TMF+ Member
  • PipPipPipPipPipPipPip
  • 1,027 posts
  • Location: Fribourg

Posted 17 January 2020 - 06:22 AM


You could make a second outside panel to hold the flat bit, have the cut out on one and the dent on the other. Start by the dent so it can pull metal in, then the edges. Maybe let the edges be a little bit too big to allow the metal to 'shrink' as you make the dent in the middle...

I'm contemplating something similar, but I'm modifying the front and rear beams to allow for a custom exhaust system.
Good luck!

Ben

Could you post some pictures about your subframe ?
Sure, as soon as I get started on it, it's still only drawings at the moment as I'm in the middle of my end of study's 'mémoire'.
Oh,and you could add the 'sportspack' reinforcements while you're at it, can't hurt. ?
Like your jig by the way. ?


Edit: longwordoutofmany...

Edited by MacGyver, 17 January 2020 - 06:23 AM.


1 user(s) are reading this topic

0 members, 1 guests, 0 anonymous users