Jump to content


Photo
- - - - -

Installing A T7 Design Heater: How I Did It


  • Please log in to reply
25 replies to this topic

#1 Benoit_Dupont

Benoit_Dupont

    Mini Mad

  • Members
  • PipPipPipPip
  • 291 posts
  • Location: Rhone-Alpe

Posted 23 March 2020 - 09:57 AM

Allright, so today story is how I installed a T7 heater unit.

the main driver to install this unit is the following:

- my old heater matrix gave up and I had to replace it.

- I wanted to get rid of the heater pull valve - that will eventually explode in the engine bay, as you know.


so I though it was a good idea to modify a few things along the way. but of course, I wanted it to be as clean as possible. because that's the way I like it. so here it is.


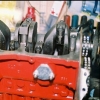
this is what a T7 design heater looks like. you can buy it from the manufacture or from your usual part dealer, up to you.


Attached File  IMG_20200215_135640_939-W600.jpg   63.47K   9 downloads


the unit is quite compact and it's really a simple design: it weights about 1.1kg. it has a fan. and a heater matrix.

it has 2 demisting ports compatible with the existing ducts

and 2 vents for in-car warm air supply.


and that's it.  :proud:


compared to the original design, here are the two units side by side:


Attached File  IMG_20200215_145824_647-W600.jpg   51.76K   10 downloads


it's a nice little unit, it's compact, well made and does not draw much current BUT make no mistake: it's not automotive grade and it will not last as long as the original one (that lasted 30y or so). so know that before you switch: it's a mod, and it will be less durable than the original, as it is most of the time.


it does not share any of the mounting points, so you have to find a way to mount it. often this is done under the dash. 


that said: because I have a later model, the hot water hose comes from 2 oval grommet holes on the bulkhead. so it's not that easy to avoid massive stress on the water hose.


so, to allow some clearance and to make some rooms for the cables, I've made some brackets (of course)  :lol:

Attached File  IMG_20200216_103523-W600.jpg   41.67K   8 downloads


thos brackets will allow a slight tilt of the heater unit, and allow some more room for the pipes. talking about pipe: I have bought now kevlar/rubber type of hose: it's good but not very flexible. I should have tried silicon, so if you plan to install one unit, think about it.


the brackets will go like this on the top plate and the rails will be fixed under the dash:


Attached File  IMG_20200216_110414_660-W600.jpg   59.99K   5 downloads


the plan is to mount the rail first, and then mount the unit under it. that what I can dismount the unit simply when/if I have to operate on it without having to mess with the dashboard.


I then painted the rails and while I was at it, I thought it would be a good idea to add some velcro loop for cable management along the bulkhead. I still had some military-grade velcro from another project in the past. it's super strong.


Attached File  IMG_20200222_160634-W600.jpg   42.02K   7 downloads


Also, what I think is a good tip, I hope: as you can see on the first picture, the fan cable is dandling at the bottom of the unit. which means it would be dandling somewhere in the cockpit, as if there were not enough loose wire in a mini interior as it is.  :D


so I modified it by removing a screw and let the wire come through one of the hope, so now the wire is invisible once the unit mounted:


Attached File  IMG_20200222_160955_108-W600.jpg   62.62K   4 downloads


speaking of electrical: you still need a switch to activate the fan. As I removed the valve pull, I was left with an empty hole there, so I ordered a pull-switch and installed it in place:


Attached File  IMG_20200215_142415-W600.jpg   34.8K   6 downloads


the switch is connected in-lieu of the original switch on the wiring loop. and I have added a little fuse there too, for good measure, because you know... british wiring loom and all...  ;D


once installed, it looks like this:


Attached File  IMG_20200216_172734_152-W600.jpg   42.17K   7 downloads


several things to see here: it's not the original switch plate: I had to increase the diameter of the hole for the switch and I don't want to mess with the original plate. I kept it safe for measuring to make parts I will talk to you about later.  :proud:


so this switch plate is the crap remanufactured switch plate I bought a while ago, only completely sanded, adjusted and repainted, because those companes can not even manage that well. anyway, it will do so far.


another tip: you may want to mount the unit with some silent block. for that I use simply M6 grommet like that:


Attached File  IMG_20200222_163448_516-W600.jpg   53.93K   9 downloads


they will prevent vibration to go through. and the unit does not rely on the metal plates for ground so it does not matter too much.


that's it for today! in the next few days, I'll share more on the actual installation and the pipe to the rest of the engine.


cheers and be safe in those difficult times. 


#2 no66

no66

    Mini Mad

  • Members
  • PipPipPipPip
  • 149 posts
  • Location: Saetre, Norway
  • Local Club: NMCC (Norsk Mini Cooper Club)

Posted 23 March 2020 - 01:43 PM

Nice. been looking at these heaters. 

As you have removed the valve, how do you adjust the heat or is in "on" all the time? 

What did you do with the fresh air intake on the car? 

Thanks


#3 sonscar

sonscar

    Up Into Fourth

  • Members
  • PipPipPipPipPipPipPipPipPip
  • 2,724 posts
  • Location: crowle
  • Local Club: none

Posted 23 March 2020 - 02:04 PM

I considered one of these for one of my other cars.No provision for fresh air feed killed it at the first hurdle.A supplier told me they were aimed at the kitcar market who need a heater/demister to pass Biva,the presence was checked the efficiency was not.Looking forward to the rest of your install.Steve..

#4 Benoit_Dupont

Benoit_Dupont

    Mini Mad

  • Members
  • PipPipPipPip
  • 291 posts
  • Location: Rhone-Alpe

Posted 23 March 2020 - 02:49 PM

Nice. been looking at these heaters. 

As you have removed the valve, how do you adjust the heat or is in "on" all the time? 

What did you do with the fresh air intake on the car? 

Thanks


All very good questions!


right now it is on all the time:

I had it on anyway in summer to get some more cooling done to help managing temperature   ;D

but I'm considering installing a permanent valve for summer/winter setting.


the fresh air intake is open, but I think I'll fit one of these

Attached File  IMG_20190813_153724-W600.jpg   52.45K   7 downloads


I still have some left from my dash projects and I have black ones. made by Franklin Louvers Company. originally not a car part, but I think they are cool.


#5 Benoit_Dupont

Benoit_Dupont

    Mini Mad

  • Members
  • PipPipPipPip
  • 291 posts
  • Location: Rhone-Alpe

Posted 23 March 2020 - 02:51 PM

I considered one of these for one of my other cars.No provision for fresh air feed killed it at the first hurdle.A supplier told me they were aimed at the kitcar market who need a heater/demister to pass Biva,the presence was checked the efficiency was not.Looking forward to the rest of your install.Steve..


from efficiency standpoint well: it takes air from the car, so it might demist less. but on the other hand, the fan works a bit better than the old one. so I get some more air on the windshield. We will see.


#6 IronmanG

IronmanG

    One Carb Or Two?

  • Members
  • PipPipPipPipPipPipPip
  • 1,135 posts
  • Location: Crawley
  • Local Club: Box hill. Lsmoc member

Posted 23 March 2020 - 06:14 PM

T7 is the smallest right? If you went up 1 size is that still smaller than the original.
Then by putting less stress on the new T...(8?) As it has to do less work it would last longer?
Or are you saying that as it's not an everyday car that it should still last 30 years?
I have been considering this for a while once my car is corona free

#7 MacGyver

MacGyver

    One Carb Or Two?

  • TMF+ Member
  • PipPipPipPipPipPipPip
  • 1,027 posts
  • Location: Fribourg

Posted 23 March 2020 - 06:50 PM


I considered one of these for one of my other cars.No provision for fresh air feed killed it at the first hurdle.A supplier told me they were aimed at the kitcar market who need a heater/demister to pass Biva,the presence was checked the efficiency was not.Looking forward to the rest of your install.Steve..


from efficiency standpoint well: it takes air from the car, so it might demist less. but on the other hand, the fan works a bit better than the old one. so I get some more air on the windshield. We will see.
Would be rather easy to build a "scoop" to connect fresh air from the outside duct, even a smaller pipe.
For the on/off switch you could always use a later type in-line valve (mpi) or similar and have a sort of handle/switch hidden under the dash.

#8 Benoit_Dupont

Benoit_Dupont

    Mini Mad

  • Members
  • PipPipPipPip
  • 291 posts
  • Location: Rhone-Alpe

Posted 24 March 2020 - 08:36 AM

T7 is the smallest right? If you went up 1 size is that still smaller than the original.
Then by putting less stress on the new T...(8?) As it has to do less work it would last longer?
Or are you saying that as it's not an everyday car that it should still last 30 years?
I have been considering this for a while once my car is corona free


I really am not sure. All I know is that the fan is not automotive grade by one bit. which is ok for me. to be honest, 99% of the parts you buy those days for minis are not automotive grade. because no small manufacturer can afford to pass automotive qualification for its parts with the low volumes our minis represent. So it is to be expected. it's like taking the fan off your laptop, or your fridge, and put it in the elements (-15°C / + 60°C) and expect it to last 25 years.  ;D


that's the difference between getting an original automotive qualified part, even from back in the days, and getting an after market replacement unit. that's all


#9 Benoit_Dupont

Benoit_Dupont

    Mini Mad

  • Members
  • PipPipPipPip
  • 291 posts
  • Location: Rhone-Alpe

Posted 24 March 2020 - 08:41 AM


Would be rather easy to build a "scoop" to connect fresh air from the outside duct, even a smaller pipe.
For the on/off switch you could always use a later type in-line valve (mpi) or similar and have a sort of handle/switch hidden under the dash.


Hi Mac,


it is. but it depends a bit on your car year: the one that do not have vac assistance on the brake usually have the hose coming down the bulk-head near the passenger side from what I see. so, the logical place to put this unit is slightly offset towards the passenger and therfore yes, what you say is a good idea, I think.

mine is a 91 model and the hose go through the bulk head on the driver side (I've left hand drive) through weird oval gromets. therefore, unless I want ot run meters of water pipes, the best place for that is to place the heater unit in lieu of the normal location for the heater unit. and so, the air intake is a bit far and it would like not ideal.


So I think I'll give it a try and if the demister is not performing, then I'll go for your solution I think.


Cheers !


#10 Benoit_Dupont

Benoit_Dupont

    Mini Mad

  • Members
  • PipPipPipPip
  • 291 posts
  • Location: Rhone-Alpe

Posted 24 March 2020 - 04:11 PM

an update:


here is how the heated water comes inside the cabin on my 91' :


Attached File  IMG_20200324_164558-W600.jpg   40.78K   6 downloads


now a bit of a tip: the heater hose are 1/2'' on the T7 Design unit, which matches earlier type of minis.

But from 85'-on, the heater hose have been changed to 5/8''. 

so it means you will need an adaptor to couple both.

Notice as well that the stock grommet are oval and made for 5/8''. but I figured out that if you stick a 1/2'' grommet inside the 5/8'' grommet, you still get an good enough seal. it's not ideal. but it does the trick.


here is how it looks like on the inside:


Attached File  IMG_20200324_164648-W600.jpg   50.72K   7 downloads


sorry about the mess on the floor, I should really clean this car: the unit is bolted at the central position, it fits nicely and no dandling wires.


retaining the original position also allows to use the original demister cable with no cutting, whatsoever:

Attached File  IMG_20200324_164717-W600.jpg   34.04K   6 downloads


another tip here:


I am not sure it's the case on all cars, but on mine a large part of the wiring loom was just sitting where the heater is. so to make cable management easier I moved all steering column cables to the top-shelf, behind the dash so they do not come in the way.


Of course I broke the stop light contactor in the process, but I'm getting a new one. it just fell apart.  :proud:


Now I have to see if I can get rid of the butcher's hook on the bulkhead but I have my doubts...


let me know if you have any questions! cheers !


#11 sonscar

sonscar

    Up Into Fourth

  • Members
  • PipPipPipPipPipPipPipPipPip
  • 2,724 posts
  • Location: crowle
  • Local Club: none

Posted 24 March 2020 - 08:16 PM

Butchers hook?my RHD car has a random hook shaped thing wrapped around the heater pipe under the dash.It has never been connected to anything whilst I have had the car but is not easily removed so I left it.Do you know what it does?Steve..

#12 Algordo1100

Algordo1100

    One Carb Or Two?

  • Members
  • PipPipPipPipPipPipPip
  • 774 posts
  • Location: West Yorkshire/Sunny coast.

Posted 24 March 2020 - 10:12 PM

I've wondered before if one of these would fit in place of the original heater

https://www.ebay.co....m4383.l4275.c10

You could have air con then but unlike Japan spec, still keep the open dash shelf.

You'd need a compressor, condenser etc but I bet it wouldn't be impossible.

#13 Quinlan minor

Quinlan minor

    One Carb Or Two?

  • TMF+ Member
  • PipPipPipPipPipPipPip
  • 992 posts
  • Location: London
  • Local Club: LSMOC

Posted 24 March 2020 - 10:56 PM

I've wondered before if one of these would fit in place of the original heater

https://www.ebay.co....m4383.l4275.c10

You could have air con then but unlike Japan spec, still keep the open dash shelf.

You'd need a compressor, condenser etc but I bet it wouldn't be impossible.

You wouldn't have demist though, which could be something of a handicap.


#14 Algordo1100

Algordo1100

    One Carb Or Two?

  • Members
  • PipPipPipPipPipPipPip
  • 774 posts
  • Location: West Yorkshire/Sunny coast.

Posted 25 March 2020 - 09:18 AM


I've wondered before if one of these would fit in place of the original heater

https://www.ebay.co....m4383.l4275.c10

You could have air con then but unlike Japan spec, still keep the open dash shelf.

You'd need a compressor, condenser etc but I bet it wouldn't be impossible.

You wouldn't have demist though, which could be something of a handicap.


True. If it were just bolted under there as is.

They do a version without the directable front vents, just two outlets. I suppose you could rig something up for it to sit into. Like a custom center consol that has connections for the de-mist hoses on the sides and eyeball vents to the front.

#15 gazza82

gazza82

    Up Into Fourth

  • Members
  • PipPipPipPipPipPipPipPipPip
  • 2,917 posts
  • Location: Bucks
  • Local Club: TMF+

Posted 25 March 2020 - 09:21 AM

Check out Car Builder Solutions for other options ..


0 user(s) are reading this topic

0 members, 0 guests, 0 anonymous users