Jump to content


Photo
- - - - -

3D Printed Car Part


  • Please log in to reply
29 replies to this topic

#1 ryanlogsdon

ryanlogsdon

    Mini Mad

  • Noobies
  • PipPipPipPip
  • 108 posts
  • Location: Pasadena

Posted 26 May 2020 - 08:46 PM

Will it work? Taking all bets...


I'm converting my 1962 Morris Mini from a dynamo to an alternator, and if anyone has a good How-to for the wiring, please send me a link!!  


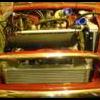
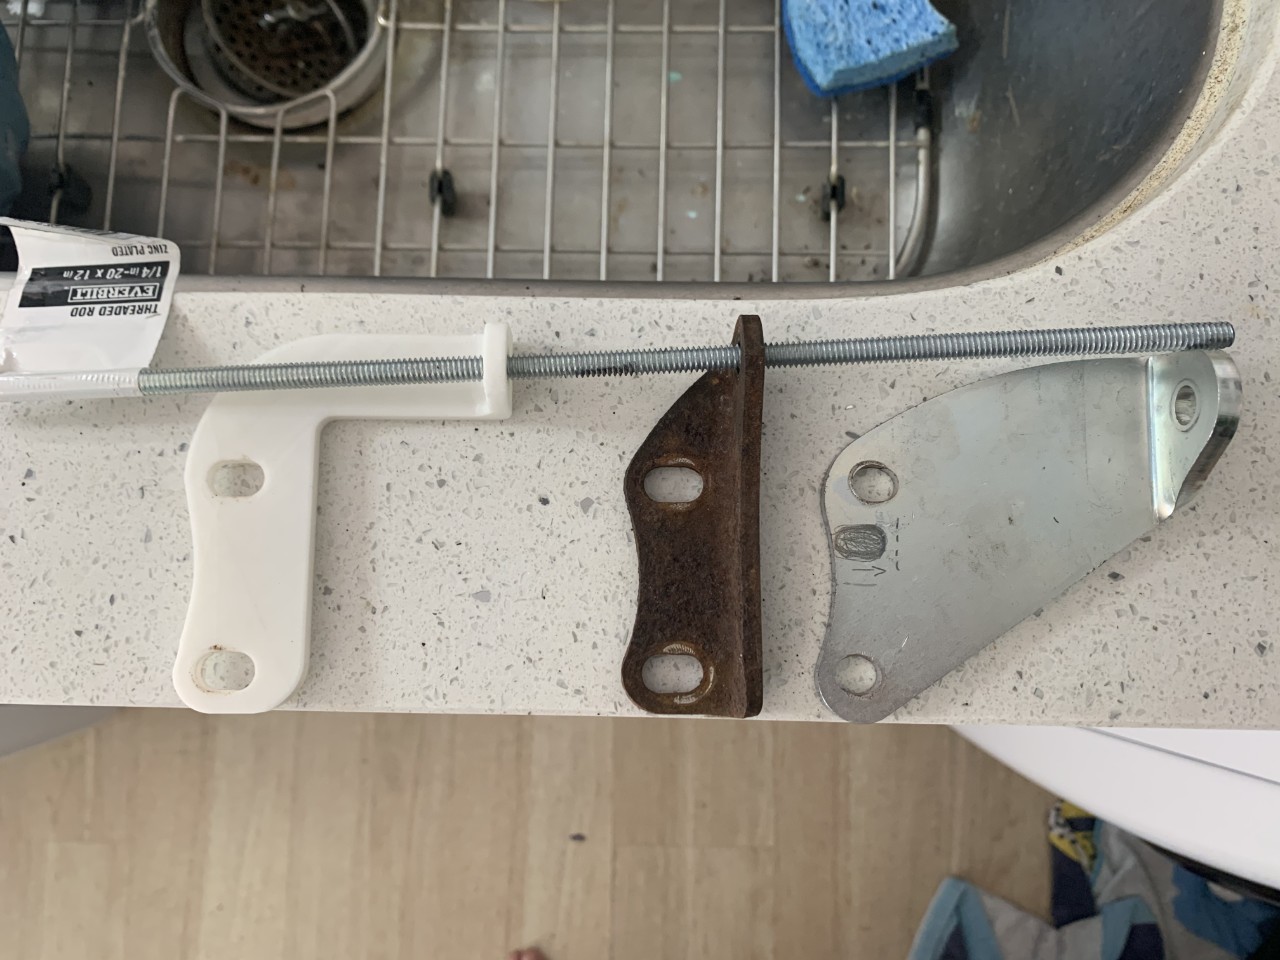
The new alternator's mounting bracket is nearly a half-inch too low, and out here in California, we're still under quarantine lock down, so my welding shop is closed.  I can't make a metal bracket for a few weeks ... maybe months.


I took some measurements, sat in front of my computer for a half an hour, and designed a new mount for my engine.  A few hours later, the print finished, and I coated it with epoxy resin to stiffen it up.  It installed per-fect-ly, but that's not really the issue at hand, is it?  :lol:


Before I attach the battery leads and turn the engine over, what does everyone think?  Personally, I'm wondering if the 3D plastic will warp inside its resin case.


Ryan


(ps: I'll build a real mounting bracket when the shop opens!)


Attached Files

  • Attached File  3d1.jpg   95.19K   3 downloads
  • Attached File  3d2.jpg   75.99K   4 downloads


#2 RustyAutoCityE

RustyAutoCityE

    Speeding Along Now

  • Members
  • PipPipPipPipPip
  • 320 posts
  • Location: Sussex

Posted 26 May 2020 - 08:50 PM

I would be afraid that it is going to shear across the 90 degree bend, or if it does survive that the engine heat would soften it.


Having said that, what material did you use?


#3 dyshipfakta

dyshipfakta

    Camshaft & Stage Two Head

  • Members
  • PipPipPipPipPipPipPipPip
  • 1,696 posts

Posted 26 May 2020 - 08:52 PM

Probably melt won’t it? It is thermo plastic. Good as a template though to make something out of metal

#4 Quinlan minor

Quinlan minor

    One Carb Or Two?

  • TMF+ Member
  • PipPipPipPipPipPipPip
  • 992 posts
  • Location: London
  • Local Club: LSMOC

Posted 26 May 2020 - 08:54 PM

It's not going to provide a very good earth!


But, seriously, I doubt if it'll be strong enough to stop all the strain being put on the front mounting and, if that fractures it's going to be expensive to fix.


#5 GraemeC

GraemeC

    Crazy About Mini's

  • TMF+ Member
  • PipPipPipPipPipPipPipPipPipPip
  • 7,314 posts
  • Location: Carnforth

Posted 26 May 2020 - 08:56 PM

It’ll probably hold up for quite a while - once it’s provided one end of the pivot ‘axle’ for adjusting the alt, and the bottom fixings are then tightened, then I dare say it is largely redundant.


when you make the steel one, I’d be tempted to make it a touch longer. The less of the sleeve there is between the alt and the bracket the better, but not to make them touch as the next alt might be slightly longer and then you’ll have no tolerance.
 

Many modern alternators only use a two point fixing


Edited by GraemeC, 26 May 2020 - 08:57 PM.


#6 ryanlogsdon

ryanlogsdon

    Mini Mad

  • Noobies
  • PipPipPipPip
  • 108 posts
  • Location: Pasadena

Posted 26 May 2020 - 09:02 PM

It's not going to provide a very good earth!


HAHA!


I built it as a template, with zero intentions of using it for anything more than making sure my measurements were good.


After I printed the part was when I found out my metal shop is cloesd.  Their website says they're open  :X


The plastic's PLA, so it's got a melting point of somewhere in the window of 130-180 C. My printer operates at 200 C.


Edited by ryanlogsdon, 26 May 2020 - 09:06 PM.


#7 ryanlogsdon

ryanlogsdon

    Mini Mad

  • Noobies
  • PipPipPipPip
  • 108 posts
  • Location: Pasadena

Posted 26 May 2020 - 09:04 PM

I dare say it is largely redundant.


Exactly what I'm thinking. 


The alternator holds in place well enough on the 2 right-side mounts.  But I want to be thorough and get that 3rd mounting point solid. 


#8 GraemeC

GraemeC

    Crazy About Mini's

  • TMF+ Member
  • PipPipPipPipPipPipPipPipPipPip
  • 7,314 posts
  • Location: Carnforth

Posted 27 May 2020 - 06:07 AM

I do wonder if it’s worth the effort of making one

http://www.minispare...|Back to search


#9 MikeRotherham

MikeRotherham

    One Carb Or Two?

  • TMF+ Member
  • PipPipPipPipPipPipPip
  • 939 posts
  • Location: Westwoodside North Lincs

Posted 27 May 2020 - 09:11 AM

Or here as it looks like op lives in the US


https://www.minimani...-The-Alternator


Edited by MikeRotherham, 27 May 2020 - 12:35 PM.


#10 nicklouse

nicklouse

    Moved Into The Garage

  • TMF+ Member
  • PipPipPipPipPipPipPipPipPipPipPip
  • 17,945 posts
  • Location: Not Yorkshire
  • Local Club: Anonyme Miniholiker

Posted 27 May 2020 - 09:49 AM

As above why print and then make a readily available part? Now if it was not available then sure.


As an aside you may not be aware that on the A+ blocks they did away with the water pump locating dowels. This lead to the bolts shearing in some cases when the alternators were not well balanced.


there is more forces going on that is first thought.


#11 ryanlogsdon

ryanlogsdon

    Mini Mad

  • Noobies
  • PipPipPipPip
  • 108 posts
  • Location: Pasadena

Posted 27 May 2020 - 03:33 PM

Thanks for the links guys!


Hopefully this picture will show why it's not working.


(How do you attach pics in replies???)


https://ryanlogsdon.com/mini/all3.jpg


#12 GraemeC

GraemeC

    Crazy About Mini's

  • TMF+ Member
  • PipPipPipPipPipPipPipPipPipPip
  • 7,314 posts
  • Location: Carnforth

Posted 27 May 2020 - 03:41 PM

Nope doesn't really.  Not sure you can expect the A series and A+ brackets to line up - as the mounting bosses on the block may be a at different heights.


I'd be looking into what's 'wrong' with yours to make it different to the 1000s others out there that the standard bracket works fine for.

If anything it looks wrong in your assembled pic as the back looks too high - have you got the lower mounting assembled correctly or is it twisting the alt?


#13 ryanlogsdon

ryanlogsdon

    Mini Mad

  • Noobies
  • PipPipPipPip
  • 108 posts
  • Location: Pasadena

Posted 27 May 2020 - 04:08 PM

I'm as surprised as you that it's not lining up.  Any tips on what to investigate?  I'm not as familiar as you guys are; I'm learning! ..but I might have 2% of the knowledge you do.


How can you tell the difference between an A and an A+ bracket?


Thanks,

Ryan


#14 ryanlogsdon

ryanlogsdon

    Mini Mad

  • Noobies
  • PipPipPipPip
  • 108 posts
  • Location: Pasadena

Posted 27 May 2020 - 04:10 PM

have you got the lower mounting assembled correctly or is it twisting the alt?


No torque, no twisting at all.


The alternator looks good when it's attached to the top-right and to the tension arm.


The top-left hole is at the exact same height as the old generator.  It matches up with the original mounting bracket in that picture I've linked.


#15 mini13

mini13

    Up Into Fourth

  • Members
  • PipPipPipPipPipPipPipPipPip
  • 3,805 posts

Posted 27 May 2020 - 04:56 PM


I dare say it is largely redundant.


Exactly what I'm thinking. 


The alternator holds in place well enough on the 2 right-side mounts.  But I want to be thorough and get that 3rd mounting point solid. 


Ive tried running just two front mounts on a light weight alternator and the waterpump casting broke there the alt bolts on... muy setup wasnt even as loaded as a std setup as it runs a toothed belt so theres little belt tension. I think the vibration did for it.


0 user(s) are reading this topic

0 members, 0 guests, 0 anonymous users