Jump to content


Photo
- - - - -

Rover Mini Cooper Mpi - 10 Day Restoration


  • Please log in to reply
55 replies to this topic

#1 nitrodave

nitrodave

    On The Road

  • Noobies
  • PipPip
  • 44 posts

Posted 24 August 2020 - 11:48 AM

Posted this on another forum, but thought you might like to see my latest project.
 
Before I get into this, I know that there are things I could have done differently and better, but this was a build that was done under very strict time constraints. If I had more time this would have been a much more thorough restoration. With that said, I am delighted with the results, the quality of the finished car and I have a lot of confidence in this lasting for many years to come.
 
I purchased this car at the beginning of June because it was offered at a price I couldn’t refuse and after 3 months of lock down I needed something to get me out the house; and my wife was equally delighted to have some time without me. 
 
I also had an empty garage, lots of annual leave to take and spare cash by not commuting into London every day. 
 
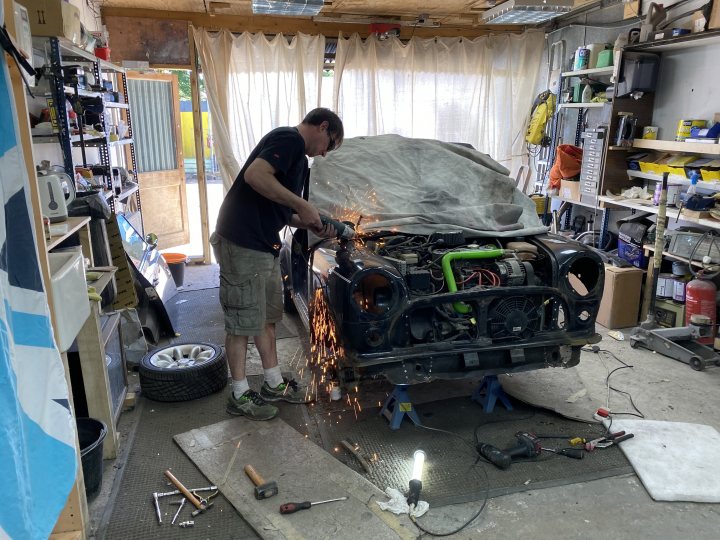
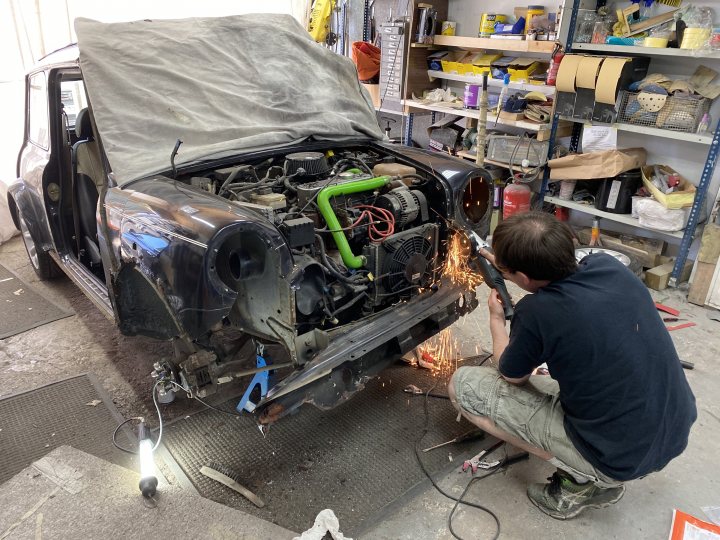
I was also only able to do this with the help of a very close friend who unfortunately was winding up his car spraying business and had just a couple of weeks left in his unit, so we were up against it with time!
 
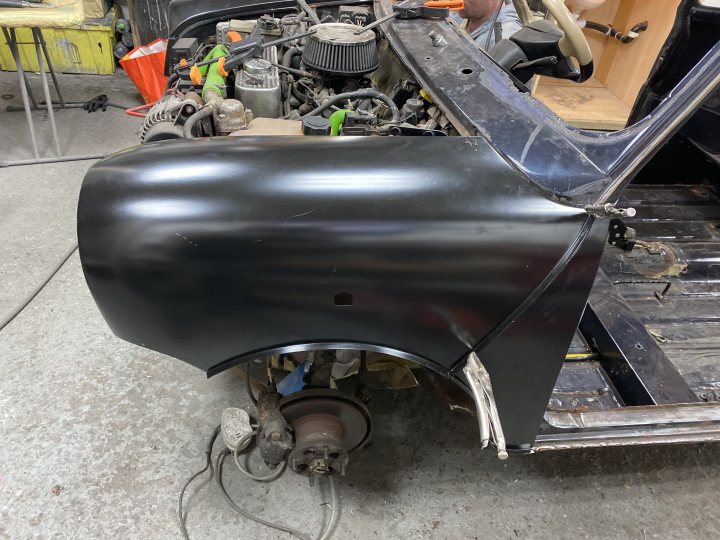
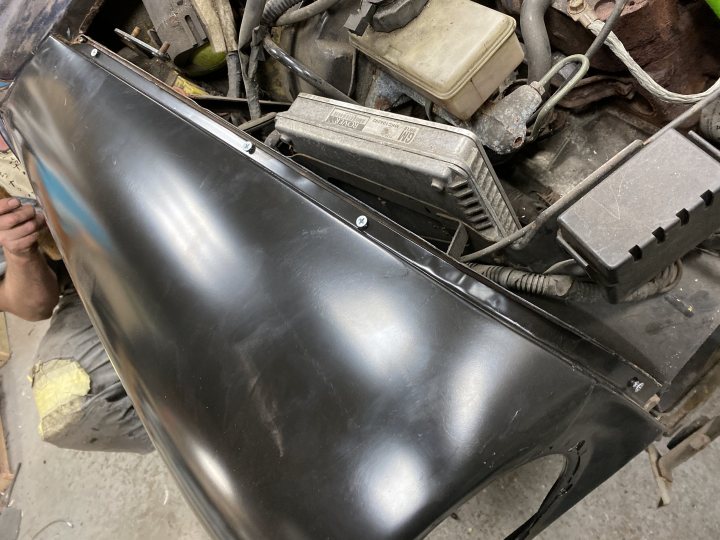
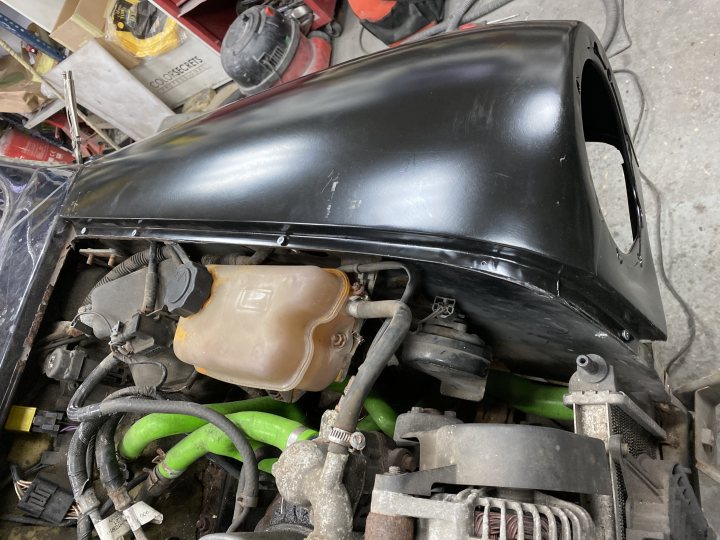
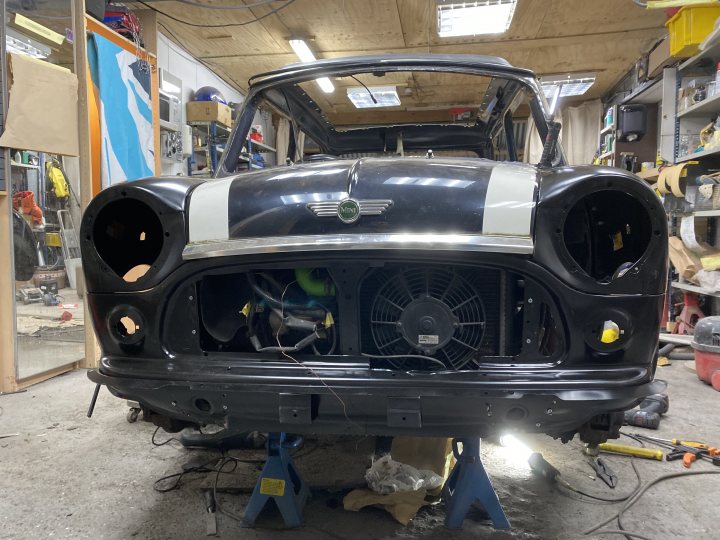
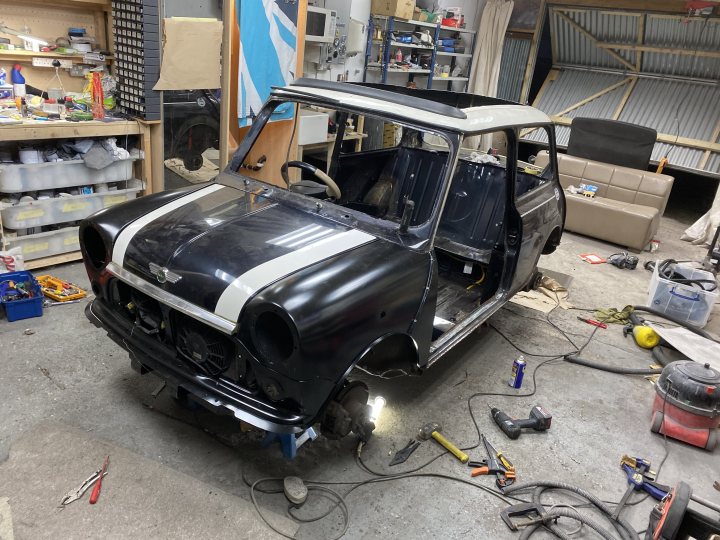
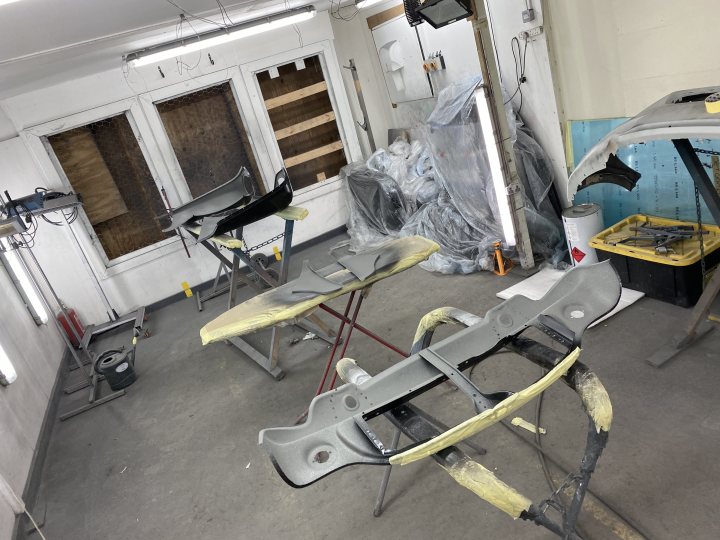
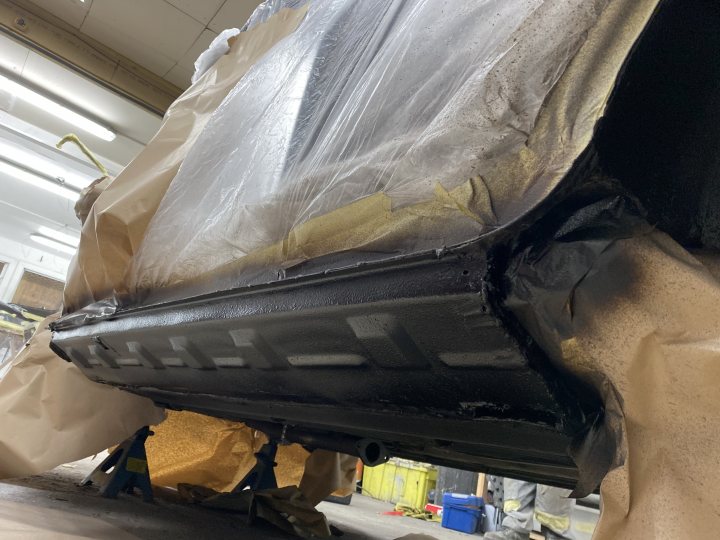
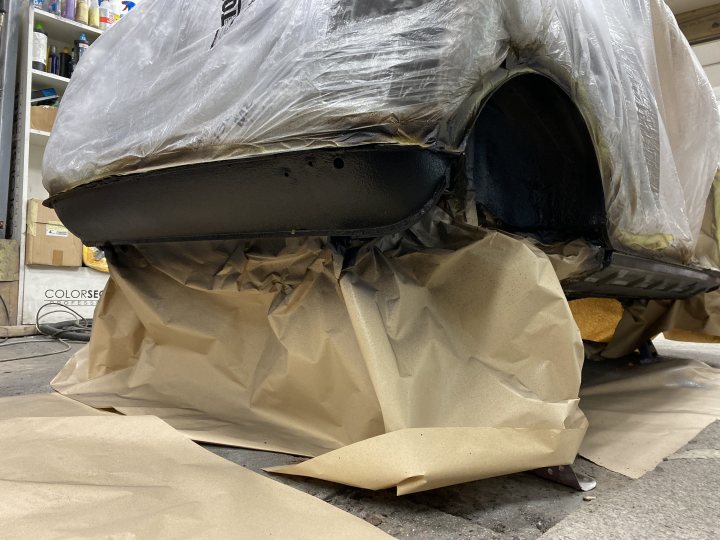
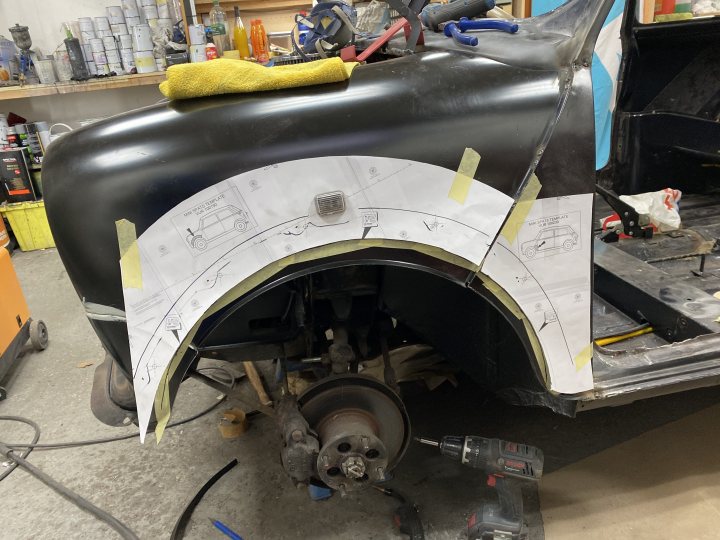
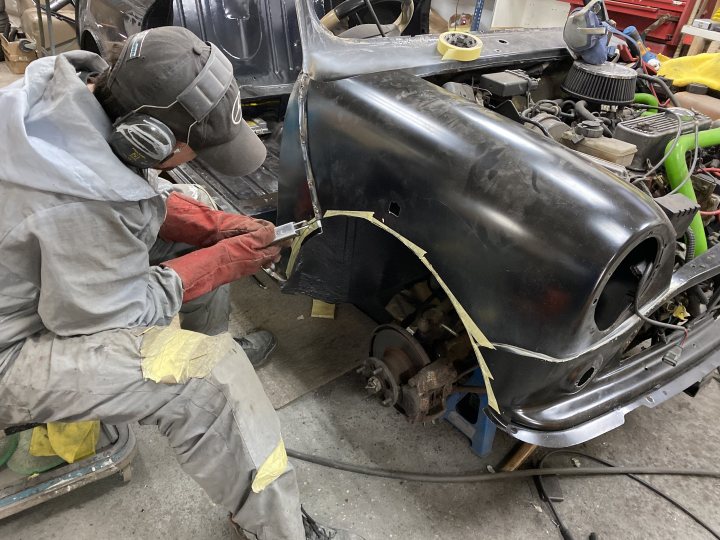
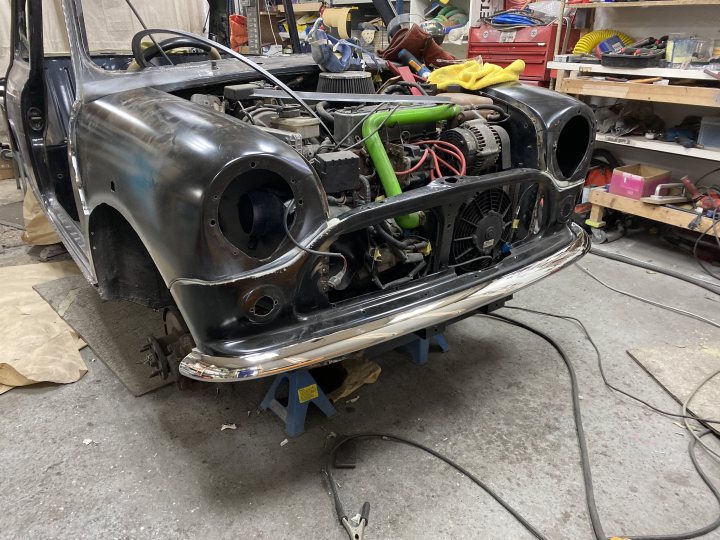
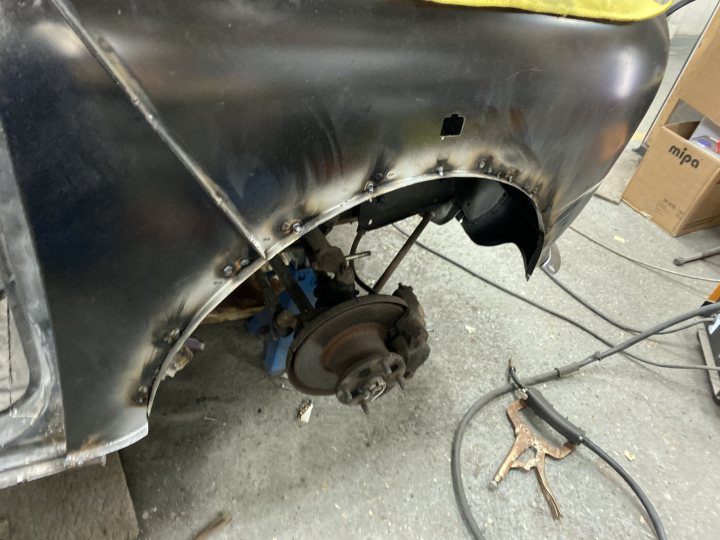
Because of the time constraints this was never going to be a nut and bolt restoration, but the plan was to get rid of any rust, repair the entire body, give it a new paint job and revert it back to as close as when it left the factory.
 
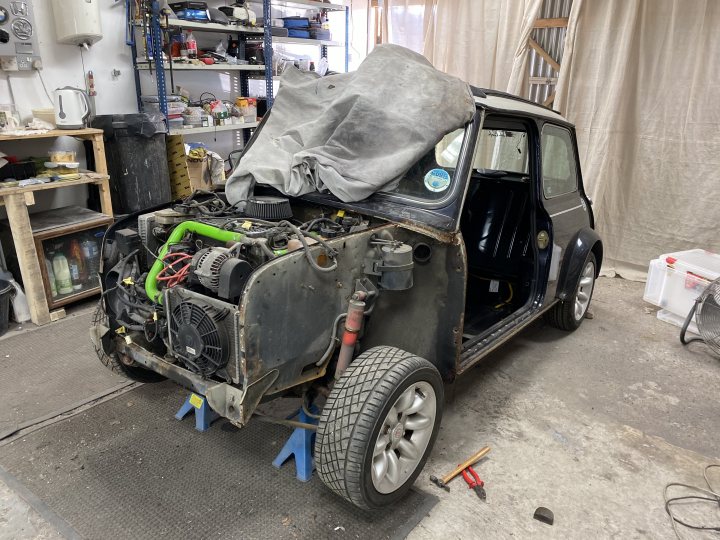
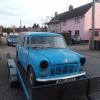
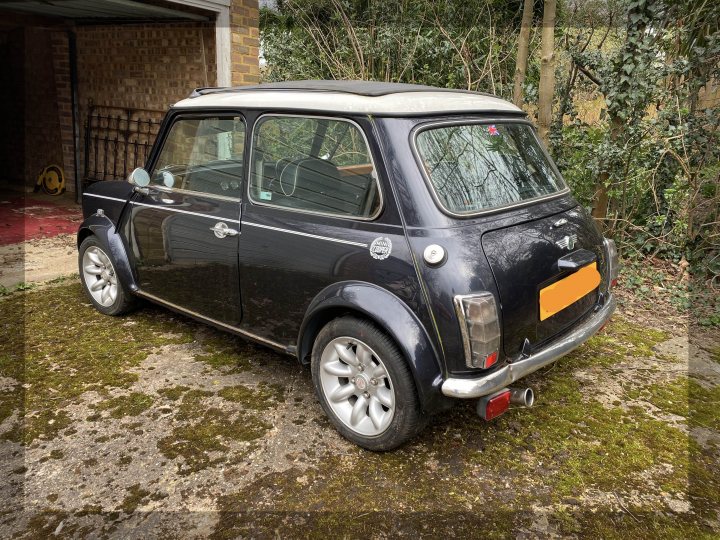
The car is a 1998 Mini Cooper MPI Sportpack and it had been sitting for 12 years before I took ownership. In that time it's done less than 200 miles! The previous owner had good intentions, but after 12 years and never doing anything with it he wanted it gone.
 
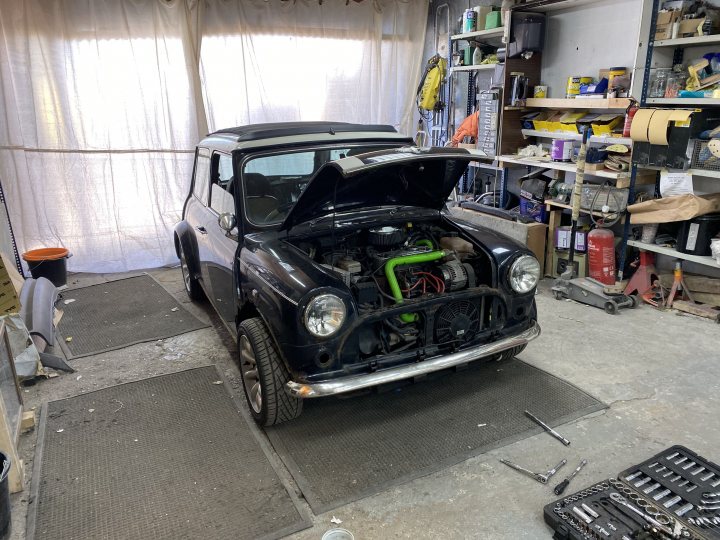
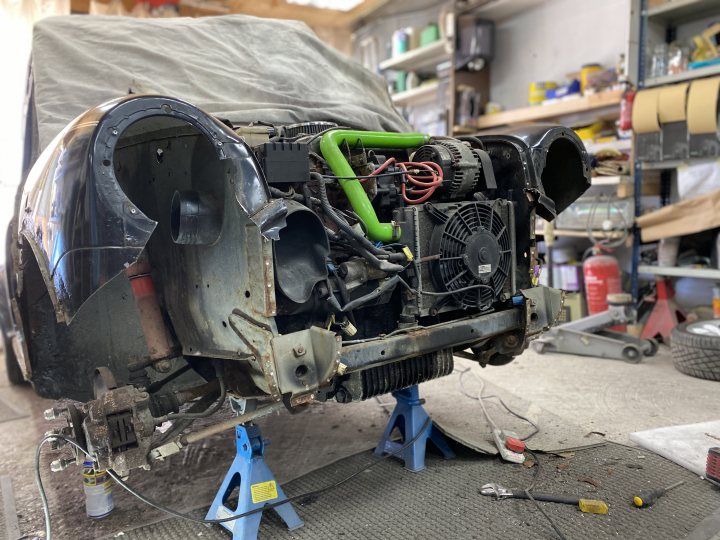
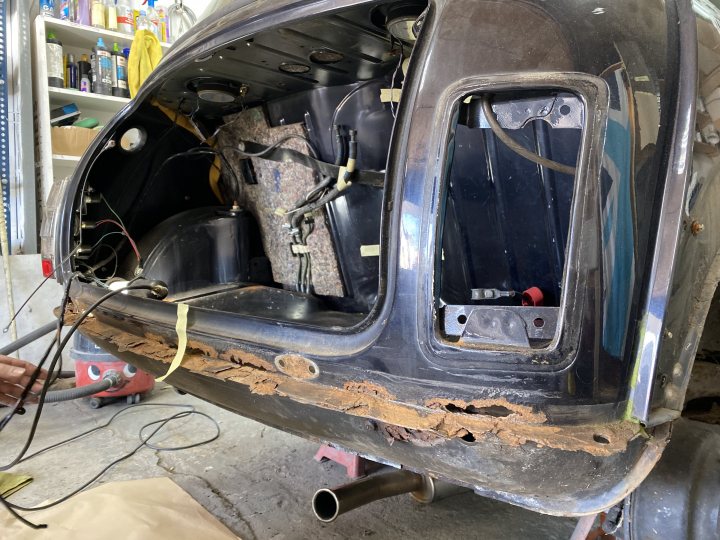
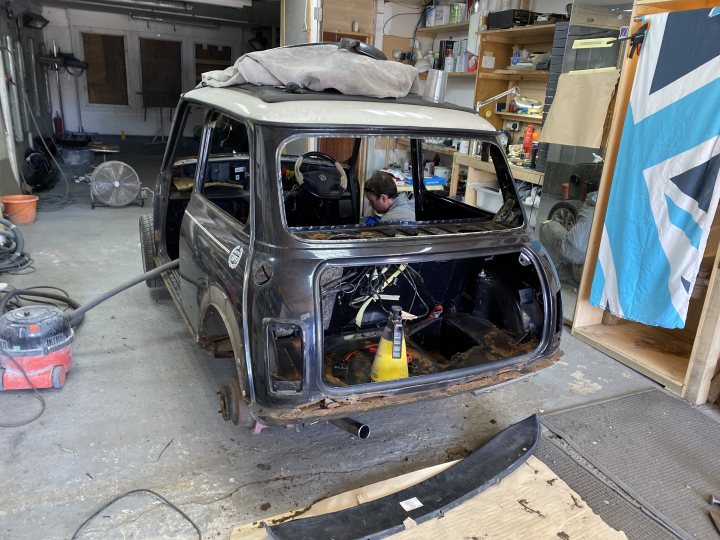
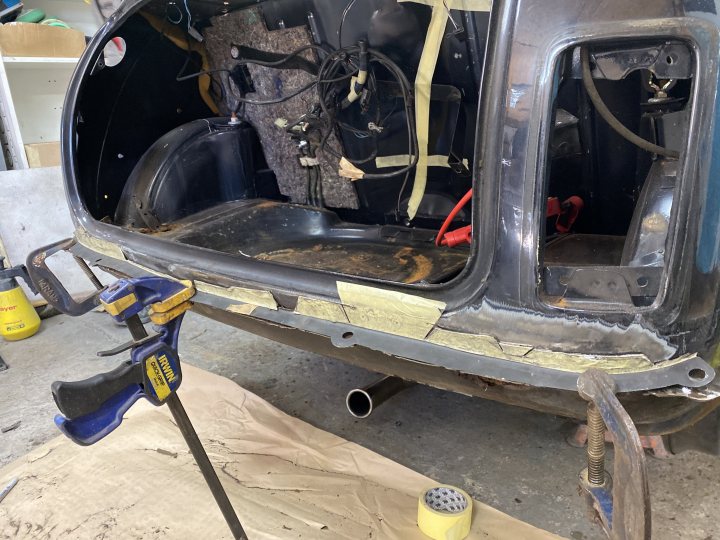
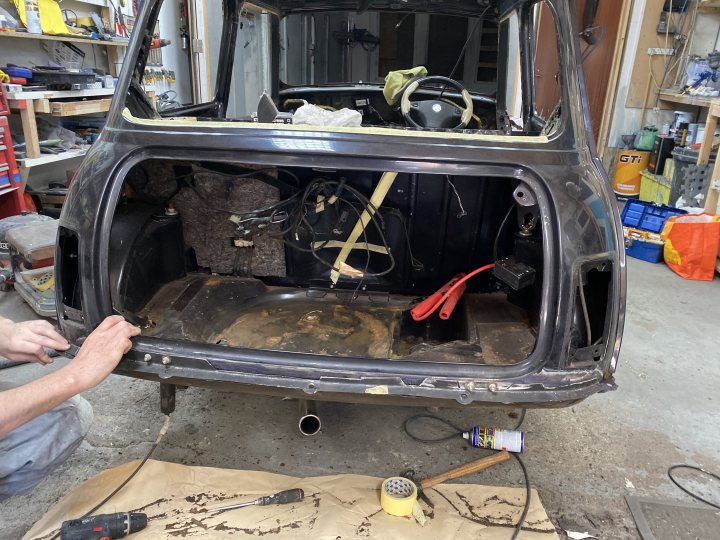
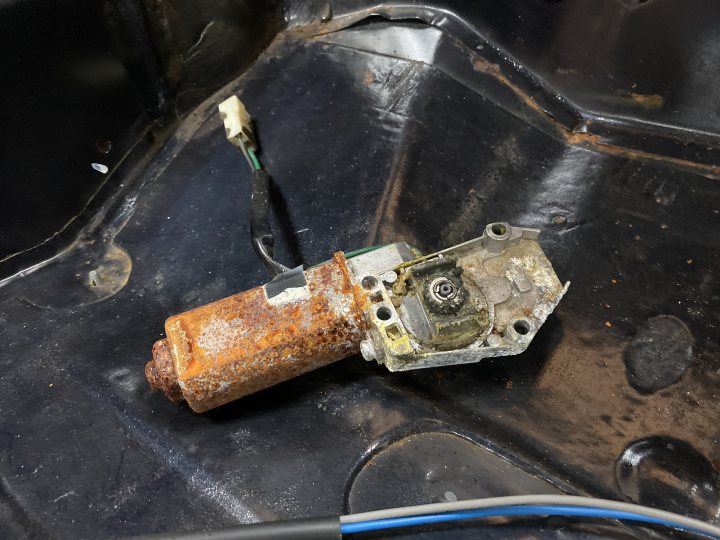
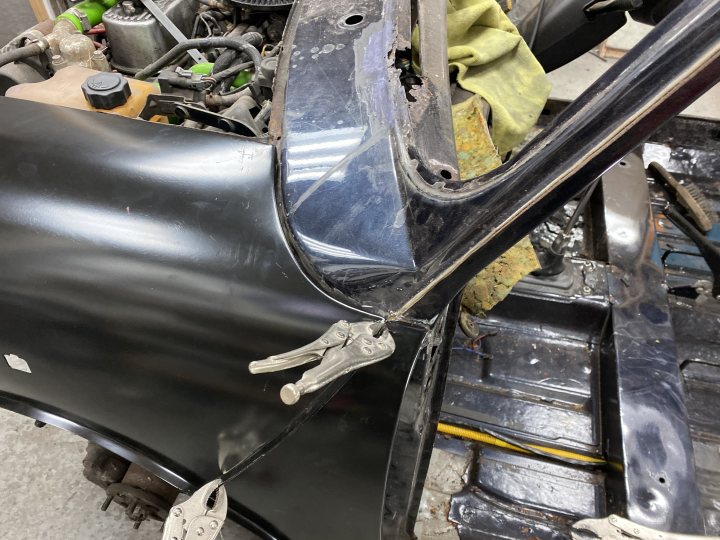
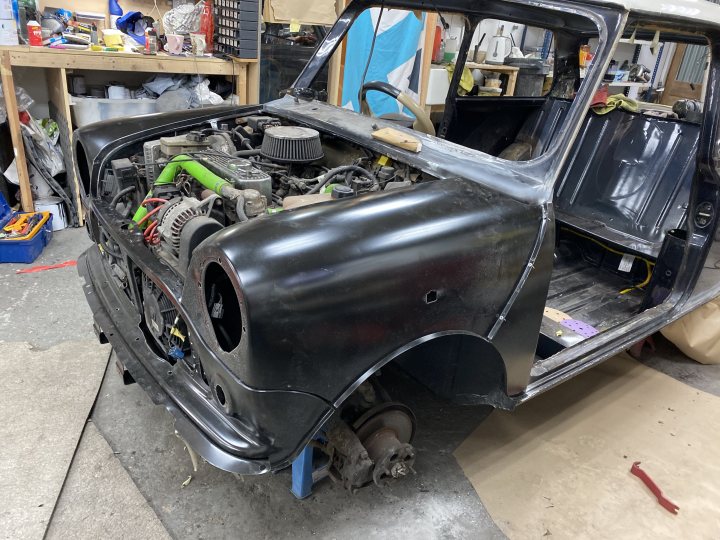
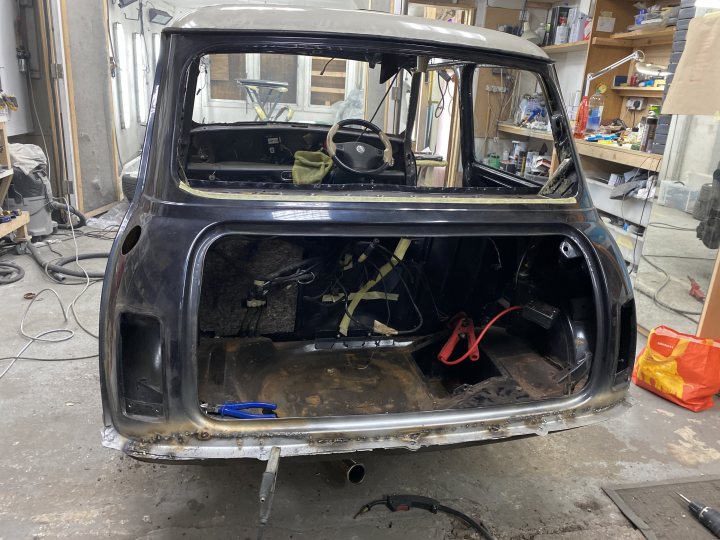
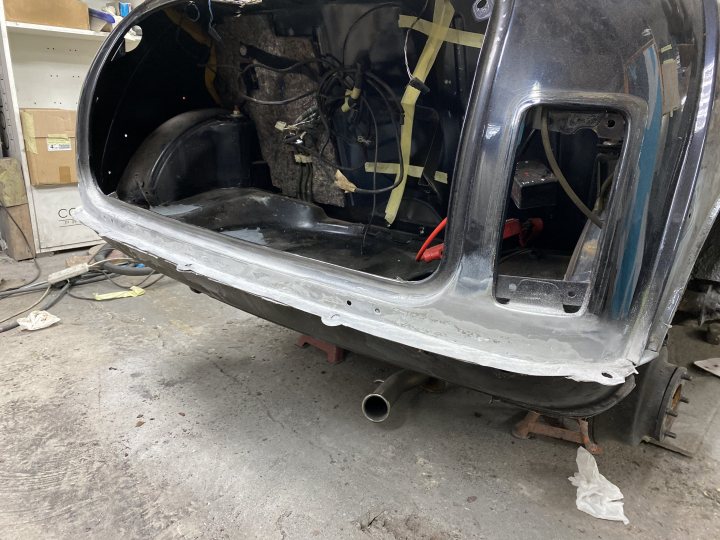
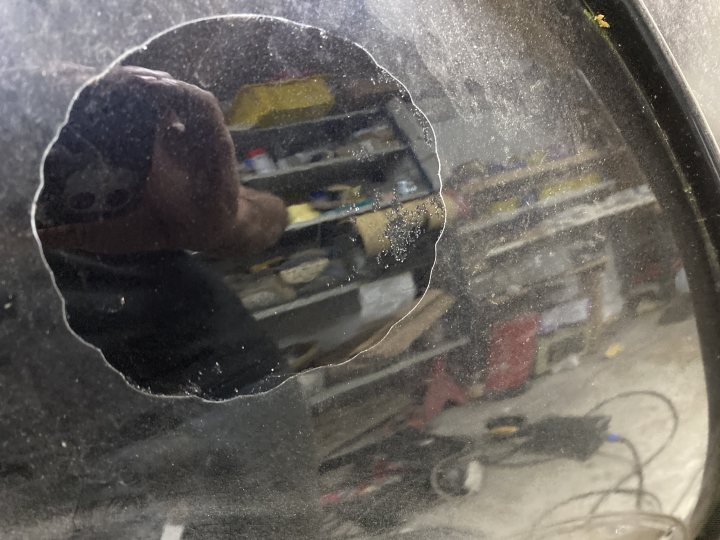
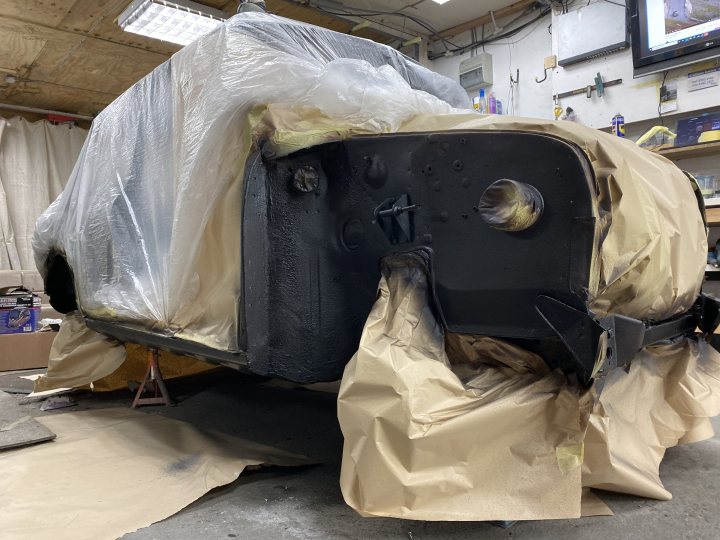
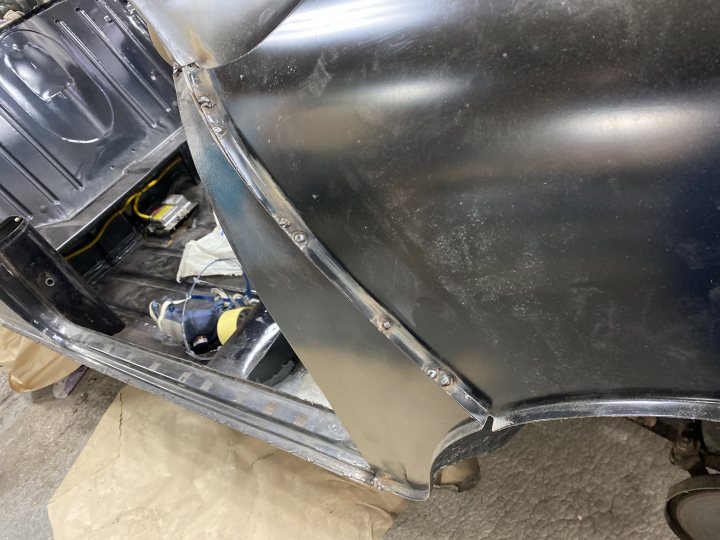
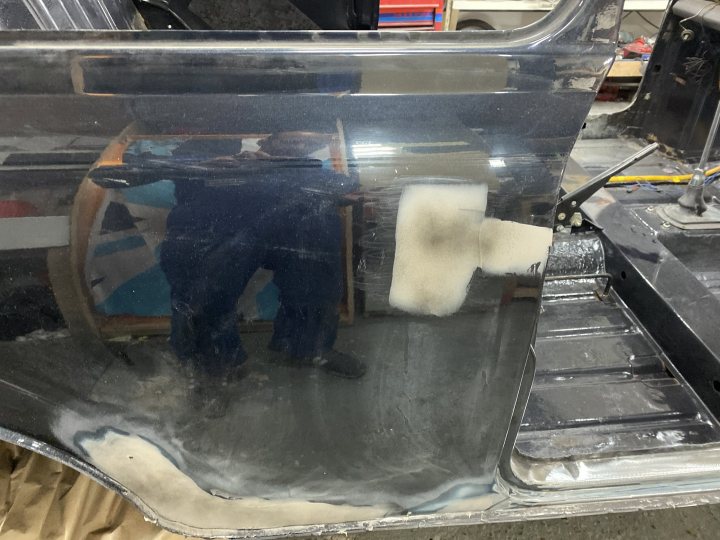
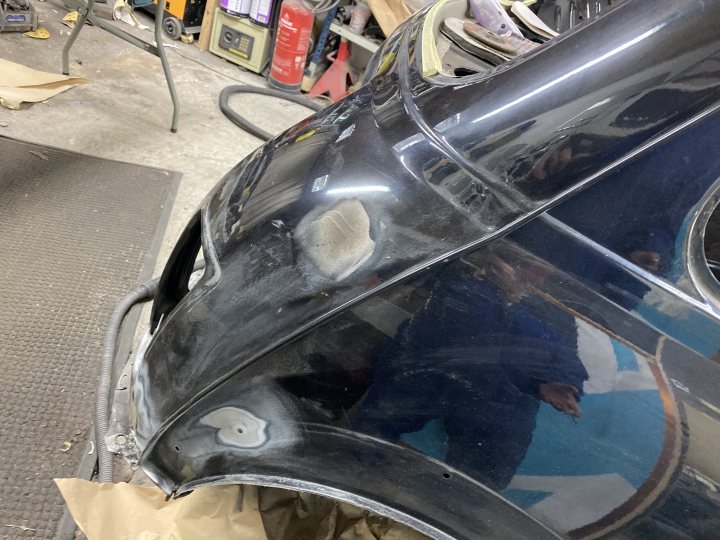
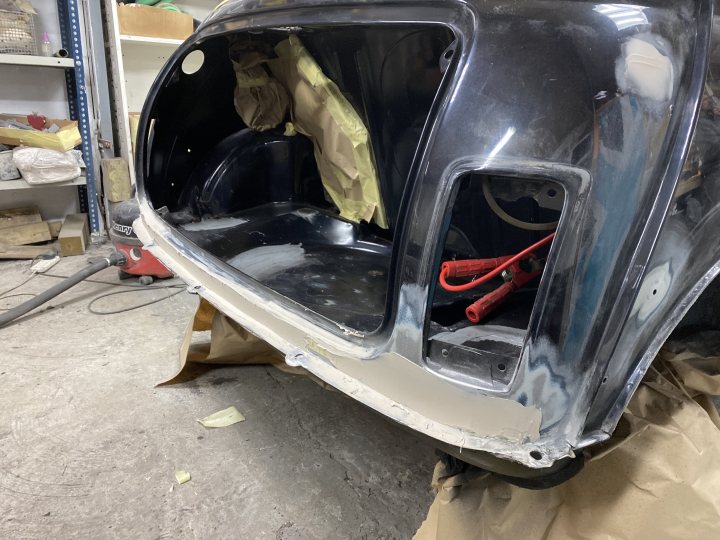
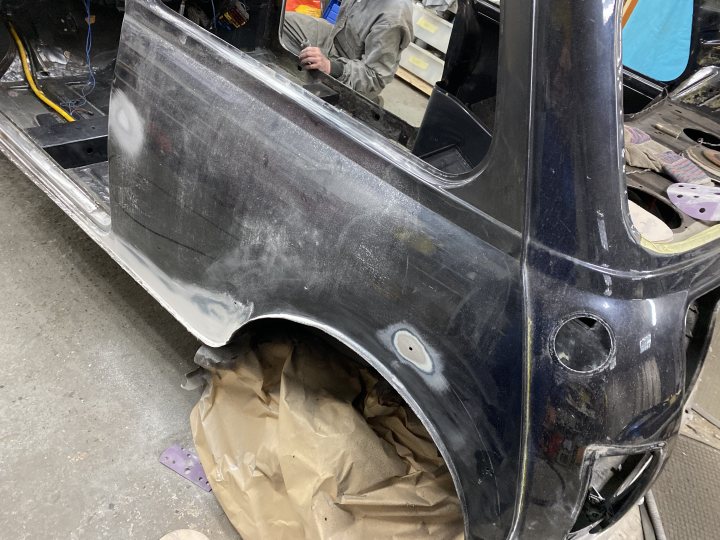
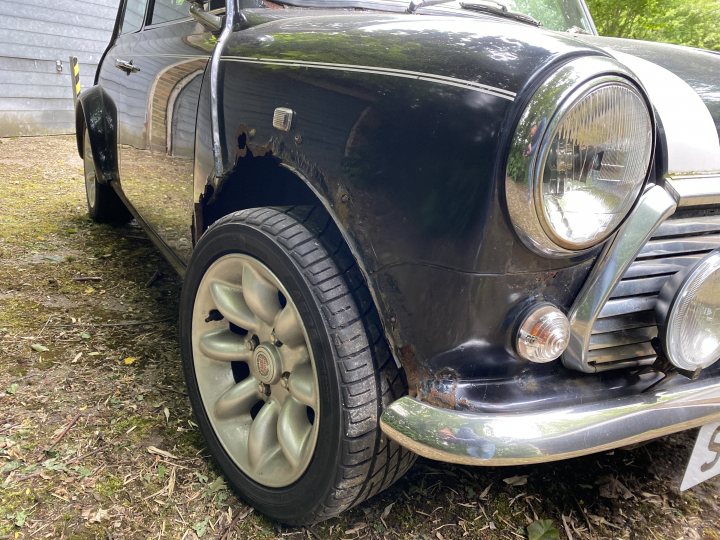
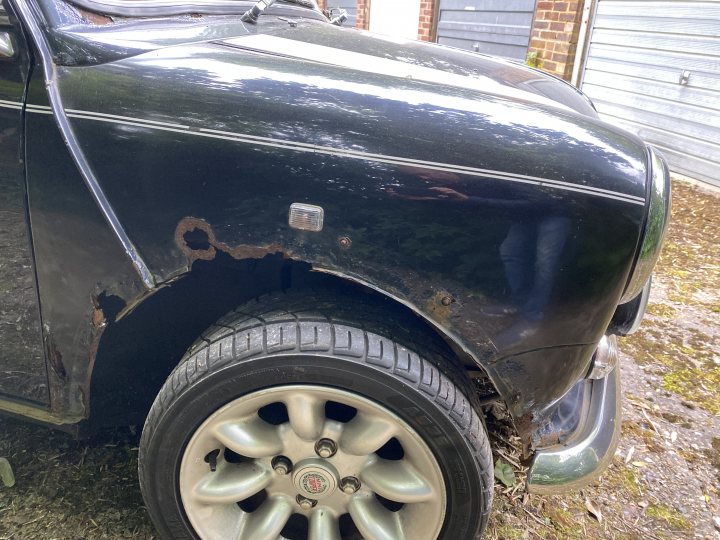
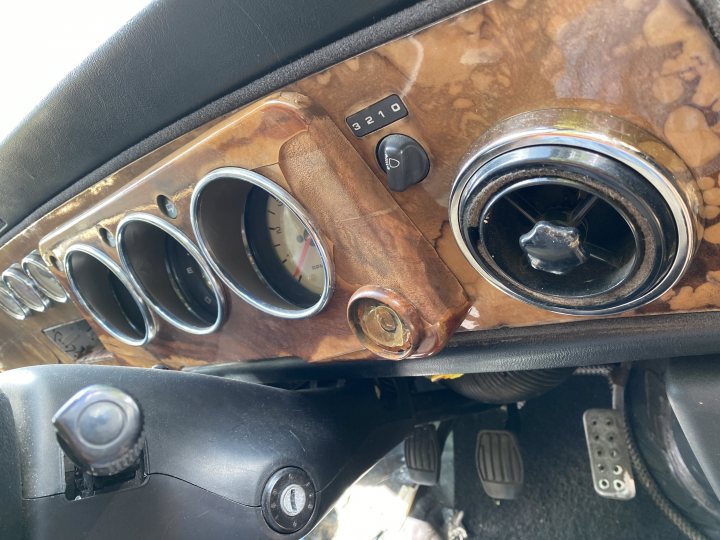
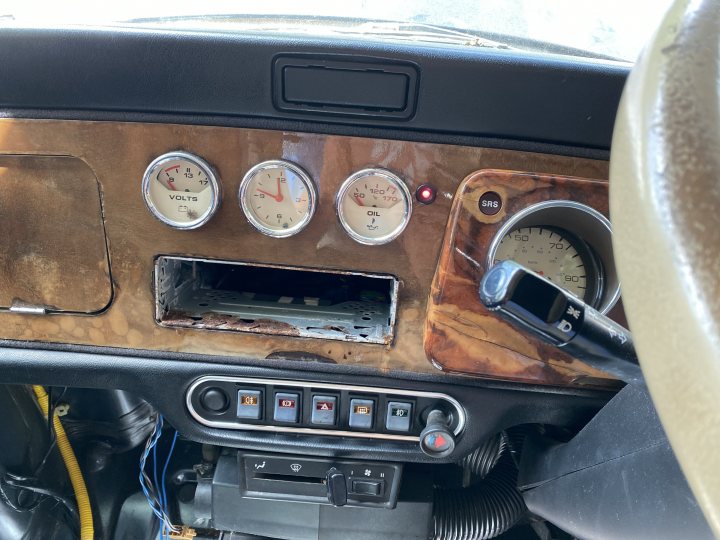
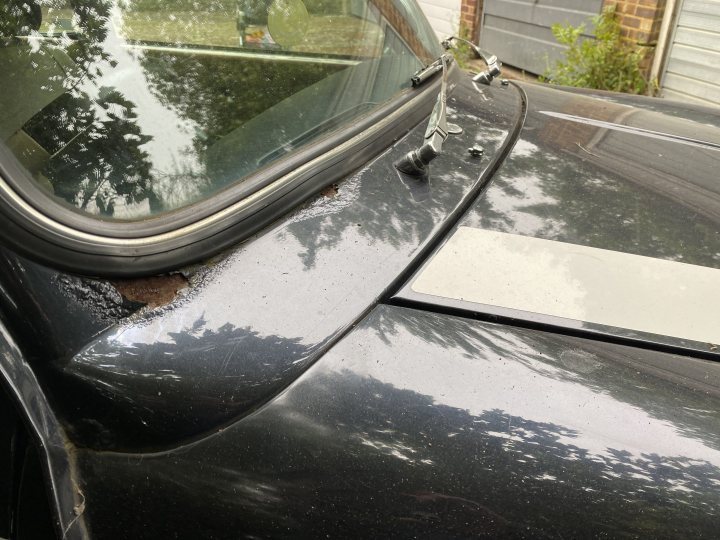
It had a badly rusted front end, the back end by the boot hinges was pretty bad and the webasto roof had shrunk and seized. The tyres were flat spotted and cracking, the coolant system wouldn’t hold pressure, it had a terrible oil leak and the interior was full of moisture and mould which also reeked havoc with the electrics and wrecked the wood veneer.
 
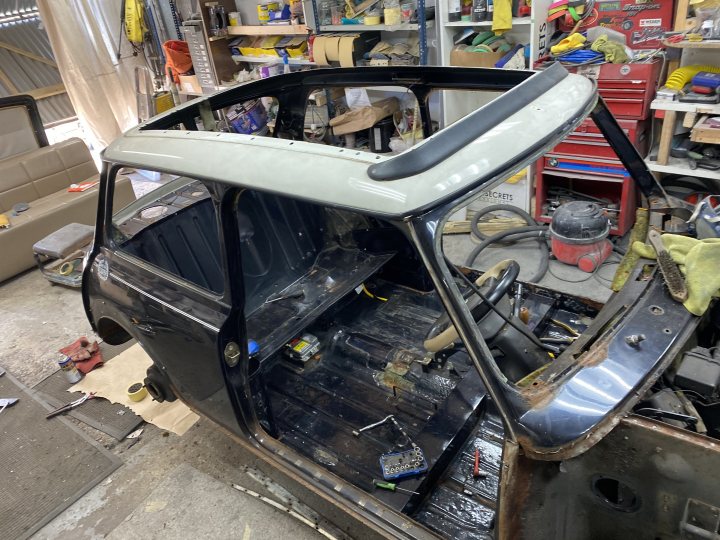
On the upside and rather amazingly the floor pan, sills, inner wings and bulkhead were solid. The car had never been in a crash nor had it ever seen paint. The boot, bonnet and doors were also original and almost totally rot free. It had all its original glass and mechanically it was pretty sound; and just needed recommissioning. 
 
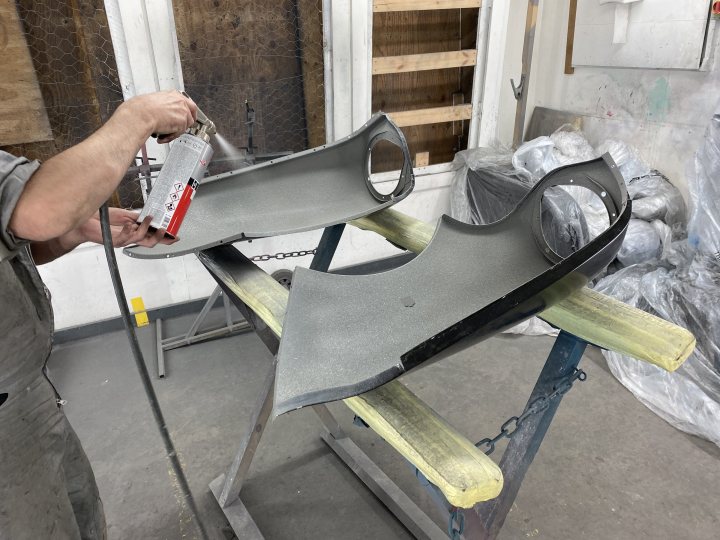
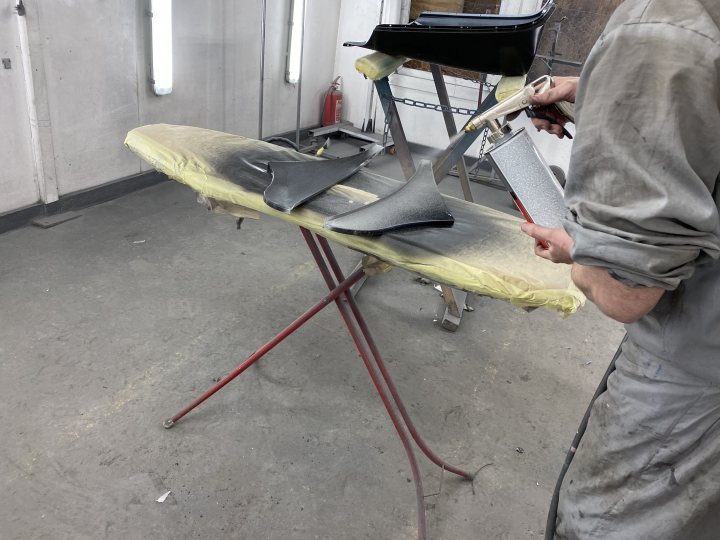
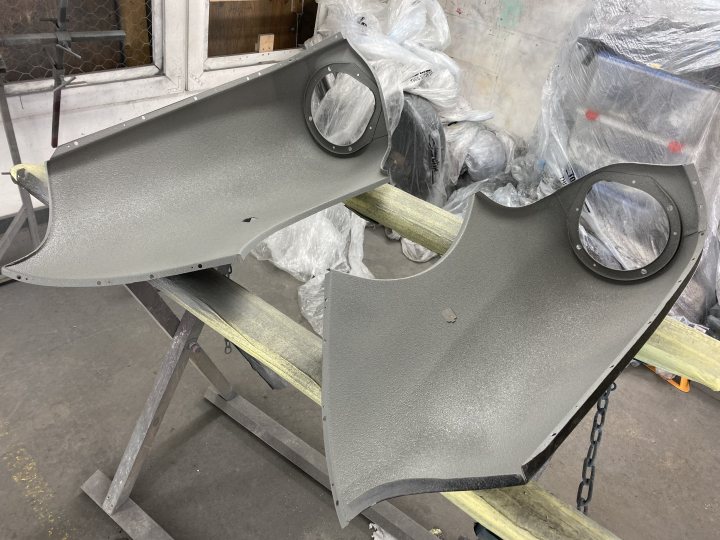
We ended up completing the job in 10 days so I’ll try and do a post to show the progress from each day.
 
Since completing the build and getting it home I have also given it a full service, fitted new brakes, brand new tyres all round, fitted a decent stereo, greased all the suspension points, fitted an entirely new coolant system including water pump, replaced the driveshaft seals and gear selector seal which cured the oil leak and taken it for MOT which it passed with no advisories. It now looks and drives like a brand new car and to top it off it only cost £97 to insure!
 
Here is the car when I got it. I’ll try update this thread as I sift through the photos.
 
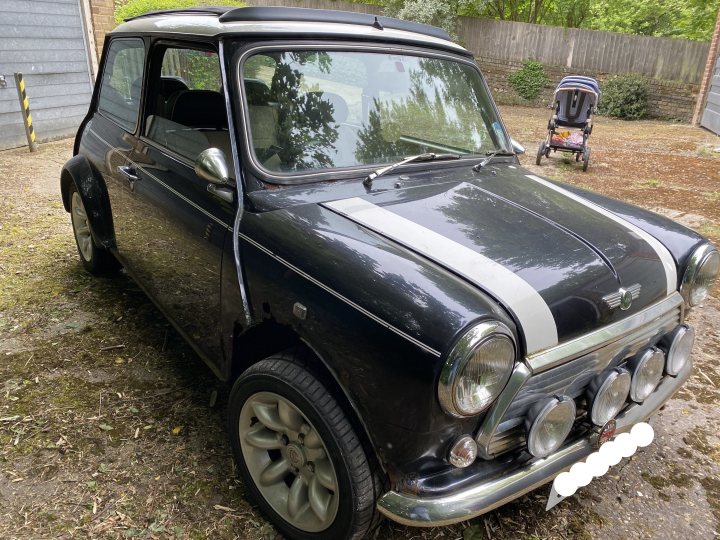
From a distance the car doesn't look to bad
 
gh5E67zC.jpg
 
until you get round to the front
 
DPy5RmVz.jpg
 
TiJ8FvwK.jpg
 
t9kheYUQ.jpg
 
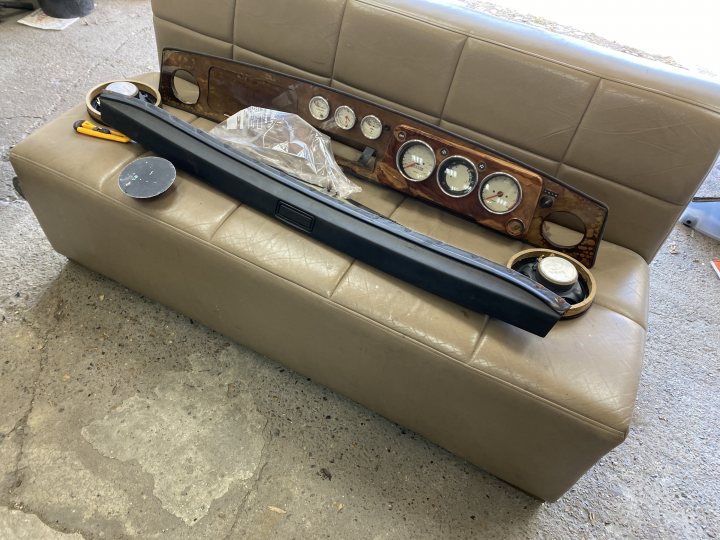
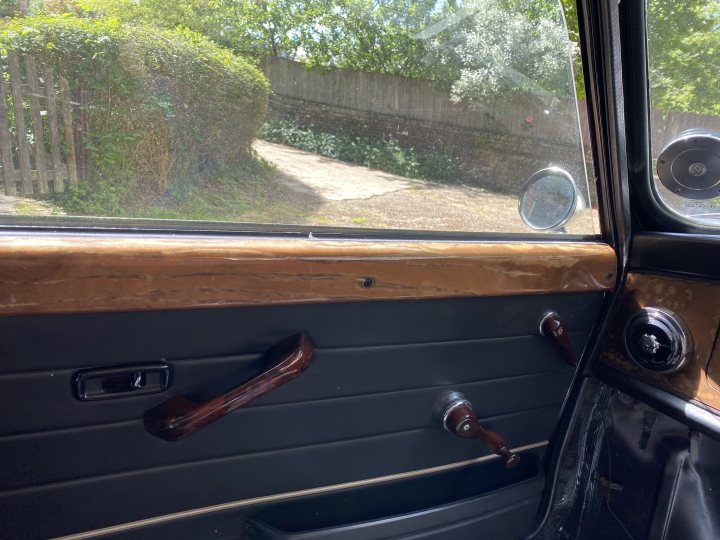
Dash and door cappings are not looking great
 
yyMCLgw1.jpg
 
huzBeWLa.jpg
 
FK4rCP9C.jpg
 
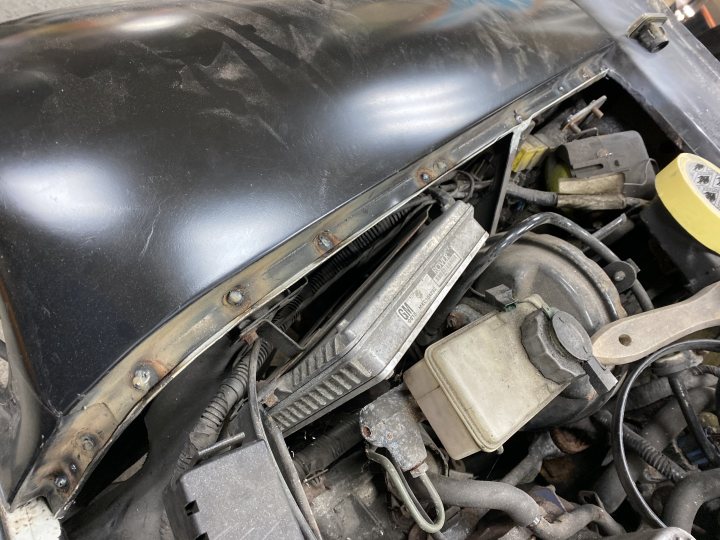
Scuttle actually looks worse than it is. although very rusted it was pretty solid
 
iXSKKHAX.jpg
 
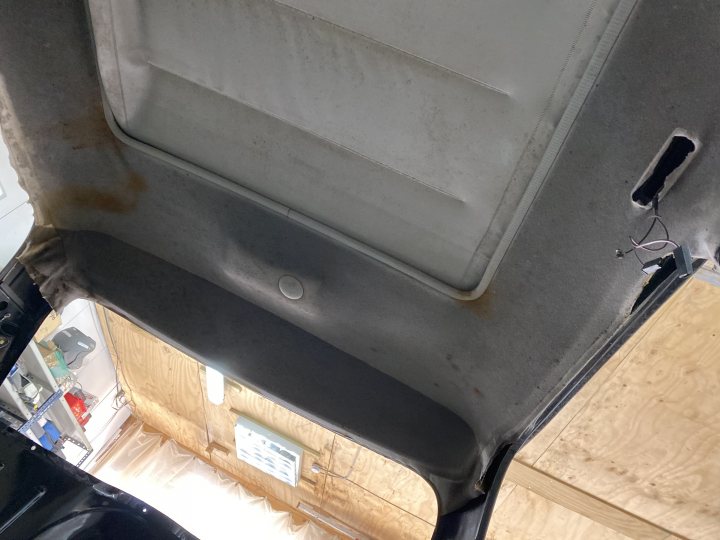
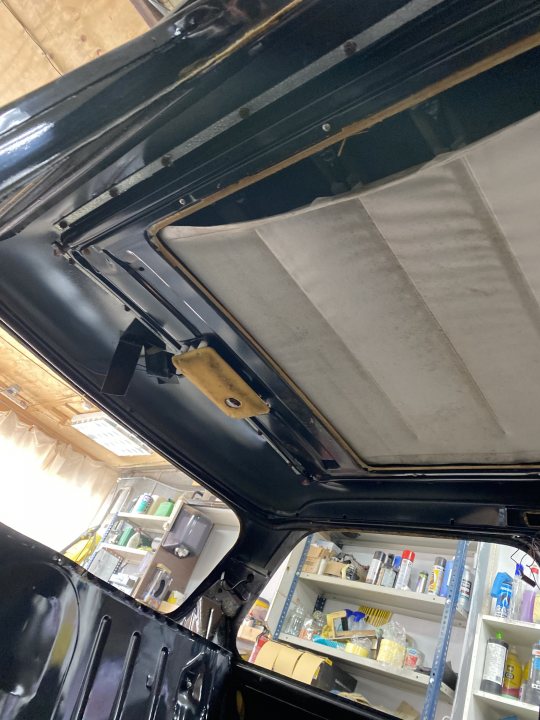
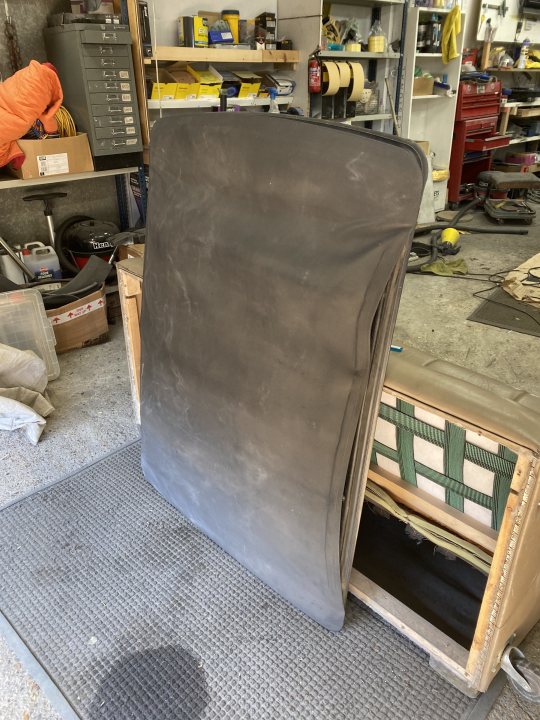
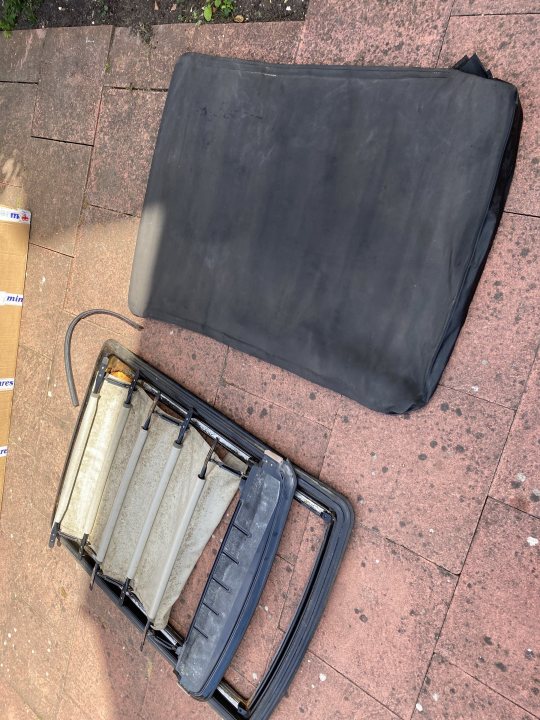
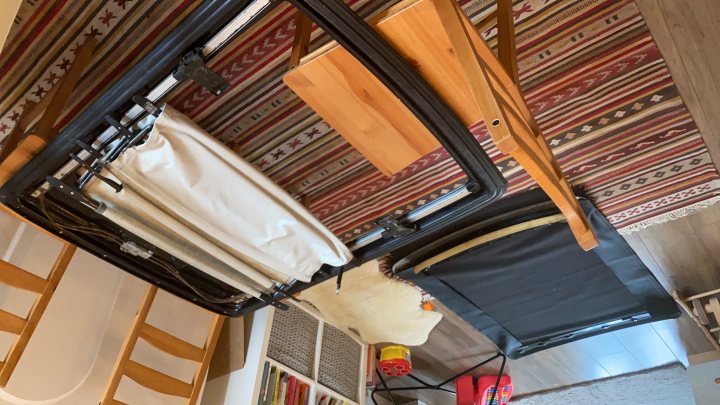
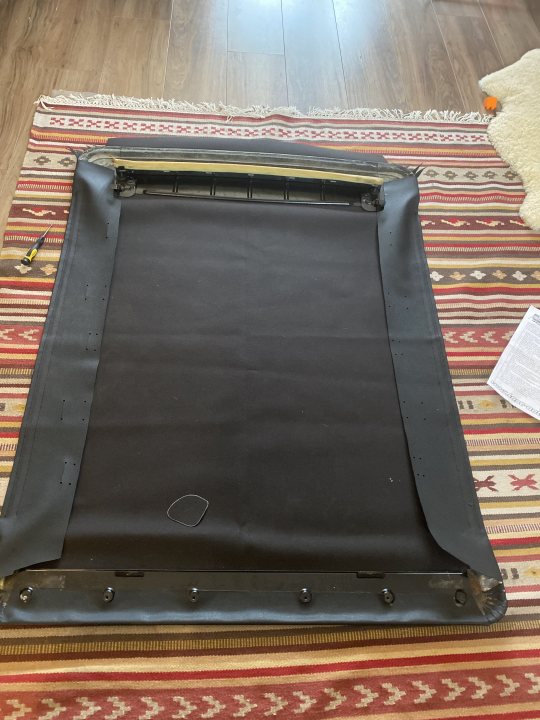
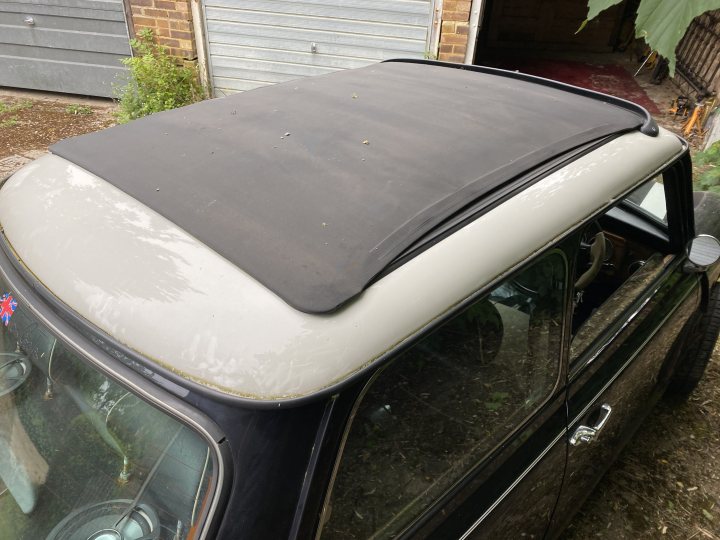
and the sunroof, although original had shrunk and wouldn't open. The roof itself was in very good shape though and didn't need painting, just a good polish
 
GCvrMMKF.jpg

Edited by nitrodave, 24 August 2020 - 12:44 PM.


#2 nitrodave

nitrodave

    On The Road

  • Noobies
  • PipPip
  • 44 posts

Posted 24 August 2020 - 12:47 PM

DAY 1
 
Before I took the car to the workshop I stripped out the interior and drove it there with just the dash, steering wheel, driver seat and seat belt.
 
It didn’t take long to remove the brightwork and we got straight on with cutting the front end off so that we could get a good idea of what we were truly dealing with. 
 
UaWCLzw1.jpg
 
WBChKhmu.jpg
 
tF5hdfFv.jpg
 
BZVFGhYq.jpg
 
SteCSfeD.jpg
 
With the front cut off we were delighted that the inner wings were 100% solid, and they hadn’t even cracked or stressed like they’re prone to doing. It seems these later cars came with no rust prevention on the front wings and front panel from the factory hence all these MPI models falling into this state.
 
Although we were up against it with time we were going to rebuild it with proper rust prevention and seam sealing so this doesn’t happen again.
 
7WgEGGAA.jpg
 
At the back things were looking pretty bad and a bit worse than we anticipated. Saying that, the lower valance was largely good with just some rot where the fog light mounts and everything from the boot hinge line up was good, so it was just that area that needed major attention. 
 
It looks a lot worse in the pictures and the area where the boot hinges mount was still intact so we had a cunning plan on how to repair this section.
 
We also took the fuel tank out which also showed the boot floor and importantly where subframe mounts to be in good shape. After skurfing it back we could see there was nothing untward in there.
 
K1yyyPqf.jpg
 
We were pretty methodical about bagging up parts with associated hardware and thankfully only snapped a few bolts along the way. One of the weird things about these cars is the complete mish mash of metric and imperial!
 
The great thing about restoring a mini is that absolutely everything was available and delivered fast. It was very satisfying writing great lists of what we’d need, buying it all online and receiving packages of goodies the next day. There wasn't a single thing we couldn't get within 24 hours.


#3 Sprinkler23

Sprinkler23

    Passed Test

  • Noobies
  • PipPip
  • 28 posts
  • Location: Roeselare

Posted 24 August 2020 - 06:16 PM

Pretty impressive!

#4 exuptoy

exuptoy

    Super Mini Mad

  • TMF+ Member
  • PipPipPipPipPipPip
  • 674 posts

Posted 25 August 2020 - 08:08 AM

Lovely car. I wish I could have gotten hold of my heritage panels in 24h! It was 10 days through Minispares. Looking forward to seeing this compete thread.

#5 nitrodave

nitrodave

    On The Road

  • Noobies
  • PipPip
  • 44 posts

Posted 25 August 2020 - 08:24 AM

DAY 2 Pt1
 
Next thing to do was remove all the glass which was an easy job all round. We also needed to unbolt all the arches which we could now do as the fuel tank was out. 
 
Many of the arches studs needed replacing. Purchasing new studs was the only truly poor value item on this build. Everything else was dirt cheap for what it was but each arch needs five studs at £5 each! We managed to salvage all the rear studs at least so only needed to purchase 10. 
 
xrZu4nzL.jpg
 
You’ll notice in the pic above the panel on the floor. That’s a replacement lower valance which we were going to flip upside down and use to repair the area around the boot hinges.  Ideally, we would have got a proper repair panel and replaced the entire back end, but that’s one heck of a job and time we didn’t have.
 
With a bit of persuasion and cutting we got it into a decent shape to tack in place. We seam sealed it properly from the inside also and it’s as good as proper job. I know it's not 'proper', but I honestly couldn’t be happier with how we did this.
 
GUrbxmgM.jpg
 
T9sBSseB.jpg
 
Next up was getting the dash out which took all of 3 minutes and then onto the sunroof.
 
eJqVqrp3.jpg
 
The head lining was in a really bad state and would need replacing. The moisture had got to it and totally ruined any chance of saving it. Unfortunately, you can’t buy these so we had to make our own once the car was painted. More on that later.
 
zS37inrF.jpg
 
With the headliner pulled off we could undo the 40 bolts holding the sunroof in place. After breaking the weather seal it popped straight out. 
 
p1HXi37b.jpg
 
I managed to find a place in Bristol who made replacement vinyls for British classics and they sold me one cut and stitched to size, with all the adhesives, cables and sealants needed to do a restoration. The kit cost £200 which wasn’t bad considering the cheapest quote I got from specialists to fix this was £1200, and that was an estimate and they said it would likely be more.
 
hNJymb5Q.jpg
 
 
It turned out one of the runners had jammed and after freeing it up and bending everything back into line it all moved smoothly. The motor also looked in a very terrible state, but when I put power to it, it ran smooth as silk. Looks can be deceiving!
 
I thought I’d need to replace the motor and these are impossible to get hold of. A bit of grease and the motor was good to go.
 
ubHsNUBs.jpg
 
The car is starting to look pretty naked by this stage! 
 
You’ll notice there’s some rust on the dash rail, but it was structurally solid and gets covered up by the dash pad so this wasn’t a priority. Ideally, we would have cut the rail and scuttle out, but with our time constraints and considering there was plenty of strength still there we opted to repair these.
 
i46KNZ1a.jpg


#6 nitrodave

nitrodave

    On The Road

  • Noobies
  • PipPip
  • 44 posts

Posted 25 August 2020 - 08:31 AM

Lovely car. I wish I could have gotten hold of my heritage panels in 24h! It was 10 days through Minispares. Looking forward to seeing this compete thread.


Thank you! I'm quite lucky in that I live 15 minutes from them and they were good enough to let me click and collect. They were very busy at the time and it took some persuasion on the phone to get them to do this for me, but they came through int he end and prepped everything in very good time for me to pick up


#7 Alice Dooper

Alice Dooper

    Speeding Along Now

  • Members
  • PipPipPipPipPip
  • 391 posts
  • Location: Co. Antrim
  • Local Club: Minis in Northern Ireland

Posted 25 August 2020 - 08:49 AM

Another Anthracite coloured Mini!!  Very few about.  Looking forward to this thread.  Will be a great wee car.


#8 nitrodave

nitrodave

    On The Road

  • Noobies
  • PipPip
  • 44 posts

Posted 25 August 2020 - 12:31 PM

Day 2 pt2
 
It was now time to start fitting up the front end. We purchased genuine Heritage panels (wings, a panels and front panel) and for anyone doing this job, don’t skimp! The genuine heritage panels are quality items made from thick gauge metal. It all fitted perfectly and was a delight to work with. It might be twice the price of pattern parts, but at £450 for an entire front end it was totally worth it.
 
It came with all the original mountings for spotlights, the cut out for the front mounted radiator and even the correct headlight rings to accommodate the headlight height adjusters. 
 
FUHRTbgL.jpg
 
The first step was fitting them all up to the car to test fitment. We started placing the panels onto the car and clamping them up with mole grips.
 
VLgsc1vV.jpg
Hy2MxTns.jpg
 
At this point we knew everything would be a decent snug fit so we started to hold it all together with self tappers. It went together like a Mechano set and very quickly we had everything in place.
 
uthraN1J.jpg
1nxCi3XJ.jpg
 
With the bonnet in position also we were amazed at how well everything lined up and we were ready to start drilling holes so that it can be welded onto the car.
 
FY7WSRaD.jpg
 
By the end of day 2 we had what looked like a mini again! But deep down we also knew there was a long slog ahead before I would be taking it home.
 
tx6PxQ85.jpg


#9 wingnut

wingnut

    Speeding Along Now

  • Members
  • PipPipPipPipPip
  • 463 posts
  • Location: bury st edmunds

Posted 25 August 2020 - 02:27 PM

I'm enjoying this so far, great work


#10 nitrodave

nitrodave

    On The Road

  • Noobies
  • PipPip
  • 44 posts

Posted 25 August 2020 - 03:01 PM

Day 3
 
The next stage of the project was to repair the front scuttle which was pretty straightforward. It needed some minor welding and then strengthening with fiberglass filler which is amazing stuff! It’s a rock solid repair and I have a lot of faith in this. 
 
If we had time we would have ideally cut out the scuttle and dash rail, but this is more than sufficient for what we wanted to achieve here. I'm confident this will last for many years. The car is garaged and I have no intentions of using it in the rain, so I'm hopeful all of this will last.
 
mJ1mz2Wc.jpg
 
We then turned our attention to the rear repair and welded in the piece we made from the inverted rear valance. Clamping it in and bolting it tight through the boot hinge mounts meant it was in the right position for us to weld it up. The panel we used had the same profile and provided the correct lip for the bumper to mount to.
 
DR2KMJf8.jpg
 
With the welds ground flush we then gave it a first skim in fiberglass filler to give it some extra strength. We also fiberglass filled it from inside the boot and also seam sealed over that. It’s super strong and water tight and we were very happy with how quickly we fixed this, the finish we got and the strength achieved. 
 
I should add that by this point that all and any rust on the car had been ground out and rust treated.
 
Again, if time wasn’t an issue we would have replaced the entire back end, but that would have taken up too much of our precious time. Maybe in 10 years time when I'm ready to Hyabusa swap I'll do a full repair back there.
 
V5HZztsR.jpg
 
Peeling off the original stickers felt somewhat symbolic. They’d been on the car for 22 years and we were careful to take measurements so the replacements would sit correctly. You can just about make out the original colour under the graphics! 
 
jPT9VMQe.jpg
 
2iwhZwbY.jpg
 
oX881z9a.jpg
 
With the front already mocked up we knew we could take it apart and it would go back together again using the self tappers previously used. 
 
To prevent the rot setting in again we coated the insides of all the new panels and front inner arches with a super strength arch lining spray on material. This stuff dries super firm and is slightly rubberised. 
 
I don't think many people do this and for anyone paying a garage to fit a front end, you should insist they do this rather than just welding on a new front end.
 
d7cXUGE1.jpg
 
KZtPdB9u.jpg
 
pCuzNht6.jpg
 
9KtrmGbs.jpg
 
We also coated all the sills, rear valance, rear inner arches and most of the floorpan with Dinitrol 4941. I did my research on what to use here and this stuff is apparently the very good. It certainly gave a nice smooth and robust finish!
 
Once the front was all welded on we also gave the front inner arches a coat of Dinitrol 4941 for even more protection.
 
LboRL5Mj.jpg
 
Gg3iKiwu.jpg
 
9JRRcmU3.jpg
 
XGaxMbxw.jpg
 
JpvAegjK.jpg
 
I also found time to restore the sunroof. I didn’t get many pictures of this, but it wasn’t too difficult in the end. The kit came with a new vinyl cover cut to size and it was just a case of reverse engineering everything, stripping off the old cover and fitting it all back together again.
 
With the motor attached I was also able to bench test this and it worked a treat, so after a couple of hours of mucking about it was ready to go back in once the car was painted.
 
avjBRJys.jpg
 
ud2KXp2T.jpg
 
5mUVc4ma.jpg
 
3BsUQvja.jpg


#11 slidehammer

slidehammer

    One Carb Or Two?

  • Members
  • PipPipPipPipPipPipPip
  • 1,081 posts
  • Location: Surrey
  • Local Club: LSMOC

Posted 25 August 2020 - 05:39 PM

Good work.

Looking at the pictures the car is currently on oversills. These are rust traps and are usually welded over old rusty metal, my advice would be remove them and put proper outer sills on the car with the vents in. You are doing so much work it is well worth taking the time on these to future proof the sills from further rust.


#12 Steve220

Steve220

    Up Into Fourth

  • Members
  • PipPipPipPipPipPipPipPipPip
  • 4,885 posts
  • Location: Shropshire
  • Local Club: RAF Mini Club

Posted 25 August 2020 - 08:31 PM

Oversills :(


#13 nitrodave

nitrodave

    On The Road

  • Noobies
  • PipPip
  • 44 posts

Posted 26 August 2020 - 06:12 AM

Good work.
Looking at the pictures the car is currently on oversills. These are rust traps and are usually welded over old rusty metal, my advice would be remove them and put proper outer sills on the car with the vents in. You are doing so much work it is well worth taking the time on these to future proof the sills from further rust.


Good spot on the sills. I have to admit that when I purchased the car I was naive to over sills, but when inspecting the car properly in the workshop they seem to be in very good order still. There’s no signs of rot in the car or the cabin bins either so I’m confident they’re solid.

They will get done eventually but for the time being they’re staying until I have the opportunity to replace.

They’ve been on there 12+ years and the car is garaged nor will it get used in the rain, so I can’t see them rotting out any time soon.

But... be rest assured that they will get cut out and proper sills put in; and I do plan to do this probably next spring

#14 nitrodave

nitrodave

    On The Road

  • Noobies
  • PipPip
  • 44 posts

Posted 26 August 2020 - 06:57 AM

Day 4
 
With the underside and inner panels protected we turned our attention to welding up the front end. 
 
Sorry I haven’t got more pics of this. My friend got on with this in my absence and I only got a couple after shots once completed. After this all visible welds needed to be ground back with a skim of filler for good measure.
 
Rrw3bVK1.jpg
 
D4gkKXvC.jpg
 
We could then turn our attention to cutting and reinforcing the front wings to accommodate the sportpack wheels and arches. It seems these are a great weak point for corrosion on a factory car. 
 
The templates aren’t much use as they never print correctly, but we used them as a guide anyway.
 
We made sure we fully seam sealed after welding on the support trims.
 
2Zuqjpmt.jpg
 
jdsxSoHd.jpg
 
LFTeXaEY.jpg
 
j72QkcF1.jpg
 
ckXK5LKu.jpg
 
We then turned our attention to sorting the very few dings on the bodywork.
 
y5jHYkFt.jpg
 
rdHbuP9i.jpg
 
8JeW8GWE.jpg
 
hDCsHxyZ.jpg
 
742zJjh1.jpg


#15 Homersimpson

Homersimpson

    One Carb Or Two?

  • Members
  • PipPipPipPipPipPipPip
  • 802 posts
  • Location: Redditch

Posted 26 August 2020 - 07:51 AM

You need more plug welds on the front wings, the number shown in the photos is nowhere near enough to make it strong enough in the event of an accident.


0 user(s) are reading this topic

0 members, 0 guests, 0 anonymous users