Jump to content


Photo
- - - - -

998 Turbo_Engine Build


  • Please log in to reply
80 replies to this topic

#1 Project_1275_GT

Project_1275_GT

    Speeding Along Now

  • Just Joined
  • PipPipPipPipPip
  • 341 posts
  • Location: Northants

Posted 27 September 2020 - 06:00 PM

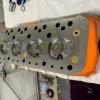
Thought I would post some pictures of my 998 engine that I have started to rebuild. This engine has been laying in the corner of my garage for some time now. I stripped the gearbox off it at the beginning of my 1310 Turbo project as I believed it had a 3.1 final drive. It wasn't. 


I have stripped the engine today and it looks pretty respectable. Found a snapped ring on piston 4 but no damage to the bore. Have checked the bores and they all look good. As I said above the gearbox was removed earlier this year and stripped. 


Here's some pics so far 


Attached File  IMG_1954.JPG   53.76K   6 downloads


Attached File  IMG_1957.JPG   54.56K   4 downloads


Attached File  IMG_1959.JPG   47.95K   1 downloads


Attached File  IMG_1961.JPG   50.17K   1 downloads


Attached File  IMG_1964.JPG   49.73K   1 downloads


Attached File  IMG_1967.JPG   45.04K   1 downloads


Attached File  IMG_1968.JPG   53.46K   1 downloads

Attached Files


Edited by Project_1275_GT, 26 November 2020 - 03:50 PM.


#2 Maccmike8

Maccmike8

    One Carb Or Two?

  • Members
  • PipPipPipPipPipPipPip
  • 1,089 posts
  • Location: uk

Posted 27 September 2020 - 07:00 PM

Il be following this with interest.


#3 Project_1275_GT

Project_1275_GT

    Speeding Along Now

  • Just Joined
  • PipPipPipPipPip
  • 341 posts
  • Location: Northants

Posted 26 October 2020 - 10:20 PM

Managed to get some more done. sorted loads in the garage today. All ready to blast a few parts in the next few days. 


Attached File  IMG_2146.JPG   56.81K   0 downloads


Attached File  IMG_2147.JPG   54.75K   0 downloads


Attached File  IMG_2148.JPG   59.79K   0 downloads


Attached File  IMG_2152.JPG   44.48K   1 downloads


Attached File  IMG_2154.JPG   44.04K   1 downloads


Attached File  IMG_2155.JPG   52K   2 downloads


Attached File  IMG_2208.JPG   48.37K   1 downloads


Attached File  IMG_2207.JPG   91.21K   2 downloads


Attached File  IMG_2210.JPG   59.18K   2 downloads


Attached File  IMG_2213.JPG   55.4K   2 downloads


Attached File  IMG_2206.JPG   53.92K   1 downloads


Attached File  IMG_2214.JPG   53.07K   2 downloads


#4 johnv

johnv

    Speeding Along Now

  • Members
  • PipPipPipPipPip
  • 494 posts
  • Location: Surrey
  • Local Club: FDMC

Posted 27 October 2020 - 06:41 AM

What's that you used to get the idler bearing out?

#5 Project_1275_GT

Project_1275_GT

    Speeding Along Now

  • Just Joined
  • PipPipPipPipPip
  • 341 posts
  • Location: Northants

Posted 27 October 2020 - 09:39 AM


What's that you used to get the idler bearing out?


Its a home made tool. 2 heavy duty washers with flats filed on the side to fit into the old bearing outer ring. Washers are to big to fit in unless the flats are filed. think they were 16mm washers. 1 normal 10mm nut, 1 length 10mm studding with two nuts locked together. 1 large socket. place the single nut in the hole where the outer is, place two washers with flats on the nut, screw the studding into the loose nut at the bottom of the hole, place the large socket over the bearing outer, add washer and nut to tighten, add two lock nuts to top of studding, heat the back end of the casting with blow torch, tighten nut against socket and out it comes. 


without the heat it does not work. tried a couple of times without heat as my blow torch kept turning into a fire ball.. Gave in and went a got a new torch and came out easily. 


Attached File  IMG_2212.JPG   55.09K   4 downloads


For the other outer i used heat on rear of casing, old screwdriver to tap under bearing outer, then more heat, then larger chisel under bottom face when lifted enough. 


Attached File  IMG_2213.JPG   55.4K   2 downloads


#6 Project_1275_GT

Project_1275_GT

    Speeding Along Now

  • Just Joined
  • PipPipPipPipPip
  • 341 posts
  • Location: Northants

Posted 28 October 2020 - 05:11 PM

Did a bit more 


Attached File  IMG_2223.JPG   62.88K   2 downloads


Attached File  IMG_2226.JPG   48.73K   2 downloads


Attached File  IMG_2227.JPG   53.58K   2 downloads


Attached File  IMG_2228.JPG   51.56K   1 downloads


Attached File  IMG_2229.JPG   53.36K   1 downloads


Attached File  IMG_2232.JPG   52.43K   0 downloads


Attached File  IMG_2230.JPG   51.95K   0 downloads


#7 Maccmike8

Maccmike8

    One Carb Or Two?

  • Members
  • PipPipPipPipPipPipPip
  • 1,089 posts
  • Location: uk

Posted 28 October 2020 - 06:18 PM

Do you do the gasket faces too?


#8 Project_1275_GT

Project_1275_GT

    Speeding Along Now

  • Just Joined
  • PipPipPipPipPip
  • 341 posts
  • Location: Northants

Posted 28 October 2020 - 08:09 PM

Do you do the gasket faces too?


Yes did the gasket face. Fine glass blast


Edited by Project_1275_GT, 28 October 2020 - 08:09 PM.


#9 Project_1275_GT

Project_1275_GT

    Speeding Along Now

  • Just Joined
  • PipPipPipPipPip
  • 341 posts
  • Location: Northants

Posted 29 October 2020 - 10:56 AM

Few more bits done last night 


Attached File  IMG_2235.JPG   42.88K   4 downloads


Attached File  IMG_2237.JPG   45.92K   2 downloads


Attached File  IMG_2240.JPG   52.01K   1 downloads


Attached File  IMG_2241.JPG   50.1K   1 downloads


Attached File  IMG_2242.JPG   49.75K   0 downloads


Attached File  IMG_2243.JPG   37.85K   0 downloads


#10 Project_1275_GT

Project_1275_GT

    Speeding Along Now

  • Just Joined
  • PipPipPipPipPip
  • 341 posts
  • Location: Northants

Posted 30 October 2020 - 04:00 PM

Been busy again. Taken the block and head to Rob Walker today for cleaning and rebore. Although the bores were hardly worn I was advised to bore and hone as the end result would be better and last longer. So taking that advice i headed off to mini spares and got some new pistons and rings. Now 998 +20


Now just need to order the rest of the bits and get busy in the garage. 


Attached File  IMG_2247.JPG   38.69K   2 downloads


#11 Project_1275_GT

Project_1275_GT

    Speeding Along Now

  • Just Joined
  • PipPipPipPipPip
  • 341 posts
  • Location: Northants

Posted 09 November 2020 - 12:40 PM

I will make some more updates to this engine build in the next week. The block and head are ready for collection from machine shop. 


Edited by Project_1275_GT, 11 November 2020 - 12:11 PM.


#12 Bobbins

Bobbins

    One Carb Or Two?

  • Members
  • PipPipPipPipPipPipPip
  • 1,344 posts
  • Location: Chester

Posted 09 November 2020 - 02:36 PM

You have mail regarding the cylinder head.


Stu.


#13 Project_1275_GT

Project_1275_GT

    Speeding Along Now

  • Just Joined
  • PipPipPipPipPip
  • 341 posts
  • Location: Northants

Posted 15 November 2020 - 10:08 AM

More progress with the engine. Block back from machining. Cleaned a bit more - replaced cam bearings and getting ready for paint 


Attached File  IMG_2341.JPG   31.17K   0 downloads


Attached File  IMG_2343.JPG   44.5K   0 downloads


Attached File  IMG_2344.JPG   47.89K   0 downloads


#14 Bobbins

Bobbins

    One Carb Or Two?

  • Members
  • PipPipPipPipPipPipPip
  • 1,344 posts
  • Location: Chester

Posted 15 November 2020 - 10:11 AM

You need to address a weight balance issue ... drink the 4th can :))

#15 Project_1275_GT

Project_1275_GT

    Speeding Along Now

  • Just Joined
  • PipPipPipPipPip
  • 341 posts
  • Location: Northants

Posted 15 November 2020 - 11:24 AM

You need to address a weight balance issue ... drink the 4th can :))


Dont worry its well balanced now.. :) 


1 user(s) are reading this topic

0 members, 1 guests, 0 anonymous users