Thanks, ill double check that with them then.
Is there anywhere else cheaper?
Thanks again
Chris

Creating The Ideal Boot Board
Started by
Russell-Mini30
, Jun 05 2008 06:33 PM
158 replies to this topic
#91

Burnard
-

- Banned
-

- 3,350 posts
4 gears good........... .......................5 gears Better
- Location: Reading
Posted 20 January 2009 - 11:36 PM
#92
glennthrower
-

- Members
-
- 296 posts
Mini Mad
- Local Club: Mini Freakz of Sussex
Posted 20 January 2009 - 11:55 PM
Probably, but its not bad that stuff, its what i wil probably use and all the guys at work have it for theres. So as for quility its all good. Otherwise ebay i spose
#93
Lukie-J
-

- Members
-
- 858 posts
One Carb Or Two?
- Local Club: South Devon Mini Club
Posted 21 January 2009 - 12:44 AM
Just found this thread!
Am definately going to have a bash at it!
Can't believe this hasn't been pinned yet!
I may have a problem with mine,
I have a 12 disc changer screwed to the "roof" of my boot.
Although i noticed some people dont have the rear board on there anyway?
Or could i mount this hidden somewhere else?
Is there anywhere behind the construction where this might fit?
Seriously well done for doing this, anyone done a drawing with dimensions for the rear speaker board?
#94
Russell-Mini30
-
- Noobies
-
- 180 posts
Mini Mad
Posted 24 January 2009 - 04:00 PM
cheers  yeh slightly disapointed it hasnt yet, but i can only hope someday it mite lol
well what can suggest is on the right hand side of my boot design on the reverse side of the panel you could mount the cd changer so it was out of sight, you would then need to create a section where the cds can be accessed for changing purposes. Plus would mean you would save room in your boot doing this. And i have got the measurements somewhere, got template i made as well, i shall find them and upload for the speakerboard, again i modified the design so that there was no chance of it moving or being kicked in hope this helps
yeh slightly disapointed it hasnt yet, but i can only hope someday it mite lolwell what can suggest is on the right hand side of my boot design on the reverse side of the panel you could mount the cd changer so it was out of sight, you would then need to create a section where the cds can be accessed for changing purposes. Plus would mean you would save room in your boot doing this. And i have got the measurements somewhere, got template i made as well, i shall find them and upload for the speakerboard, again i modified the design so that there was no chance of it moving or being kicked in
hope this helps
#95
Sam_The_Man
-

- Members
-
- 224 posts
Mini Mad
- Local Club: Tyred and Exhausted
Posted 29 March 2009 - 04:00 PM
this is awesome!! just what i needed!
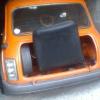
is the whole thing just 'loose' in the boot and just stays there because its wedged or is it secured with any brackets or anything?
i think in gunna put sopme carpet on the roof of mine then try to attach velcrow or somethign to keep tools and stuff in a nice neat place!
not sure how long it will take me though but looks great from ur pictures.
Thanks
#96
danny1
-

- Members
-
- 1,321 posts
In the navy you can sail 7 peas
- Local Club: bumpstart
Posted 29 March 2009 - 11:34 PM
for god sake pin this guys.
my boot is a right mess think im gonan give this a go. just curious i dotn carry a spare as i have 7x13 wheels on and its poitn less but i carry a full tool kit every were as it keeps brakign down. wouldi be able to modifie it to carry the bag sucrley fitted down?
my boot is a right mess think im gonan give this a go. just curious i dotn carry a spare as i have 7x13 wheels on and its poitn less but i carry a full tool kit every were as it keeps brakign down. wouldi be able to modifie it to carry the bag sucrley fitted down?
#97
mini_matt_106
-
- Members
-
- 599 posts
Super Mini Mad
- Location: Andover
Posted 31 March 2009 - 02:09 AM
pin pin pin pin pin..........
i have to do this, my boot is a state! might not find this thread again if its not pinned or in th faq thingy ma bob, when i do mine i will be putting a 10" sub to the right, but i bought a special flat sub so that i should be able to fit it flush with where the boot opening is, therefore not losing any/much space!
danny, i have seen toolboxes that fit inside ur rear wheel in 'the range' so might be a good idea to fill that gap but cant see a problem, just put some lil rubber feet on the base board
ps nice looking boots, get a thin piece of ply and carpet that and atatch it to the inside of the boot lid an it will look 10 times better though! good work!
#98
Disco Dan
-

- Members
-
- 332 posts
Speeding Along Now
- Local Club: MCCoA
Posted 31 March 2009 - 06:16 AM
ahh well done that man. Very nice idea.
One thing that struck me was the boot seal - some have rubbers on the car body others on the boot lid ? I'm worried I have ordered the wrong one now from mini spares ! Too late as it is currently somewhere over the atlantic.
When the $$$ builds up again I will certainly have a crack at this. Need to fix a couple of leaks first though - water leaks through boot lid seal as well as holes where badge is attached.
#99
Russell-Mini30
-
- Noobies
-
- 180 posts
Mini Mad
Posted 04 April 2009 - 08:45 AM
In reply to how this is held in within the boot, it is made to perfect size so that is has absolutly no room for movement. It took me a little while to work out all the measurements and templates but it workz a treat.
#100
Sam_The_Man
-
- Members
-
- 224 posts
Mini Mad
- Local Club: Tyred and Exhausted
Posted 04 April 2009 - 11:06 AM
ah fantastic, thanks.
im gunna try to make a start on it this afternoon so hopefully not long before its all up and running and working as a nice, smart, solid boot kit as apposed to a jumble of mess!!!!
im gunna try to make a start on it this afternoon so hopefully not long before its all up and running and working as a nice, smart, solid boot kit as apposed to a jumble of mess!!!!
#101
Sam_The_Man
-
- Members
-
- 224 posts
Mini Mad
- Local Club: Tyred and Exhausted
Posted 05 April 2009 - 01:48 PM
quick question?
the petrol tank side (lets say the left side), i had a bit of difficulty making the template fit? it fit the right hand side though which i thought was odd? have a mixed up the measurements or are the left and right side the exact same size?
also the 2 rectangular pieces? which one is the base and which oine is the rear of the kit? thanks much appreciated.
#102
Russell-Mini30
-
- Noobies
-
- 180 posts
Mini Mad
Posted 07 April 2009 - 11:46 AM
Hi Sam,
I found that its best to double check the measurements using tape measure in the car, the base and back board i believe are pretty much the same size width wise baring about a Cm or so if i remember, so the one with smaller width is going to be he base and the one thats wider shall be the backboard as this is the main support were the other panels connect to. And as for the petrol tank side, it takes a bit of fiddling along with patience but it should fit in the left hand side, you may find you need to cut out a small section on the left hand side of the flexy mdf so that it bypasses a support for the petrol tank.
Hope this helps. Many thanks for using the guide.
RM30
#103
leaky
-

- TMF+ Member
-
- 6,890 posts
Iv never hit a penguin in the face with a casserole
- Location: Costa Del Tadley
- Local Club: Basingstoke Mini Club
Posted 12 April 2009 - 11:04 AM
This is great. Gonna have a crack at making this sometime this week.
#104
Russell-Mini30
-
- Noobies
-
- 180 posts
Mini Mad
Posted 13 April 2009 - 02:23 PM
Cheers yeh is definatly worth doing, and is cheaper to make your own as well lol
yeh is definatly worth doing, and is cheaper to make your own as well lol
#105
karl & his cooper
-
- Members
-
- 915 posts
One Carb Or Two?
Posted 14 April 2009 - 11:09 PM
Plans with a sub on the right hand side about yet? Good work!


1 user(s) are reading this topic
0 members, 0 guests, 0 anonymous users
-
Bing (1)


