Jump to content


Photo
- - - - -

Mk1 Project


  • Please log in to reply
84 replies to this topic

#16 adam_93rio

adam_93rio

    Up Into Fourth

  • Members
  • PipPipPipPipPipPipPipPipPip
  • 3,271 posts

Posted 08 March 2010 - 08:32 PM

as per text

ive only got a couple that were slightly different to the ones you have shown so ill put these ones up dad

the old girl in her new home
Posted Image

up on stilts
Posted Image

close up of the engine once out
Posted Image

and a picture of all 3 making the driveway look even bigger than it already is
Posted Image
(thats mk1john right there)

#17 EatSleepJDM

EatSleepJDM

    previously known as 88minicity

  • Members
  • PipPipPipPipPipPip
  • 631 posts
  • Location: Swindon, Wiltshire
  • Local Club: Blakehill Minis

Posted 08 March 2010 - 08:42 PM

great project mate :(

#18 mk1john

mk1john

    Stage One Kit Fitted

  • Noobies
  • PipPipPip
  • 55 posts

Posted 10 March 2010 - 09:35 AM

Thanks for looking, hope i can do it justice.
Anyway thought I'd download more photos As I have done a far bit of work on it.

The first bit to bite the dust was the boot hinge panel which was more filler than metal, this was replace with a after market panel before i cut out the floor so i had more to line it up with.
I then completely removed the boot floor and replaced with a Heritage panel, but as you can see I have left the front part of the seat in as I found the new panel a bit thin and it bends when you lean on it,( as i found when we fitted another one in my daughters mini) and the original seems to be thicker. Anyone else found this?

Posted Image

Posted Image

that left a hole so now to fill it.

Posted Image

Posted Image

Posted Image
as you can see I took the time to weld up any holes that wernt needed and drill any that were to make this panel suit a mk one before fitting, although I have not drilled out the hole for the petrol tank drian plug after hearing stories of people drianing the fuel using these. I also welded in the subframe strengthening plates to the floor as the panel does not come with these.I also had the brianwave to weld the rear valacne and closing panels on before welding the floor to the car, take my advice don't, when I tried to fit it there was a 2 inch gap in the middle of the boot which I did manage to close but took hrs to sort out so that I am happy with it, it involved a couple of jacks and numerous blocks of wood and even more cursing.
I finished off the boot with welding in repair plates to the arches, didn't replace whole arch as wanted to keep as much original metel as poss and save cash.

Posted Image

Posted Image

well thats it for now will put some more up later.

#19 adam_93rio

adam_93rio

    Up Into Fourth

  • Members
  • PipPipPipPipPipPipPipPipPip
  • 3,271 posts

Posted 02 April 2010 - 10:57 AM

GET SOME PICTURES UP!!!!

ill do it for you if you want

#20 mk1john

mk1john

    Stage One Kit Fitted

  • Noobies
  • PipPipPip
  • 55 posts

Posted 12 April 2010 - 08:08 PM

GET SOME PICTURES UP!!!!

ill do it for you if you want


Ok son got some time so here goes
After sorting out the boot i moved onto the sills which i noticed where on the wrong sides, which meant that the jacking points where too far back, cant find a picture of the old sills but got one of the innersills

Posted Image

Posted Image

I repaired these and then welded the outer sills on

Posted Image

Posted Image

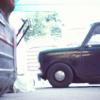
I then moved onto the front scuttle which sadly meant i had to remove the front wings and as feared they were worse than i thought , so i just cut them off and got new heritage ones, not what i wanted but it was quicker than repairing the old ones. The only problem was that the front panel was well out of shape and was missing the top edge on the drivers side due to the dreaded tin worm and the passenger side where it meets the wing was 20mm away on the arch side so sadly i bought a new front panel so my car looked like this

Posted Image

The bonnet was left on to help with alignment as it was a nice fit before so wanted to keep it that way.

The front subfrme was lightly cleaned and replaced so that i could line up the front panel and wings

Posted Image

Under the grime I found this

Posted Image

Looks like the original subframe or an original replacement part?

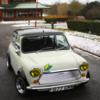
Any how from that to this

Posted Image

Cool isn't it?

Well onto the bottom of the radiator cowl which was shot so I made this

Posted Image

to replace this

Posted Image

didn't make it identical as on the original one the outer lip turns up and over and catches water mine turns down and under, hopefully it wont catch water.

Posted Image

So after a few small repairs its ready for a skim of filler and then paint.

One repair to the floor meant i had to repair the rear of a flute in the floor so i made this,

Posted Image

like this

Posted Image

Two large spanners with the steel trapped between

Posted Image

Posted Image

Then i tapped it with a hammer, gently as if you try to rush this the metal may split so take it easy and stretch the metal slowly.

Any how I had to skim the rear drivers wing as it had a fair few dents in it. this was the worst area and after a few days work and help from my brother it was ready for primer.

Posted Image

Nearly caught up so thats it for now
post some more later.

#21 mk1john

mk1john

    Stage One Kit Fitted

  • Noobies
  • PipPipPip
  • 55 posts

Posted 15 April 2010 - 09:00 PM

Hi well from ready for primer to this

Posted Image

as the smoke clears

Posted Image

(by the way the guy in the picture is my brother, who took over the spraying)
and this

Posted Image

then the next day
after an hour or two sanding

Posted Image

Posted Image

Posted Image

Finally covered in a new coat of speedwell blue.
The doors , boot and bonnet came out good as well

Posted Image

Posted Image

Posted Image

Posted Image


So now its just clean and paint all the other bits, paint and fit
starting with the petrol tank

Posted Image
Posted Image

the tank came up well BUT under the rust on the base i found a few holes

Posted Image
I have flused the tank out and am airing it to get rid of the fumes so i can weld it but this can take awhile and i would rather wait a few months before weldin it up. As luck would haveit my son is helping his mate change to a bigger 7 1/2 gal tank and i can have the smaller one for £20, great eh!
Well think this is getting a bit long so put more up later.

#22 ministe

ministe

    Mini Mad

  • Members
  • PipPipPipPip
  • 179 posts

Posted 15 April 2010 - 09:57 PM

This is looking great! Speedwell blue is one of my favourite colours.

#23 mk1john

mk1john

    Stage One Kit Fitted

  • Noobies
  • PipPipPip
  • 55 posts

Posted 25 April 2010 - 10:27 PM

This is looking great! Speedwell blue is one of my favourite colours.

Glad you like it , thanks for looking.
Heres some more
Well the petrol tank deal fell through, as my sons mates mum decided he didnt need a spare tank and threw his 7 1/2 tank away, so that meant i had to weld mine up for now.
After about an hour of welding, grinding,, testing then starting all over again i decided that i would settle for it not leaking, rather than one that looks great, so i left it at this

Posted Image

I did tidy it up a bit but didnt go too far this time and I will replace it later.

Then onto more spraying
From this

Posted Image

to this

Posted Image

AS you can see i ended up with new hinges, as this was quicker than repairing my old ones.

The bonnet hinge needed a new stud welding in so i repaired it like this

Posted Image

welded in the new thread
Posted Image

cut off the excess
Posted Image

and cleaned it up
Posted Image

then to make it look like the others
Posted Image

end result
Posted Image

Now for my rear subframe, my trumpets were corroded to the extent that they gave under thumb pressure so, after comparing prices i went for Hi Los and springs so:-

Posted Image

and
Posted Image
to this
Posted Image

and the front,
Posted Image
Posted Image
Posted Image
Posted Image
Posted Image
Posted Image

#24 mk1john

mk1john

    Stage One Kit Fitted

  • Noobies
  • PipPipPip
  • 55 posts

Posted 25 April 2010 - 10:42 PM

and the engine
Posted Image
Posted Image
to this
Posted Image
Posted Image

put them together and you get this
Posted Image

so the next job was to get it all in the car. as we had lifted my sons engine in we had decided to go the other route and build it all up and lift the car over it. verdict:- we found it easier the other way, but we did get the engine in
Posted Image

and the car on its wheels
Posted Image

I just think I might have a problem with speed bumps as it is though

Posted Image
Posted Image
well thats it for now,

#25 Mini-Mad-Craig

Mini-Mad-Craig

    Crazy About Metro's

  • Members
  • PipPipPipPipPipPipPipPipPipPip
  • 9,298 posts
  • Location: Travelling in a fried out Kombi

Posted 25 April 2010 - 10:42 PM

Looks sweet as mate!

#26 mad mk1

mad mk1

    One Carb Or Two?

  • Members
  • PipPipPipPipPipPipPip
  • 746 posts
  • Location: woking
  • Local Club: TurboMinis.co.uk

Posted 25 April 2010 - 10:55 PM

looks good lads top work

#27 82hle

82hle

    Mini Mad

  • Noobies
  • PipPipPipPip
  • 100 posts

Posted 25 April 2010 - 11:42 PM

The car's looking great - well done to you and your brother.
Mart.

#28 Scallywag630

Scallywag630

    Up Into Fourth

  • Banned
  • PipPipPipPipPipPipPipPipPip
  • 2,850 posts

Posted 25 April 2010 - 11:52 PM

Great job....well done

#29 miniallsort

miniallsort

    Up Into Fourth

  • Members
  • PipPipPipPipPipPipPipPipPip
  • 4,723 posts

Posted 27 April 2010 - 10:24 AM

great job mate

#30 mk1john

mk1john

    Stage One Kit Fitted

  • Noobies
  • PipPipPip
  • 55 posts

Posted 13 May 2010 - 09:27 PM

Thanks guys glad you like it.
Sorry not updated for a while but been blitzing my car trying to meet my deadline of the L2B and when i did try to download my photos i could not log in to photobucket, but thats sortednow so here goes:-
and for my first cockup,
decided to put some bits back on the engine and:-
Posted Image
the vertical bar on the front panel was in the way, didn,t want to cut it out or remove the engine so
Posted Image
decided to remove the lefthand stud using two nuts to undo it then
Posted Image
Posted Image
Posted Image
Posted Image
then twist into line
Posted Image
Posted Image

Next cockup, bit more serious this time, decided to fit the wiper motor and spindles but
Posted Image
when i welded up the 2 spare holes in the scuttle i compared it with my sons car but didnt realise that his was differant being a 93
so i welded up the wrong hole for the drivers side, could have cried, did swear.
so had to measure and cut a new hole
Posted Image
Posted Image
now i had three holes
Posted Image
well at least it fits now
Posted Image
well thats it for now more later, will i make the L2B? tune in next time for more Mk1 sagas


2 user(s) are reading this topic

0 members, 2 guests, 0 anonymous users