To be honest i've never examined a mini brae servo before so couldn't tell you much.
You'll still be able to do the visible bits of the clutch through the grill hole and i know people paint the servos and you can buy chrome cover for the reservoir which looks good. I guess you'll just have to allow extra time for doing your engine...

Detailed Engine Bay Guide
Started by
mike.
, Nov 26 2007 10:32 PM
26 replies to this topic
#17

stormintrooper
-

- Members
-

- 2,072 posts
Up Into Fourth
Posted 12 August 2008 - 09:38 PM
Id love to know how u got the oil and grease outta the nooks and crannies as iv been cleaning now for 2 days and still havent got it all off, how did u manage the back of the engine block aswell?
#18
mike.
-
- Members
-
- 6,176 posts
Crazy About Mini's
Posted 13 August 2008 - 11:57 AM
Gunk is pretty much all i used, if you spray enough on the grime just rinces off with the hose
#19
stormintrooper
-
- Members
-
- 2,072 posts
Up Into Fourth
Posted 13 August 2008 - 08:20 PM
i been doing this for 2 days now
lol
is there any downside in using hammerite instead of halfords own stuff?
lol
is there any downside in using hammerite instead of halfords own stuff?
#20
mike.
-
- Members
-
- 6,176 posts
Crazy About Mini's
Posted 13 August 2008 - 10:13 PM
The only downfall i found with hammerite is that it doesn't go on as nicey and as smoothly as the thinner engine paint.
Plus its abit of a pain to clean
Plus its abit of a pain to clean
#21
blasto
-

- Noobies
-
- 9 posts
Just On Tickover
- Local Club: No Mini Club
Posted 27 August 2008 - 05:11 PM
shine like a dime, good job. im planning to do mine. hopefully soon...
#22
malaysiaminilover
-

- Noobies
-
- 17 posts
Learner Driver
- Local Club: www.malaysiaminilover.com
Posted 19 September 2008 - 08:14 PM
Hi minimadmike,
Do u have more pictures during the cleaning process? Can you share to us?
Do u have more pictures during the cleaning process? Can you share to us?
#23
mike.
-
- Members
-
- 6,176 posts
Crazy About Mini's
Posted 21 September 2008 - 09:57 PM
Unfourtunatly i havn't. I didn't know i would be writing this guide so only took before and after pics.
The only pics i have were when i first bought my car. Originally the block was very oily and grimey so one of the first few things i did was give it a quick wash with some gunk - Just like i've explained in this guide.
Before:
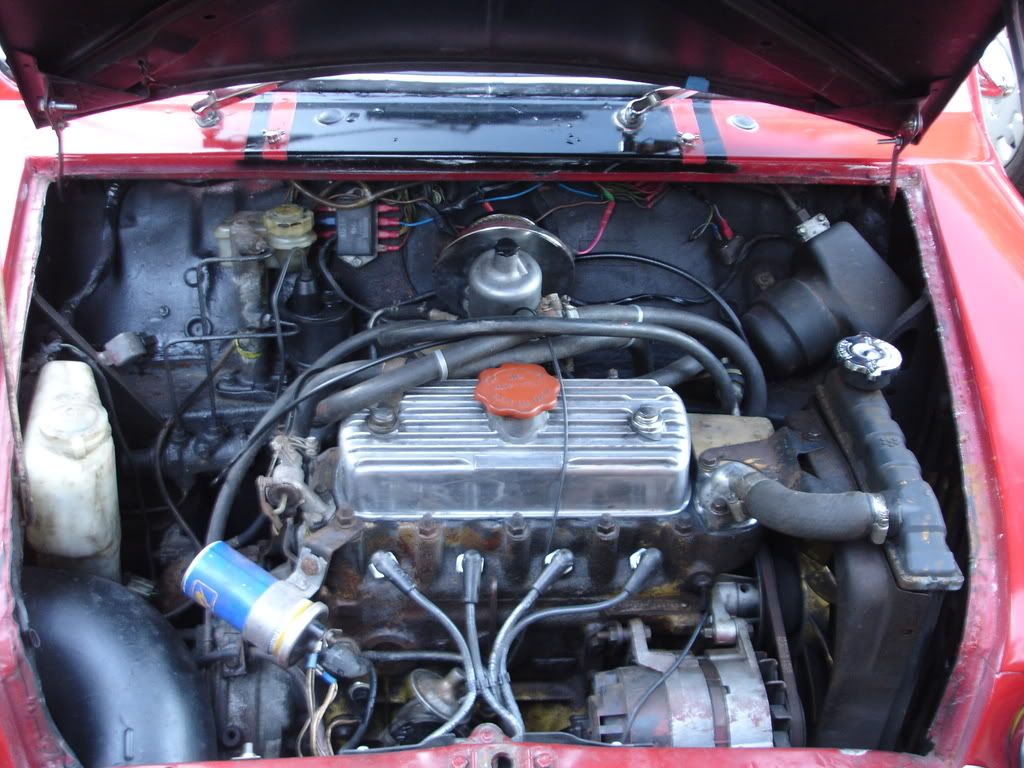
As you can see the blocks really oily
After:
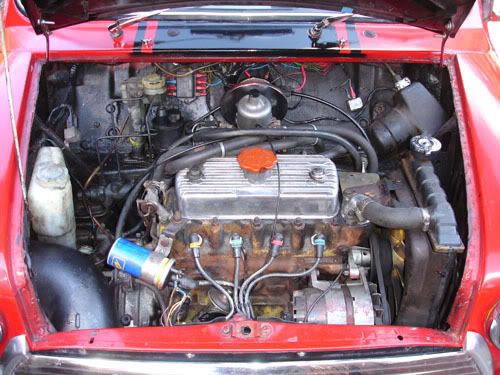
Like i said all i did was degrease the block with some gunk cleaner - At that time i hadn't done anymore cleaning apart from that.
The only pics i have were when i first bought my car. Originally the block was very oily and grimey so one of the first few things i did was give it a quick wash with some gunk - Just like i've explained in this guide.
Before:
As you can see the blocks really oily
After:
Like i said all i did was degrease the block with some gunk cleaner - At that time i hadn't done anymore cleaning apart from that.
#24
mk1leg
-

- Members
-
- 9,341 posts
Crazy About Mini's
- Location: Jersey
- Local Club: Mini Club Jersey, MCR
Posted 21 September 2008 - 10:09 PM
Well I hpoe to do as good as job as this engine bay stunning ...................
.but I'm lucky to have a fresh empty engine bat to start with.........

and will soon have MY Swiftune EVO2 motor to install...............
.but I'm lucky to have a fresh empty engine bat to start with.........
and will soon have MY Swiftune EVO2 motor to install...............
#25
mike.
-
- Members
-
- 6,176 posts
Crazy About Mini's
Posted 21 September 2008 - 10:28 PM
Yeah thats nice. When i eventually fit a new engine in my car i'll go to that sort of effort.
#26
dougie1142
-

- Members
-
- 500 posts
Super Mini Mad
- Location: Inverness/Elgin
- Local Club: I.M.O.G
Posted 23 May 2009 - 01:42 PM
great guide, however, what if u have a brake servo like i do, because my engine bay is alot more cramped than yours lol
yeeah i agree haha! we just gotta deal with it!
#27
Brookesy
-

- Members
-
- 507 posts
Super Mini Mad
Posted 04 August 2011 - 04:16 PM
Began cleaning mine today..
Havnt began painting yet and granted not the best cleaning job as im stull unsure what can be removed/ what cant e.t.c. Fan needs a better clean but i ran out of energy
Before

After Spray and rinse

Then after wiping down all the other bits and bobs with some cillit bang and toothbrushes

Havnt began painting yet and granted not the best cleaning job as im stull unsure what can be removed/ what cant e.t.c. Fan needs a better clean but i ran out of energy
Before
After Spray and rinse
Then after wiping down all the other bits and bobs with some cillit bang and toothbrushes


0 user(s) are reading this topic
0 members, 0 guests, 0 anonymous users


