wiring guide mate


Camshaft & Stage Two Head


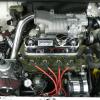
Stage One Kit Fitted
Posted 24 September 2010 - 07:37 AM
Mini Mad

Posted 15 January 2011 - 12:21 PM
Stage One Kit Fitted
Posted 14 May 2011 - 08:15 AM

Edited by apjmini, 14 May 2011 - 10:35 AM.
Stage One Kit Fitted
Posted 14 May 2011 - 08:21 AM


Edited by apjmini, 14 May 2011 - 10:30 AM.
Stage One Kit Fitted
Posted 14 May 2011 - 08:23 AM
Stage One Kit Fitted
Posted 14 May 2011 - 08:31 AM

Edited by apjmini, 14 May 2011 - 10:31 AM.
Stage One Kit Fitted
Posted 14 May 2011 - 08:34 AM


Edited by apjmini, 14 May 2011 - 10:37 AM.
Stage One Kit Fitted
Posted 14 May 2011 - 08:37 AM


Edited by apjmini, 14 May 2011 - 10:28 AM.
Stage One Kit Fitted
Posted 14 May 2011 - 08:53 AM

Edited by apjmini, 14 May 2011 - 10:24 AM.
One Carb Or Two?

Posted 14 May 2011 - 10:14 AM

Stage One Kit Fitted
Posted 14 May 2011 - 10:24 AM
One Carb Or Two?
Posted 14 May 2011 - 10:55 AM
Thank you
Edited by Artstu, 14 May 2011 - 10:58 AM.
Super Mini Mad
Posted 14 May 2011 - 11:00 AM
Stage One Kit Fitted
Posted 14 May 2011 - 11:35 AM


0 members, 0 guests, 0 anonymous users


