
Going for heavy duty adjustable. But getting initial length might be awkward because I can't use the current ones as a guide unless I measure the bend LOL!

105 replies to this topic
#16

DEPS
-
- Members
-

- 188 posts
Mini Mad
- Location: Leicestershire
- Local Club: Carlton & District Motor Club
Posted 25 June 2013 - 09:12 PM
#17
DEPS
-
- Members
-
- 188 posts
Mini Mad
- Location: Leicestershire
- Local Club: Carlton & District Motor Club
Posted 01 July 2013 - 08:01 PM
Top coated the engine bay this weekend. I know the air box has to go back in, but don't like leaving in primer too long as absorbs moisture. Will just have to touch up surrounding area when box back in.


Then just been on Minispares to order bits to rebuild subframe and the red spot rubber doughnuts are out of stock D'oh!
oh and does anyone know how to measure steering rack gaiters? You can buy 4.5 or 7.5 inch, but hard to tell when on rack and depends whether stretched or compressed???
Then just been on Minispares to order bits to rebuild subframe and the red spot rubber doughnuts are out of stock D'oh!
oh and does anyone know how to measure steering rack gaiters? You can buy 4.5 or 7.5 inch, but hard to tell when on rack and depends whether stretched or compressed???
#18
DEPS
-
- Members
-
- 188 posts
Mini Mad
- Location: Leicestershire
- Local Club: Carlton & District Motor Club
Posted 14 July 2013 - 05:21 PM
My welder friend has completed the seam welding on the front subframe that I partially did previously and welded the sump guard nuts on to make them captive.


Then employed child labour to paint it. Found it was easier to hang it. The subframe that is. Not my Son!!


Just in case you think I have done nothing. I have been cleaning up a front number that I got off the Internet and have sprayed the inside of it as there was a bit of rust that needed dealing with! Forgot to take a photo though! Just needs chrome polishing, which sounds like a child labour job.
Then employed child labour to paint it. Found it was easier to hang it. The subframe that is. Not my Son!!
Just in case you think I have done nothing. I have been cleaning up a front number that I got off the Internet and have sprayed the inside of it as there was a bit of rust that needed dealing with! Forgot to take a photo though! Just needs chrome polishing, which sounds like a child labour job.
#19
DEPS
-
- Members
-
- 188 posts
Mini Mad
- Location: Leicestershire
- Local Club: Carlton & District Motor Club
Posted 26 July 2013 - 09:55 PM
Subframe back in (solid mounted this time around) with new red spot doughnuts and previously fitted Hilos

Then fitted new heavy duty tie bars along with neg camber bottom arms (again had these on before). All fitted with new bushes.

Finally wheels back on and lowered back on to 4 wheels ( will probably replace brake callipers later as looking a little long in the tooth)

I am a little concerned about the ride height. Hilos are near lowest setting but the new doughnuts probably need time to settle and they are much deeper than the old ones that have just come off! Plus there isn't the weight of the engine yet!

Next job more paint stripping ready for re spray!
Then fitted new heavy duty tie bars along with neg camber bottom arms (again had these on before). All fitted with new bushes.
Finally wheels back on and lowered back on to 4 wheels ( will probably replace brake callipers later as looking a little long in the tooth)
I am a little concerned about the ride height. Hilos are near lowest setting but the new doughnuts probably need time to settle and they are much deeper than the old ones that have just come off! Plus there isn't the weight of the engine yet!
Next job more paint stripping ready for re spray!
#20
DEPS
-
- Members
-
- 188 posts
Mini Mad
- Location: Leicestershire
- Local Club: Carlton & District Motor Club
Posted 08 September 2013 - 04:24 PM
Slow progress but finally finished stripping the boot to bare metal then sprayed. Not perfect, but a hell of a lot better.


If that wheel arch looks a bit odd, it is because it was cut and modified to allow for the coil overs. Not the prettiest welding ( done years ago by a chap I knew at the time) but seems pretty strong. Would also say the paint finish looks better in the flesh! The ipad camera does not seem to get the light and colour quite right, or maybe it is might rubbish photographic skills?
If that wheel arch looks a bit odd, it is because it was cut and modified to allow for the coil overs. Not the prettiest welding ( done years ago by a chap I knew at the time) but seems pretty strong. Would also say the paint finish looks better in the flesh! The ipad camera does not seem to get the light and colour quite right, or maybe it is might rubbish photographic skills?
#21
DEPS
-
- Members
-
- 188 posts
Mini Mad
- Location: Leicestershire
- Local Club: Carlton & District Motor Club
Posted 24 September 2013 - 09:40 PM
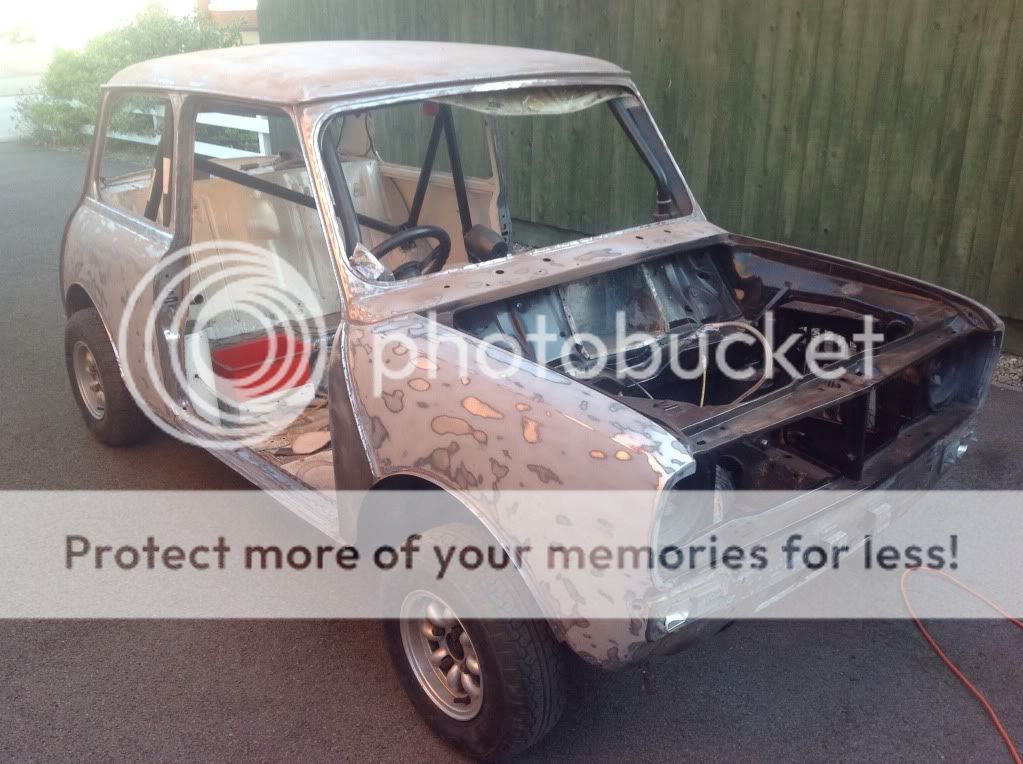
Glass is now all out and sanding down ready for re spray well under way


 l
l

 t
t
lt
#22
DEPS
-
- Members
-
- 188 posts
Mini Mad
- Location: Leicestershire
- Local Club: Carlton & District Motor Club
Posted 11 March 2014 - 09:12 PM
Long time since last update.
Unfortunately my mate who had been doing the welding work and was going to respray injured his knee, so plan B was required.
In the end bought a new welder and my Son and I have been filling various holes I had drilled when it was stage prepared and have now also welded in the air box. Have also bought a new fibreglass boot lid (double skin type) which I have trial fitted and fits much better than the old single skin one.
So now some photos


So air box in properly this time, not pop rivets and fibreglass!

Front cage, heater and instrument binnacle removed.

And bit the bullet and removed the headlining! Might regret that one??
Then made another phone call to get it booked in for respray, hopefully going next week.
Then it will be a case of putting it back together again........

Most of this lot has got to go back in. A double garage and still struggling for space!
#23
DEPS
-
- Members
-
- 188 posts
Mini Mad
- Location: Leicestershire
- Local Club: Carlton & District Motor Club
Posted 18 March 2014 - 10:47 PM
and so off for respray......


Only problem now is got to get on with the decorating whilst it is away!


Only problem now is got to get on with the decorating whilst it is away!
#24
mk3 Cooper S
-
- Members
-
- 5,569 posts
Crazy About Mini's
Posted 18 March 2014 - 11:38 PM
Great looking project and a really solid looking shell to start with.
Black is going to look great, I'm not into russet myself.
Crack on with the decorating - keep her sweet and then dream of fitting up that lovely freshly painted shell. That must be the best part of any restoration.
Wish I could get my son interestedin my project and get some child labour but the draw of the river bank is too great for him!!
Edited by mk3 Cooper S, 18 March 2014 - 11:38 PM.
#25
keefr22
-
- Members
-
- 591 posts
Super Mini Mad
Posted 19 March 2014 - 08:54 AM
Your shell is looking really nice & solid - I wish our rear seat base/bulkhead looked like that! How did you manage to get the centre cage feet fitted properly with the companion bins in place? The guy that ''built'' ours had tried & had fitted it with two bolts either side instead of the required four - & one each of those was only hand tight! And if you're going to rally him, how are you going to get big enough re-inforcing plates as needed by the Blue Book under the feet in there? I ended up cutting our bins out, but am not sure if we do decide to build to full historic spec whether we'll need to weld them back in.
Can I ask where you bought the fibreglass bootlid from please? I want to get one & a bonnet for ours. I was surprised by how much (bonnet especially) they weigh!
keith
#26
DEPS
-
- Members
-
- 188 posts
Mini Mad
- Location: Leicestershire
- Local Club: Carlton & District Motor Club
Posted 19 March 2014 - 01:13 PM
Great looking project and a really solid looking shell to start with.
Black is going to look great, I'm not into russet myself.
Crack on with the decorating - keep her sweet and then dream of fitting up that lovely freshly painted shell. That must be the best part of any restoration.
Wish I could get my son interestedin my project and get some child labour but the draw of the river bank is too great for him!!
Know what you mean. We also do a bit of fishing and must say when it was nice at the weekend the thoughts of sitting by a pond in the sun did seem more appealing than being in the garage!
I am particularly looking forward to being upside down trying to put clevis pins back in on the clutch and brake pedals!! 
#27
DEPS
-
- Members
-
- 188 posts
Mini Mad
- Location: Leicestershire
- Local Club: Carlton & District Motor Club
Posted 19 March 2014 - 01:51 PM
Your shell is looking really nice & solid - I wish our rear seat base/bulkhead looked like that! How did you manage to get the centre cage feet fitted properly with the companion bins in place? The guy that ''built'' ours had tried & had fitted it with two bolts either side instead of the required four - & one each of those was only hand tight! And if you're going to rally him, how are you going to get big enough re-inforcing plates as needed by the Blue Book under the feet in there? I ended up cutting our bins out, but am not sure if we do decide to build to full historic spec whether we'll need to weld them back in.
Can I ask where you bought the fibreglass bootlid from please? I want to get one & a bonnet for ours. I was surprised by how much (bonnet especially) they weigh!
keith
Hi Keith,
The cage was fitted many years ago with the intention of stage rallying (I ended up only doing 2 single venues). I remember at the time the requirement had not long been in for 3 bolt fixing. Think this only applied to the main hoop, but my Aley bar cage came with it on every leg hence the strange arrangement on/off the rear arches. Also at the time it was only necessary for 3mm plate of a certain size immediately under the foot, think they now have to go up the sills a bit too? We welded them in using gas, but I do remember it having to go to my Dad's mechanics garage to be finished off, especially after I had blown a hole in the rear wheel arch! I would say they are all reasonably welded in and I think do the intended job, but don't think they would pass stage scrutineering now! Think the other point was that we positioned the cage, which was blinking hard work and then moved it back whilst we welded. Impossible with it all bolted in.
The boot lid came from Minispares. Wasn't happy with the fit of the old single skin. The new one is obviously not as light, but lighter than the metal one and considerably cheaper than a metal one as well.
Cheers!
Dave
#28
keefr22
-
- Members
-
- 591 posts
Super Mini Mad
Posted 19 March 2014 - 01:54 PM
Thanks Dave, I shall check out Minispares.
Looking forward to seeing Baldric back from his paintjob! 'Black Baldric' - good nickname!
keith
edit - speellingg!
Looking forward to seeing Baldric back from his paintjob! 'Black Baldric' - good nickname!
keith
edit - speellingg!
Edited by keefr22, 19 March 2014 - 01:55 PM.
#29
DEPS
-
- Members
-
- 188 posts
Mini Mad
- Location: Leicestershire
- Local Club: Carlton & District Motor Club
Posted 26 March 2014 - 07:33 PM
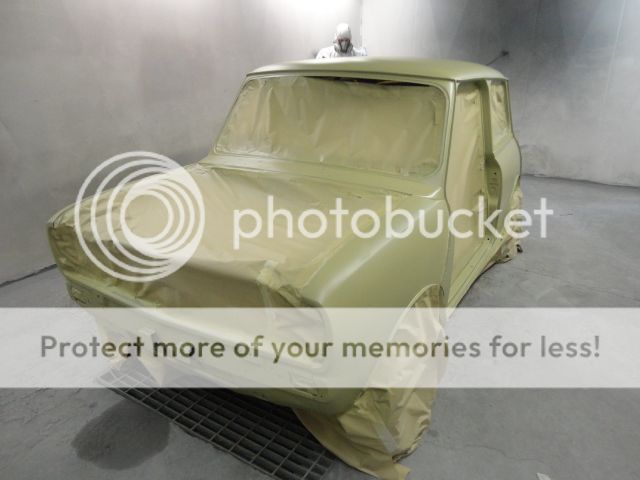
Was invited down to the spray shop to view progress, which increases confidence in the quality. They have also provided me with pictures. So here goes from arriving to re-sanded, to etch primer(yellow), to primer (white/grey)


Also tagged with one or more of these keywords: clubman
Projects →
Mini Saloons →
Cape Town 🇿🇦 1275HleStarted by JAYO , 28 Feb 2021 |
|

|
||
Projects →
Mini Saloons →
Budget Mini Clubman Shell Restoration For £1500Started by minimissions , 13 Nov 2019 |
|

|
||
Projects →
Mini Saloons →
1275Gt Tarmac Rally Car - From ScratchStarted by KRM_Simon , 26 May 2019 |
|

|
||
Projects →
Mini Saloons →
1275Gt Resto - From Flip To FactoryStarted by Verderad , 12 Mar 2018 |
|

|
||
Projects →
Mini Saloons →
1977 Leyland Mini - 1275Started by parrellan , 27 Oct 2017 |
|

|
0 user(s) are reading this topic
0 members, 0 guests, 0 anonymous users


