Jump to content


Photo
- - - - -

'audrey' My 31 Year Old Loveable 'pain In The Ass' Resto. (1983-998Cc Mayfair)

roundnose

  • Please log in to reply
20 replies to this topic

#1 nealtdavies

nealtdavies

    Learner Driver

  • Noobies
  • PipPip
  • 19 posts
  • Location: Aylesbury

Posted 17 November 2014 - 11:57 PM

Hi there,


Posted a couple of times before and wondered whether anything i can add will help anyone in the forum....but to be honest my experience is next to nil, and its all of you on the forum i'm taking the tips from!
 

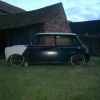
So this is Audrey..... (the mrs loves Audrey Hepburn and so my logic of naming her that has bought me maybe an extra 24 hours of tolerance of bits of mini on the dining table!)

First mini, probably not the best one i could have found, but hey for the experience i lack i make up in willing!


photo4_zps03c2a672.jpg


So thats her. Back of a trailer in the summer. Ran on 3 cylinders, the bottom of the rear quarter full of what turned out to be decorators caulk and poly-filler. Oh yeah, and the boot turned out to be a great nest for a mouse. Pretty big one. Who liked chewing stuff.

Not a pretty state. So of course, at the time, my novice self thinks "Meh....bit of welding and a spit and polish and she'll look lovely" 3 months later the reality set in. But so did the love for this little car!

So within two weeks, some new plugs, leads, and a friend re-uniting the rear subframe mount to the car as opposed to it latched to 'air' (in the memory of what was once a boot floor) she got an MOT. This was just to make her mobile for a while. Drive her, assess her a bit better!

1C345FAD-E2D8-4035-A9BA-D07DAE077898_zps


Rear quarters succumbed to a good bit of rot over the years...

WindowRot1_zpsc4590183.jpg

My pal "Theclubbyhubby" pointed me in direction of the forum, and i posted about repairing rear quarters. Maybe a new bit of steel welded in....and i believe it was unanimous 'Kurust' and a patch wouldnt cut it. So off i trotted to get myself a set of rear quarters.

It was good advice indeed. Once the rear windows came out so did half the panel, like powdered cocoa. All over the deck! So Rob (clubbyhubby) and his pal helped put the rear quarters in for me, and also sorting out more of the 'floating subframe' panel with shuttle runs to minispares for bits!

1BD781C2-17CF-4AD7-8C9D-635A90C1E906_zps


0154614B-8E3D-4085-98D5-3D347211EF4B_zps


So with her 'Panel wise' Solid, and A panels on for good measure... begins this week....bringing me up to date.

So on Friday she went on her last celebratory drive across town before her 'botox' makeover. A friend of my girlfriends has a big old barn, and despite no power and no lighting it was the best we have. (long extension lead to her house just about does the trick though!)

Fits in nicely!....

240ACBB8-3285-4E02-B9F9-3DA9FB203B14_zps


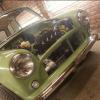
So began stage one. Stripping this 31 year old down to her bare bones. See what shes made of! *(or used to be made of anyway) i was dreading finding more caulk and polyfiller but i was pleasantly suprised!

484DFE21-53D1-471C-B659-AF22AD9E300F_zps


F94BDC51-60F6-4136-9AC1-4CA826D0D8EE_zps


18CFF168-A398-4DC3-A563-A53734F87F8D_zps


I dont know if you can see under the dirt from the engine bay pic but i believe its a 'Gold Seal' engine (again stuff ive learnt off your forum.) I thought until i researched that some chav over the year had painted it gold. So seems she must of had a new lump at some point!.

Any more info on the gold seal replacements would be really interesting if you could help!

So with the interior stripped, and a crane *(but alas no chain to pick it up with) we removed the little lump with a ratchet strap (standing well back and holding our breath) and put her nicely in a £2.99 argos inflatable paddling pool. Great way to clean the gunk and not make a mess!

DC8B5C49-D30F-492B-AE89-B3C05DFEDC69_zps


Then flipped her over....have a good look. Then my heart sank.............

The previous owner said he had the inner and outer sill done professionally. I was chuffed at that. However the other side.....

3C6A5D6C-9800-4855-98A8-53A5A23CE701_zps

C4632496-59FC-48EA-B2F9-B16E508FD914_zps


OVVVVVVVVVVVVVVEEEEEEEEEERRRRRRRRRRRSSSSSSSSSSSIIIIIIIIIIIIIIIIILLLLLLLLLLLLLLLLLL

Damn. Worse? barely welded, and actually pop riveted into place. (though at least it allowed moisture to escape i suppose!) unfortunately probably also let alot in....

So...question. Before i weld it on properly do i just drill out the rivets and expose the hidden dangers? Im interested in seeing whats under there. Oversills ive read are Mini killers??

So anyway...after reeling in that i thought i would have a go at using a good old wire brush on a drill.....and one of those polycarbide attachments and got 'scrubbing!' (note the O/S floor pan replaced previously too in a similarly bad fashin requiring re-welding!)

4BCBD150-4B57-4F57-8CF8-643A1A4DFC0E_zps


And this brings me pretty up to date. Sorry for the long post just thought i would try catch up on what ive been at.

Idea for the bottom is as follows. Please tell me if it sounds reasonable:

  • Back to Bare metal. Any rust scraped back until nigh on gone.
  • Kurust on everything. make it blue, at least it seals any tiny weeny bits. Surface rust no rot.
  • Zinc 182 (lovely thick zinc rich stuff)
  • Zinc rich chassis paint - Satin black.
  • Underseal/waxoyl.

Done the kurust and Zinc already (picture to come) just to keep the air off it anyway (and left the bits to be welded coated in weld through primer for now!)


Am i taking enough good measures against rust?

Anyway hope you enjoyed, and hope your interested in my progress. Quite enjoy having a diary of whats done!

I love reading all yours and i hope to keep mine updated too! (keen to show you an engine in a paddling pool!)

Neal. :proud:


#2 Covert

Covert

    Super Mini Mad

  • Members
  • PipPipPipPipPipPip
  • 526 posts
  • Location: Northampton

Posted 18 November 2014 - 06:16 AM

Lovin the name audrey, keep the missis happy!
You did the best thing with the rear quarters by the looks of things , keep the pics coming and good luck!

#3 nealtdavies

nealtdavies

    Learner Driver

  • Noobies
  • PipPip
  • 19 posts
  • Location: Aylesbury

Posted 28 November 2014 - 12:56 AM

Update:

So painting has gone well.... with "Zinc 182" (the ominously band related named paint)


Zinc primer also underneath. Lots of oil along the rod change 'tunnel'. Degreaser/thinners were doing well cutting through but needed that extra kick.

B&M were advertising a steam blasting gun for £14.99. 4 mins switched on, and blasting steam for ages. Blew the muck right off!


However it felt rather cold coming out of the gun, so shot it at close range at the girlfriends bum as she bent over (something i now realise was a little stupid)


Lesson Learnt.


9EBE2B19-D860-4693-9AC8-0067C8266396_zps


6A0CA5BC-D1A4-4791-B7F6-256DAAD63859_zps


its a week since these photos were taken and after what looks to be a 2nd degree burn, she's still yet to see the funny side.


A81FA976-32CD-4EBA-B4E0-B6CADE62EA75_zps


So originally thinking once painted its nice and sweet.....but the oversill is bothering me. Im going to take it off i think. I mean theres about 2% weld holding it on anyway!

And up top of arch below scuttle.....how do i get up there?!


658DEF53-6A15-4AD8-A409-CAEA506A3F0F_zps


I suppose the next update will be what the hell is under the oversill and arch....wish me luck.


Edited by nealtdavies, 28 November 2014 - 09:01 AM.


#4 Ben_O

Ben_O

    Mill Road Garage

  • Paint Doctor
  • PipPipPipPipPipPipPipPipPipPip
  • 9,781 posts
  • Location: Isle of Wight

Posted 02 December 2014 - 10:35 PM

Nice little project.


Is it just the picture or is that front drivers floor quarter barely welded on?


Bit worrying, that!


Ben


#5 mk1leg

mk1leg

    Crazy About Mini's

  • Members
  • PipPipPipPipPipPipPipPipPipPip
  • 9,341 posts
  • Location: Jersey
  • Local Club: Mini Club Jersey, MCR

Posted 02 December 2014 - 10:42 PM

Hi..looks like a great project.....keep up the good work.........are you keeping it as orignal or modded


#6 nealtdavies

nealtdavies

    Learner Driver

  • Noobies
  • PipPip
  • 19 posts
  • Location: Aylesbury

Posted 04 December 2014 - 05:11 PM

Hi guys.


Thanks for the feedback!

The floor pan looks barely welded on but thats just spotty welding on top. Its pretty solid.


Not going to mod her to hell....just keep her an honest mini. Not sticking true to the 'mayfair' spec though as such. Not a fan of the elephant grey plastic!


(Plus its hard to stay faithful when I'm now the 14th owner of this little lady and it looks like its made up of about 7 or 8 different donor cars over the years anyway!)

I hope to journal my progress either way. even if my legs fall out of the floor pan! :-)

Neal.


#7 bluemini17

bluemini17

    Mini Mad

  • Members
  • PipPipPipPip
  • 158 posts
  • Location: Bangor

Posted 15 December 2014 - 09:46 PM

looking good, great project to help eat up your free time :lol: get the welder at the ready, great skill to learn if not already done so.


#8 nealtdavies

nealtdavies

    Learner Driver

  • Noobies
  • PipPip
  • 19 posts
  • Location: Aylesbury

Posted 19 January 2016 - 11:03 PM

Return to the thread over a year of nothing! The Mini is back on the road, so this will be in retrospect over one hell of a painful year.

SO the girlfriends ass has recovered, yet still scarred from the steam gun and she doesnt let me forget it. So here is my attempt at some more.


January 2015:

With the old barn becoming pretty much too cold to work in now, and the girlfriend being loathed to come down and help whilst im armed with power tools, we decided to make a move of the car to home. The only problem is that home is a mid terrace house, with no back access other than a small side gate. The rear is the neighbours house. So ahead of actually thinking about HOW we would get the Mini in there, i just went ahead and built a shed.

6681D109-56B6-448E-A569-78F2EAC9A879_zps


04B32489-B644-42C6-AC6F-C767066E58E9_zps


I thought it would be perfect to do bits for the car in away from the cold in the event i couldnt work out how to move it. We insulated it, ply lined it, and even a wee TV for the late nights.

Photo%2021-03-2015%2015%2010%2049_zps4un


Friend put in some flooring. With the boards and the ply the floor came to over 2 inches thick!
 

F7D88BCB-0BDF-4AC7-A6D5-E11D6C82909C_zps


Herein came the problem i had kind of blissfully put to the back of my mind. How to put a car in there.

We thought of many ideas. Crane, knocking down the wall (that isnt even my wall) or even seeing if Barrats still had a helicopter we could borrow. Safe to say, we kind of drew a blank.

The thought of the old, cold barn was too much to bare so we started to bring her back. Piece by Piece. Doors, panels, interior, petrol tank, parts, tools, bit by bit until all we basically had a car....minus a rolling shell.

With all the commotion the next door neighbour (to the left) poked his head over the fence asking what was going on. He's a good guy. So we got talking cars. And like everyone you meet i got the whole 'oh i had a Mini once' and therein began a conversation over the love of the cars. Turns out he has side access to his house. Also turns out whilst talking over the fence the panels i installed while building the shed were easy enough to "Slot out" and remove.....it doesnt take a genius to work out the angle i then later suggested.

After talking to his better half, we had a deal. One time in, one time out, to the detriment of the flower bed, and one hell of a tight squeeze, the Mini is coming home!


So one wet January morning, Rob, aka "the Clubby Hubby" on this forum turns up with a trailer.


Photo%2004-04-2015%2008%2007%2004_zpsu4p


Fence comes out...


Photo%2028-08-2015%2019%2044%2015_zpsts3


And with a 16 Point turn.....Audrey comes home!

Photo%2004-04-2015%2009%2034%2042_zpsgsw

Photo%2004-04-2015%2009%2034%2028_zps7ab


More to follow!!!....


#9 domdee

domdee

    Formally known as dominicdee

  • Members
  • PipPipPipPipPipPipPip
  • 1,183 posts
  • Location: hull
  • Local Club: hull clubs on FB

Posted 19 January 2016 - 11:09 PM

Nice idea with the steam gun

#10 minimissions

minimissions

    Up Into Fourth

  • Members
  • PipPipPipPipPipPipPipPipPip
  • 3,427 posts
  • Location: North West
  • Local Club: M.M.O.C

Posted 20 January 2016 - 06:27 AM

Loving that little garage its awesome... nice build mate :)


#11 cityspeed

cityspeed

    Mini Mad

  • Noobies
  • PipPipPipPip
  • 193 posts
  • Location: Essex

Posted 20 January 2016 - 07:22 AM

Must admit I'm rather envious of you garage, keep up the good work!

#12 nealtdavies

nealtdavies

    Learner Driver

  • Noobies
  • PipPip
  • 19 posts
  • Location: Aylesbury

Posted 20 January 2016 - 03:55 PM

Thanks for the comments gents. The garage is a damn sight warmer!

Lets fast forward to end of Jan:

So with her now in her new home, we can relax a bit. The days of not being able to feel your fingers due to cold are over. We can see with real light as opposed to 2 spotlights in an otherwise draughty barn....BLISS.
 

However space was at a premium now. My spare room? Mini parts. Bedroom? Mini parts. Kitchen? yup you guessed it.
I 'ummed' and 'aaaaahed' at the work that was done welding on a new part of the front valance in the barn. There were still bits to fill, spot in, and to be honest it would never be right.

I went to grab some filler, realised I'd lost the hardener anyway. So in a fit of being pretty fed up with it, I grabbed an angle grinder while the girlfriend was out at work, spur of the moment and cut the entire front end off. (minus the A Panels). This would force me to not just bodge it with filler.

Below: Girlfriend coming home and putting on gloves, and opening garage door. Then seeing I went a bit 'brutal' with the angle grinder....She wasn't happy. At all.

Photo%2011-05-2015%2019%2003%2001_zps7fd


HOWEVER.... this gave ample access to the engine bay. I had some Rustoleum Combicolour mixed for me by Avenue Coatings. Those of you not familiar, its basically like hammerite but levels and protects LOADS better. The added bonus is they could colour code it.
 

Being able to do this I had to obviously choose the colour of the car. Never an easy choice. However with it just saying 'Blue' on the logbook it gave me a good choice of shades. Answer? Fiat 'Volare Blue'. The colour of the new Fiat 500. (love that blue! just hate Fiats!)

The Result....
Photo%2012-05-2015%2019%2058%2038_zps8do

The girlfriends smaller hands helped also with this. Especially painting the Subframe in situ too. (Hammerite black)

LESS angry now. Likes the colour.
Photo%2012-05-2015%2019%2027%2031_zpsthq


Inner wings need attention too. Probably replacing.

So, with the front 'rust proofed' (I don't know if you call removing all the panels 'rust proofing' but there's nothing there now to rust.) the bottom of the car was ZINC 182'd in the barn, it was time to flip her over and paint the other sill. Rolling her over was great as we pinched another one of those beanbags from the barn for 'keeping cattle warm'...turns out to be the perfect and damage free option for rolling our little car!

HOWEVER....rubbing down the sill/grinding it back to metal took a turn for the worst. Half way through the sill, 'white clouds' started to appear. Smelt like old filler....


Photo%2028-08-2015%2019%2044%2053_zpssqw


Turns out someone sculpted decent patches of filler over a pretty knackered sill! not pleased.
Explore a little more with a  screwdriver???


Photo%2028-08-2015%2019%2045%2006_zpsdju


Cup of tea time I think.


Edited by nealtdavies, 20 January 2016 - 04:18 PM.


#13 James_eaton_thewholething

James_eaton_thewholething

    One Carb Or Two?

  • Members
  • PipPipPipPipPipPipPip
  • 1,063 posts
  • Location: Manchester

Posted 20 January 2016 - 04:59 PM

I think we need to start a thread about the bodges we have all found. That's a nice blue though. I like the dark grey on the fiats but as you I hate fiats haha.

#14 Marco1972

Marco1972

    One Carb Or Two?

  • Members
  • PipPipPipPipPipPipPip
  • 822 posts
  • Location: Birmingham

Posted 20 January 2016 - 09:33 PM

Enjoying reading your thread

And very envious of your garage :-) that inner sill looked like mine did

Keep up the good work

Mark

Edited by Marco1972, 20 January 2016 - 09:38 PM.


#15 The Clubby Hubby

The Clubby Hubby

    Super Mini Mad

  • Members
  • PipPipPipPipPipPip
  • 555 posts
  • Location: south bucks
  • Local Club: Friends with minibitz

Posted 20 January 2016 - 10:05 PM

Good work Neal


Also tagged with one or more of these keywords: roundnose

0 user(s) are reading this topic

0 members, 0 guests, 0 anonymous users