it should,when i took the passenger side off( it was the original sill not bad for a 28 year old car ) i drilled the spots out and cut along the seam, the sill came of quite easy around the jacking point . i think it all depends on the person at the factory and if he was at the end of his shift or the start

How Do You Take The Sills Off
Started by
lew
, Jan 05 2007 12:07 AM
47 replies to this topic
#32

scrutineer
-

- Noobies
-

- 43 posts
On The Road
Posted 09 February 2007 - 06:17 PM
started to do it with a angle grinder then remembered i got an air chisel when i bought a compressor a few years ago ......... tried that
yeeee haaaar!!!!! ripped that rusty old sill straight off
but slipped and went off course at one point ....... and ripped a big hole in the inner sill as well........ oh bo ll ox
yeeee haaaar!!!!! ripped that rusty old sill straight off
but slipped and went off course at one point ....... and ripped a big hole in the inner sill as well........ oh bo ll ox
Edited by scrutineer, 09 February 2007 - 06:18 PM.
#33
Matrix
-

- TMF+ Member
-
- 589 posts
Super Mini Mad
Posted 27 April 2007 - 11:03 PM
The last two I did, I used an air chisel nice and quick though lethal in the wrong hands! so as said stick with a grinder and a thin disk
#34
JoeMcb
-

- Members
-
- 165 posts
Mini Mad
Posted 20 June 2007 - 10:47 PM
Silly question:
Im taking my sills off at the minute, but the spot points arnt very apparent, am i missing something?
Is there a good wy to find them easier?
Im taking my sills off at the minute, but the spot points arnt very apparent, am i missing something?
Is there a good wy to find them easier?
#35
Ethel
-

- TMF Team
-
- 25,409 posts
..is NOT a girl!
- Local Club: none
Posted 20 June 2007 - 11:08 PM
Avoid chisels 'n grinders if you can - all some point you have to weld all that mangled tin back together!
If you can ease a thin edged screw driver between the seams, where you can't pry the two flanges apart is where the spotweld is, they stand out quite well that way
spot remover or drill is the best way for sure
If you can ease a thin edged screw driver between the seams, where you can't pry the two flanges apart is where the spotweld is, they stand out quite well that way
spot remover or drill is the best way for sure
#36
black jack1275
-

- Members
-
- 276 posts
Mini Mad
Posted 21 June 2007 - 08:16 PM
JoeMcb hi mate
if you look at the diagram i did you will see the blue dots along the bottom of the sill, the best way to find them is to use a twisted wire wheel on your angle grinder and clean all the paint away, then you should see small round dents along the edge (they can be quite hard to see) normaly about an inch or so apart.
Drill them out then use a cold chisel between the bottom edge of the sill and the floor to seperate it.
Where the sill is atatched to the door step use the angle grinder cut just below it( red line) using a cutting blade then change to a grinding blade or a linishing disc and clean up the lip
#37
mattw13
-

- Members
-
- 178 posts
Mini Mad
- Local Club: Chichester Mini Club
Posted 29 March 2008 - 08:08 AM
Is there any chance of the picture being put back up on this thread as I cant seem to be able download it. Cheers
#38
maurais
-

- Members
-
- 196 posts
Mini Mad
- Location: eastbourne
Posted 29 March 2008 - 12:27 PM
i second that my sills are getting desperate and i havent got a danny roo what im doing, little help please lads
cheerz shaun
cheerz shaun
#39
mike.
-

- Members
-
- 6,176 posts
Crazy About Mini's
Posted 09 April 2008 - 08:27 PM
Wouldn't mind seeing this diagram myself now. Did anybody save it....?
#40
Abs
-

- Noobies
-
- 119 posts
Mini Mad
- Local Club: 16vmini
Posted 10 April 2008 - 04:50 AM
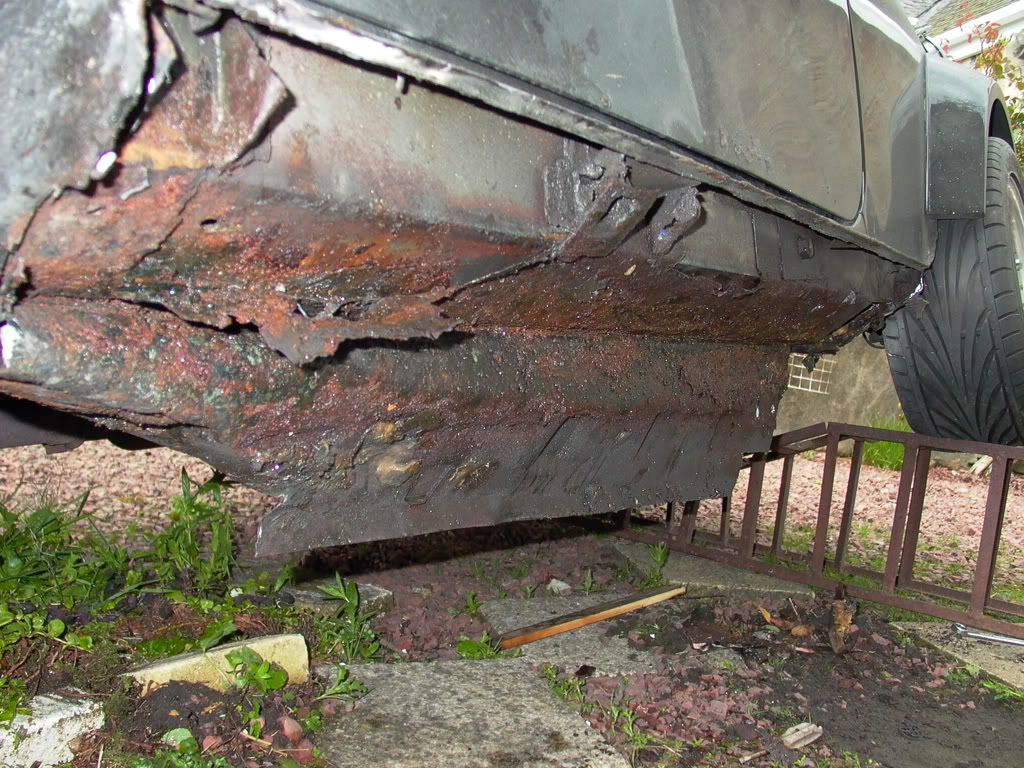
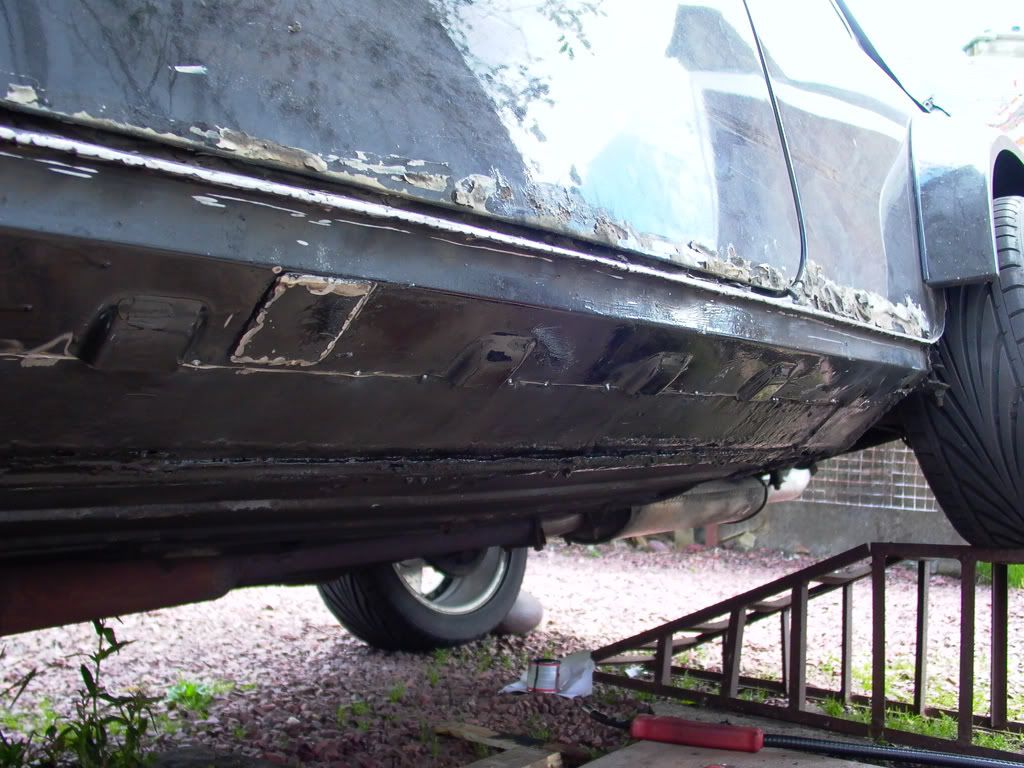
I just used a angle grinder with a plasma disc for the cuts then the grinding disc for the edge. Took a long time but was very clean and flat at the end. I seam welded the whole edge, thats what my mot guy said, he said no spot welds, I know that is the original but he told me replacement panels had to be seam welded. Its stronger any way so I just did it. Its an oversill to normal sill but its about the same. Hope it helps.
start
finished except bottom welds
More pictures at: http://s173.photobuc.....ll replacing/
start
finished except bottom welds
More pictures at: http://s173.photobuc.....ll replacing/
#41
black jack1275
-
- Members
-
- 276 posts
Mini Mad

#42
zodiac123
-

- Noobies
-
- 64 posts
Stage One Kit Fitted
- Local Club: Local Classic car club
Posted 18 August 2008 - 04:51 PM
Just joined the forum and this is exactly the sort of info I am after. Those before and after shots are great.
I have taken my outer sill off, (its all original metal as I've owned the car for the best part of its life), and have found that the exposed surface underneith, ie the floor of the car is now very thin metal once the surface rust has been removed.
I want to cut this out and replace with new metal so do I buy a floor edge repair section and weld this in?
Also, there are 6 inch sills available. Are these better and why would I need to use them?
Cheers
#43
blakestar
-

- Noobies
-
- 14 posts
Learner Driver
Posted 21 August 2008 - 07:10 PM
hey sorry if this is in the wrong place i have the oppisit problem i bought the chrome arche and sill kit and ive got my arches on no problem but cant figure out how u put the stips on, do the old plastic ones have to come off? or do they go voer the top also there slightly too long do i need to cut them or tuck them under the edges of the wheel arches please can someone talk me through how to fit these!!
#44
Gizzum
-

- Members
-
- 554 posts
Super Mini Mad
- Local Club: None atm
Posted 06 October 2008 - 02:59 PM
Guys,
I have found oversills on my BOC. I am getting the genuine sills but need to know what is required to weld them on? Do you seam weld the whole thing in place, minus the drain holes obviously, or is it case of spot welding where the original ones were i.e. in the same places as that pict above. All I can find on here is how to get them off, not putting them back on! If I get some guidance then when i do mine I will produce a how to... but at the moment I am a bit in th dark!
Thanks in advance
Jez


0 user(s) are reading this topic
0 members, 0 guests, 0 anonymous users


