Jump to content


Photo

Changing A Cars Colour In Photoshop Tutorial


  • Please log in to reply
17 replies to this topic

#1 Ollie

Ollie

    Mini Mad

  • Members
  • PipPipPipPip
  • 278 posts
  • Local Club: TurboMinis

Posted 19 November 2008 - 06:58 PM

OK, I made this tutorial as recently there are alot of people asking for others to change colours etc. Personally i don't mind helping someone who has had a go themselves, but if they clearly can't be bothered then nor can I.

The quality of the photoshop definately relies on the quality of the picture,and the time taken. I have found that a poor quality/ poorly lit photo doesn't have the results of a crisp picture. anyway............

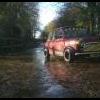
I have used my friends RX-7 as an example:

step one:

open up the picture you wish to use

File - Open - etc etc

Posted Image

step two:

make sure that you copy the background layer. this is done by simply dragging the background layer the the symbol shown below

Posted Image

step three:

make sure that your "background copy" is highlighted within your layer pallet

polygonal lassoo tool is highlighted and the feathering properties are that of 1 pixel. it is not vital but by changing it to 1 pixel it takes away the harshness.

Posted Image

step four:

this is the part that takes most of your time. the longer you spend on doing this park properly, the better the final image will be.

shortcut: (Ctrl & +) and the opposite (Ctrl & -) to zoom out

zooming in alot helps you here, you will have to trace around the object. remember that at this stage you are only after the shell of the car. we can cut windows etc later on.

should look something like this.........

Posted Image

step five:

now that you have traced around the car on background copy right click inside the traced area and chose "layer via cut" - by doing this it will creat a new layer just with what you have traced.

Posted Image

step six:

after cutting the layer, you will need to deselect the lasso. press Ctrl & D

hide your other layers so that you are only left with what you traced

Posted Image

step seven:

make sure that layer one is highlighted.

do exactly the same as step four, select the pologonal lasso tool and trace around objects such as indicators, lights , windows etc. basically anything that you don't wish to be coloured.

once you have selected a part (eg indicator) simply press the delete key, this will revmove your selected area. and move on to the next object.

you should end up with something looking similar to this

Posted Image

step eight:

soon comes the fun part........but for now we need to desaturate the layer.

make sure you are on the layer that has just the shell of the car and press

Ctrl & Shift & U

this will desaturate your layer and leave it looking like this........

Posted Image

it doesn't look any different really, but it makes alot of difference for the next step

step nine:

Image - Adjustments - Selective colour

Posted Image

you will get this box:

Posted Image

it is vital that you change the drop down box from default red, to neutrals...

this is where you change the amount of CYAN, MAGENTA, YELLOW & BLACK this will alter the colour of the desaturated shell....

Posted Image

note: the slightest change can make a huge difference, it can take time to get the colour you like.

it's not over yet...

step 10:

because it is so difficult to get your desired colour, there is another function within photoshop which we can use.

Image - Adjustments - Variations

Posted Image

you will get shown this:

Posted Image

by playing about a little more, you can change the colour of the car again, or add and get the colour exactly how you wish it to be

step eleven:

the finishing line........

simply show the background layer again and you will have fully changed the colour of the car........easy >_<

Posted Image

step twelve: - file saving

once you have completed your photoshop, make sure to save it as a jpg

File - Save As ........

Posted Image


hope this little tutorial can help a few people.

I would just like to add, this is just a tutorial to show the way i do it, there are plently of other techniques that people use or find easier. All tasks above are what i find suits me best and gives a good result.

Cheers

#2 sweetser

sweetser

    Up Into Fourth

  • Members
  • PipPipPipPipPipPipPipPipPip
  • 3,995 posts

Posted 19 November 2008 - 07:16 PM

;D excellent guide mate, think i might have to down load the trail version to see if i can do it.

I think this should be pinned aswell.

Cheers Luke. >_<

#3 Jimmy Hat

Jimmy Hat

    One Carb Or Two?

  • Members
  • PipPipPipPipPipPipPip
  • 960 posts

Posted 19 November 2008 - 07:52 PM

I recoloured a Transit and did a decent job of it using GIMP, using a slightly more Heath Robinson method, and it looked excellent, if i do say so myself >_< so pretty much ANYBODY can do it lol.
Nice tutorial by the way, might try doing that on my next one!

Edited by Jimmy Hat, 19 November 2008 - 07:53 PM.


#4 ashton

ashton

    Stage One Kit Fitted

  • Noobies
  • PipPipPip
  • 98 posts
  • Local Club: Kings Lynn Mini Club

Posted 20 November 2008 - 08:19 PM

anyone able to provide a GIMP guide? it seems to be quite different to photoshop!! cheers

#5 Mini Adam

Mini Adam

    Super Mini Mad

  • Members
  • PipPipPipPipPipPip
  • 682 posts

Posted 20 November 2008 - 09:28 PM

Very Good Tutorial

Couldn't be done any better than the way you suggested!

Just a quick note, at the very start if you double click the background layer in the layers menu it makes that layer available to use. This way you don't have to create a new layer from the background

#6 Jimmy Hat

Jimmy Hat

    One Carb Or Two?

  • Members
  • PipPipPipPipPipPipPip
  • 960 posts

Posted 20 November 2008 - 09:31 PM

As a very very brief guide ashton, what I did was lasso tool around the bodywork of the car, taking the time to make lots of clicks around the body rather than a few big ones, hold control and subtract the bits you dont want to recolour from the selection, then click the Colours menu, Colourise, turn the saturation down to zero, click ok. Then go into Colours, Colourise again and have a mess about with the hue, lightness and saturation controls until you get the right colour. I didn't do all that messing about with layers and everything but you might get slightly better results if you do? Hope that helps you, you may find more information about it on google?

Edited by Jimmy Hat, 20 November 2008 - 09:32 PM.


#7 Jonny998cc

Jonny998cc

    Speeding Along Now

  • Members
  • PipPipPipPipPip
  • 396 posts

Posted 20 November 2008 - 10:26 PM

cool whip:)

#8 andy_b

andy_b

    Mini Mad

  • TMF+ Member
  • PipPipPipPip
  • 157 posts

Posted 25 November 2008 - 01:09 PM

I've just tried to do this but it hasn't turned out quite like yours! My picture is taken at an angle with the front of he mini in the light and the rear in a shaddow. When I try to adjust the colour the front changes OK but the rear stays very dark so it's pretty much two colours, well one colour and black. How can I sort this?

Cheers, and thanks for a great guide. I'm going to be on Photoshop for hours now :)

#9 Beddo88

Beddo88

    Mini Mad

  • Members
  • PipPipPipPip
  • 253 posts
  • Local Club: not yet..

Posted 25 November 2008 - 04:15 PM

Brilliant tutorial!! Just having issues with the colour adjusters.. is there a way you can use the standard 255 on the three colours? Much help anyway, i'll have a play, hopefully be able to use it properly for my degree! lol

#10 Ollie

Ollie

    Mini Mad

  • Members
  • PipPipPipPip
  • 278 posts
  • Local Club: TurboMinis

Posted 25 November 2008 - 06:09 PM

the only way i found ab;e to get close to the colour i want is to use the colour picker tool so i know the percentage of CMYK.

even then it's not ideal, so just use the last part of the tutorial "Variations"

The example below shows (in red) the percentage of CMYK in the colour you have picked. Just transfer these to your slective colour on the right (in blue)

Posted Image

sorry i couldn't be of more help, if anyone figures out a better way please post up for everyone :)

Edited by Ollie, 25 November 2008 - 06:10 PM.


#11 Beddo88

Beddo88

    Mini Mad

  • Members
  • PipPipPipPip
  • 253 posts
  • Local Club: not yet..

Posted 26 November 2008 - 07:57 PM

Took a bit of playing around, but depending on what you want to use, you can use the colour sampler, pick up to 4 points you want, it will give you each one in either the 255 figures, or cmyk etc. Only thing is u have to write down the numbers, because as soon as you open up the selective colour window it stops showing the samples you've chosen. What version of photoshop do you use by the way?

#12 Ollie

Ollie

    Mini Mad

  • Members
  • PipPipPipPip
  • 278 posts
  • Local Club: TurboMinis

Posted 26 November 2008 - 09:48 PM

Took a bit of playing around, but depending on what you want to use, you can use the colour sampler, pick up to 4 points you want, it will give you each one in either the 255 figures, or cmyk etc. Only thing is u have to write down the numbers, because as soon as you open up the selective colour window it stops showing the samples you've chosen. What version of photoshop do you use by the way?


pen and paper :thumbsup: ptttf - you've got photoshop - just screen print it and paste in a new document..will save the effort of writing it down.

The photoshop i've got is CS2 mate.

#13 Beddo88

Beddo88

    Mini Mad

  • Members
  • PipPipPipPip
  • 253 posts
  • Local Club: not yet..

Posted 27 November 2008 - 08:38 AM

Haha yea didnt think of that!! I've managed to get my fingers on CS3, good but i dont know how to use 80% of the stuff on there!

#14 kez_19

kez_19

    One Carb Or Two?

  • TMF+ Member
  • PipPipPipPipPipPipPip
  • 946 posts

Posted 27 November 2008 - 09:04 AM

Thankyou for a great guide i will be playing with this alot in the future thankyou

michael

#15 Ollie

Ollie

    Mini Mad

  • Members
  • PipPipPipPip
  • 278 posts
  • Local Club: TurboMinis

Posted 29 November 2008 - 11:52 PM

glad i could help a few people out :P

post your efforts in here for everyone to see!!


2 user(s) are reading this topic

0 members, 2 guests, 0 anonymous users