Can anyone give me any advice on replacing my front inner arches? as im about to attempt this on my '89 racing green.
I was wondering if I should weld in braces to hold everything together whilst I do it because im worried that my doors wont fit afterwards.
Also, what would be the best way to support the car whilst I put the panel in?
thanks a lot
pEaCE
Dom
Also, rather than starting another thread. Any advice on the panel that the rear subframe mounts to would be appreciated. The panel is in good condition, its just that the bolts have sheared in the captive nuts.
Should I try drill/tap the old ones out? grinding them out and replacing them, looks like it would be a right pain in that position.


replacing front inner arches
Started by
Telejmp
, Aug 02 2005 09:49 PM
7 replies to this topic
#2

Guess-Works.com
-

- Traders
-

- 19,838 posts
Gearbox Guru
- Local Club: Rugby Classic Mini Owners Club
Posted 03 August 2005 - 06:41 AM
I assume you are talking about the fitch panel, the back of the inner arch where it joins the door hinge and the A panel.... unless your patching, I fairly sure you'll need to remove the A panel, and maybe the wing to gain access.. This is obviously a repair panel so will nead seam welding all the way round..
If your talking about the whole inner wing then the easiest would be to remove whole of the front end of the car including suspension, engine and subframe
As for the heel board, you can buy repair panels which have the captive nuts welded on, but what I had to do on grotbag was punch one of the nuts through and opened out the hole and welded a new nut into the plate.
#3
Woody
-

- Members
-
- 1,763 posts
Ring Runner 2005
Posted 03 August 2005 - 05:34 PM
If you mean the flitch or the whole inner wing , the easiest way would be to remove the whole front subframe complete with all the running gear , cut out the inner wings , clamp the new ones in place , bolt the bare subframe back in(to act as a jig to get corect alighnment of the front end) , weld the inner wings in place ,paint , replace the built up front subframe , BINGO! job done .
#4
Woody
-
- Members
-
- 1,763 posts
Ring Runner 2005
Posted 03 August 2005 - 05:37 PM
the front bolts in the rear subframe shearing is a common problem , last time i did the fix to this was to cut a hole in the sill and weld a new nut from behind , but then the mini needed a new sill anyway .
#5
Telejmp
-
- Members
-
- 184 posts
Mini Mad
Posted 07 August 2005 - 06:18 PM
Thanks for the replies everyone, sorry I havent checked the forum sooner.
My mini is already fully stripped to bare shell, with no front end, so im about ready to tackle this.
So, is it likely I wont have trouble with the doors not fitting? It just looked like the door hinge panel might get a bit of strength from the inner wing.
How did you both get the old nuts on the heel board out? My sills are just held on with self tappers for now so I can take them off, its just It looks like it would be difficult to get a grinder in, even without the sill there.
One other thing that I forgot to mention before. The area around the suspension mountings really needs attention. I can see that there is another skin underneath the inner wing in that area and that needs replacing too. Does this skin just stop C**p from getting into the front beam thingy? and can I get a replacement for this, or can I just use a piece of sheet steel?
I might be able to work this out once ive cut the wing out, but Id like to know what to expect before I start.
Thanks again
pEaCe
Dom
You two make it all sound so easy , your both so annoying lol. This job alone will probarbly take me weeks.
#6
balloonatic97
-

- Noobies
-
- 69 posts
Stage One Kit Fitted
- Local Club: Essex Mini Club
Posted 23 August 2009 - 09:01 AM
I need virtually the same thing doing, shame you live in Hull I could do with some help lol 
Let me know how long it takes you so i have some idea of what i am getting myself into
Much appreciation
Sam
Let me know how long it takes you so i have some idea of what i am getting myself into
Much appreciation
Sam
#7
minispark
-

- Noobies
-
- 73 posts
Stage One Kit Fitted
- Local Club: lsmoc
Posted 07 July 2010 - 06:28 PM
mine needs the same any help!
#8
sonikk4
-

- Admin
-
- 16,042 posts
Twisted Paint Polisher!!!
- Name: Neil
- Location: Oxfordshire
Posted 07 July 2010 - 06:45 PM
What you have where the damper mounts to is this
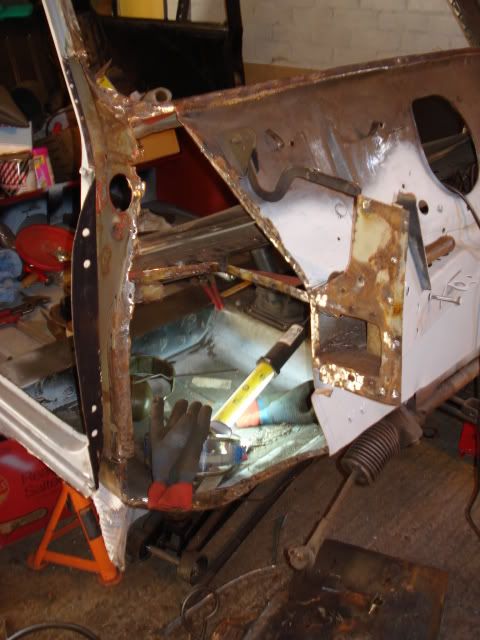
now this is obviously knackered and should look like this

Now with the inner wing welded on
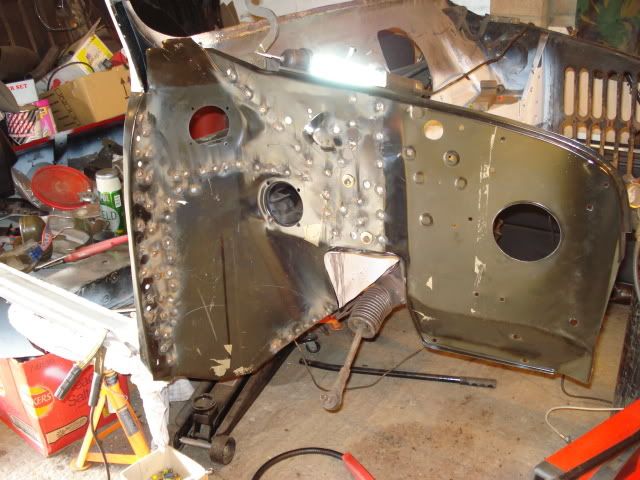
If you look at the last photo you can see where it is plug welded to the door post assembly. All i did there was to carefully drill out the existing spot welds where the old inner wing attached to the A post pillar then i used that with the door hinge holes to help align the new inner wing plus the damper mounting holes as well.
Help this helps anymore info then pm me also have a look at the Project Erm link and you can see what i had to do to the front of the car.
Sorry should have said that inner reinforcement plate for the damper i manufactured. The fwd edge has a slight fold to it to follow the contour of the inner wing.
This is the panel as you would view it from inside the inner wing
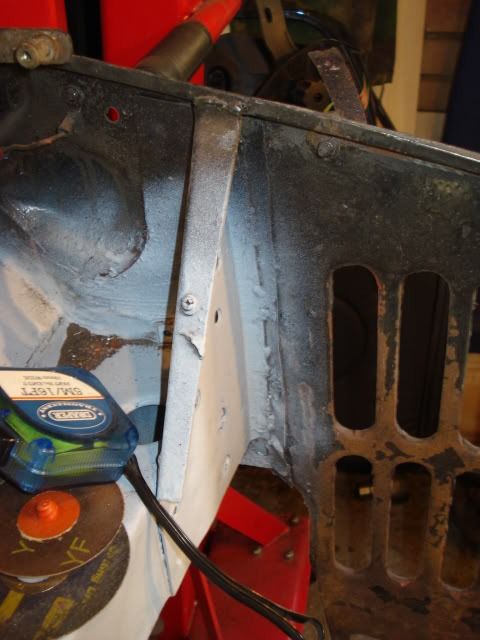
You can just make out the contour of it. (sorry about the way its rotated having a mare with photobucket)
now this is obviously knackered and should look like this
Now with the inner wing welded on
If you look at the last photo you can see where it is plug welded to the door post assembly. All i did there was to carefully drill out the existing spot welds where the old inner wing attached to the A post pillar then i used that with the door hinge holes to help align the new inner wing plus the damper mounting holes as well.
Help this helps anymore info then pm me also have a look at the Project Erm link and you can see what i had to do to the front of the car.
Sorry should have said that inner reinforcement plate for the damper i manufactured. The fwd edge has a slight fold to it to follow the contour of the inner wing.
This is the panel as you would view it from inside the inner wing
You can just make out the contour of it. (sorry about the way its rotated having a mare with photobucket)
Edited by sonikk4, 07 July 2010 - 07:00 PM.


1 user(s) are reading this topic
0 members, 1 guests, 0 anonymous users


