Jump to content


Photo
- - - - -

1998 Brg Mpi Rebuild........


  • Please log in to reply
68 replies to this topic

#1 tony kenobi

tony kenobi

    Speeding Along Now

  • Members
  • PipPipPipPipPip
  • 381 posts
  • Location: Perth, Western Australia
  • Local Club: Mini Owners Club of WA

Posted 11 January 2009 - 09:02 PM

Hi all, well its about time i put my mini project up here on the mighty TMF. Its been nearly a 2 year build, so sit back and enjoy the reading, oh and lots of pics (always a good thing).

From i was 15 i wanted a mini, but was warned off them by my dad,telling me i would be taking on another mans troubles. Well that did keep me from buying one...for 10 years untill i was 25 lol. Then a late Thursday night on ebay i find a 1998 MPI BRG with 32,000 on the clock, very little detail and a zero feedback seller. I knew nothing about minis, the various models and engine types. I sent a message and agreed a cracking price and jumped on the boat next day (oh yeah, im in N Ireland and it was in Scotland).

So picked it up and got it home to give it some TLC and after my first clean up,8 hours worth, i had this....
Posted Image

Posted Image

Posted Image

So i was over the moon with my buy, my first mini and enjoyed the summer, just really giving it a good service and a few new parts.

Edited by tony kenobi, 11 January 2009 - 10:15 PM.


#2 tony kenobi

tony kenobi

    Speeding Along Now

  • Members
  • PipPipPipPipPip
  • 381 posts
  • Location: Perth, Western Australia
  • Local Club: Mini Owners Club of WA

Posted 11 January 2009 - 09:16 PM

But as with any mini, it had the dreaded rust, and me being a real perfectionist, i wanted it sorted, so on a sunday afternoon i set about investigating the windscreen leak i had. The resulting afternoons work has continued to this present day.
My main aim was to of course have a rust free mini, but having never worked on a car in my life, no garage and no restoration experience, i set about taking the poor thing apart!....

Posted Image

Posted Image

Posted Image

So of course the rust turned out to be bad enough. I had wholes in the left a panel, both wings and the scuttle was gone..

Posted Image

Posted Image

Lucky it didnt rain for a few days, and i really had not a clue what i was getting myself into. Im a firm believer in not starting something unless you do it right. At this stage i was for keeping the engine in, rubbing down the shell and a quick respray, also keeping the subframes in as well.....but.....

Posted Image

...ooops.

So ok, now the back one was out, i was gonna clean it, check my back arms, cones etc and make sure all was in order.
Then an uncle of mine came round, he had restored a few VW campers and was praising my work so far. I was gaining confidence and enjoying the experience. He mentioned that i should take the engine out and consider taking it back to a bare shell. So the engine came out and was to remain untouched internally, but a quick clean up to put back into the mini after i had finished with the rust repairs.
Of course, now the mini needed a home, so i bought it one...

Posted Image

#3 tony kenobi

tony kenobi

    Speeding Along Now

  • Members
  • PipPipPipPipPip
  • 381 posts
  • Location: Perth, Western Australia
  • Local Club: Mini Owners Club of WA

Posted 11 January 2009 - 09:28 PM

So the engine was out and i was left looking at the front subframe..

Posted Image


Time to start into the loom and finish getting the interior out...

Posted Image

and then it was gone...

Posted Image

At this stage i was outta control, just taking it aprt for the fun of it, leaving me with a bare shell..oh, and a few more rust holes..

Posted Image

Posted Image

Ok, it took me about 2 months to get to this stage and it was November 2007. I had a bare shell which to be honest was a great shape, and everything else to put it back together again. I really didnt know where to go with the project, what detail, how much to spend, time scale or anything. So i got stuck in. My job at the time ment i was home every day during the week for 4pm, so every evening was spent working on it. My plan was to clean every single component i could and refit the mini back to standard.
I then discovered POR15 paint, read up on it, and thought it was a good route to go. So i started with the subframes and fittings...

Posted Image

They where sent away to be blasted and came back in great condition. I was no aware that i had a great foundation of a mini for a project. The shell was in ok condition and everything else could just do with a clean up. Both frames where then coated...

Posted Image

Any other loose parts i could get my hands on where also blasted and coated...

Posted Image

Posted Image

#4 tony kenobi

tony kenobi

    Speeding Along Now

  • Members
  • PipPipPipPipPip
  • 381 posts
  • Location: Perth, Western Australia
  • Local Club: Mini Owners Club of WA

Posted 11 January 2009 - 09:39 PM

I spent just over 9 months working on various parts of the subframes, painting them etc. Then i started buying parts. Not that anything really needed replaced, but the fact i had went to this stage on a rebuild and give it the attention it needed would have been stupid and maybe regret it in the future. New bearings, arm rebuild kits, genuine Minifins, new brake pipes, up graded dampers, new genuine rubber cones, the list goes on and one, but nothing was getting left behind.....

Posted Image
Posted Image

heres a few other photos of various stages of the rebuild....

Posted Image
Posted Image
Posted Image

Meanwhile my shell was just sitting there, but there was a reason. I was finding it near impossible to find someone to even come look at what work needed done to it, let alone get a price. I eventually spoke to a friend who i knew did repsrays etc, but he told me that he'd only consider doing the prep work and he wasn't confident enough to do the finishing repsray. well at least it was a start, so off the shell went...

Posted Image

#5 mighty mini jack

mighty mini jack

    Mighty Before a Pint

  • Members
  • PipPipPipPipPipPipPipPipPipPip
  • 5,095 posts

Posted 11 January 2009 - 09:44 PM

Looks like a good project dude. Well done

Where did you get that mini Green cover thingy from, its brilliant.

Edited by mighty mini jack, 11 January 2009 - 09:45 PM.


#6 Foxy Mini

Foxy Mini

    One Carb Or Two?

  • TMF+ Member
  • PipPipPipPipPipPipPip
  • 1,068 posts
  • Local Club: East Coast Mini Club

Posted 11 January 2009 - 10:00 PM

Amazing, that's really made me smile looking at that :(

#7 tony kenobi

tony kenobi

    Speeding Along Now

  • Members
  • PipPipPipPipPip
  • 381 posts
  • Location: Perth, Western Australia
  • Local Club: Mini Owners Club of WA

Posted 11 January 2009 - 10:01 PM

We then decided to blast the bottom of the mini up to the lip on the sills and replace the whole front end with genuine Heritage panels, this included the 2 wings, 2 a panels, scuttle and front panel, over £400 on panels! My uncle is a pro mobile sandblaster, he kindly did the blasting....
check out his ailen suit...

Posted Image

After it was blasted the welding began on the new panels. A few other holes where cut out and new metal put in. The front and underside of the shell was then coated in POR15 and primed. This left me with a completely rust free mini, what i had set out to do a year earlier,lol. It was then preped for painting and brought back home...

Posted Image

Posted Image
Posted Image

The hunt then began for a paint shop to do the finish, but again i ran into problems. I was so hard to find anyone that i was very close to selling everything and buying another running mini. The above pics are from around Feb 2008, i didnt find anyone untill July that year.

As i had now got both subframes built up and i was having trouble with the respray, i tunred my attention to this...
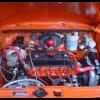
Posted Image
....the engine!

I had everyhting bought to give it the mother of all cleans, but as it was out and i had time to spare i thought id give it the once over and opened it up...
Like i said having never worked on a car in my life and with no help, i knew taking the body of one and its fixings apart was one thing, but to me, engines where a black art.But you gotta just get stuck in,lol......

Posted Image

Posted Image

All in all, everything looked to be in ok condition, so why did i go to the trouble of spliting it. It was just your standard MPI engine, 320000 on the clock, but it did have the crunch into second gear, so i considered sending the box of to John Guessworks, but instead, like everyhting else, i got stuck in myself.
I ordered a rebuild kit from john, as well as a 3.4 final drive and some s/c drops. Hours and hours spent on TMF in the injection section helped me. Plus Mini Mag had a gearbox rebuild article out so i thought how hard would it be,lol.

Posted Image

Five rebuilds later and i had it back, with new bearings alround, new syncro's, new final drive and central oil pickup...

Posted Image
Posted Image

My diff then had an overhaul...

Posted Image

#8 tony kenobi

tony kenobi

    Speeding Along Now

  • Members
  • PipPipPipPipPip
  • 381 posts
  • Location: Perth, Western Australia
  • Local Club: Mini Owners Club of WA

Posted 11 January 2009 - 10:13 PM

With my gearbox rebuilt, i turned to my block. Again lots of research and i was pointed towards this kit....

Posted Image

Its Swiftunes SWi05 cam, with 1.5 rollers, oil pump and duplex timing gear. I was now really starting to get into this engine building. I had my block bored out to 1295 ,honed and painted...

Posted Image

New main bearings fitted and cam bearings as well...

Posted Image
Posted Image
Posted Image
Posted Image

It all came together well, and timed it up as to Swiftunes recommened figures. I had everything done but still had my origianl head. Again hours of research told me that to unlock the minis power, a good head is key. So mine was wrapped up and sent off to Morspeed for the work. Bad idea, i understand many people have had work done by them and had great results.My experience with them was bad, and months and months of waiting i still had no head work done and was waiting. Eventually, i got my money back and sent off head to MED instead.

#9 tony kenobi

tony kenobi

    Speeding Along Now

  • Members
  • PipPipPipPipPip
  • 381 posts
  • Location: Perth, Western Australia
  • Local Club: Mini Owners Club of WA

Posted 11 January 2009 - 10:37 PM

My attention then turned to the manifold. I had it opened out,gasflowed and polished inside.Then fitted my new Burlen 52mm throttle body....
Posted Image

Posted Image
Posted Image

Then in Aug of 2008 i found someone to spray my mini, that was a good day,lol. Even though i was quoted over what i wanted to spend, a price was agreed and a date set. After alot of photoshop etc, i couldnt make my mind up on the colour to go with. I originally was going to BRG again, but was starting to reslly love the classic solid colours, espically Surf blue. But my interior wouldnt have matched up, then i came across Island Blue. That was that, came back to him about 2 weeks later to this....

Posted Image

Posted Image

Posted Image

Was really pleased with the work so far, and it was starting to come together. He had to re-prep the shell to his liking, which was expected with it coming from one body shop to another. It was then stonechipped and the spraying started.

Another 2 weeks passed and i got a call it was done, excited was an understatment...

Posted Image

Posted Image

Posted Image

So Island Blue with an Old English roof. I wasnt so sure on the colour of the roof, but it really has grown on me, adds to the retro feel.
With it now sprayed, i had a retro theme to go by for the rest of the mods etc.
I had originally decided to stick to the 12" wheels, but like everything else that changed for 10's of course!

#10 Sir Cheat

Sir Cheat

    One Carb Or Two?

  • TMF+ Member
  • PipPipPipPipPipPipPip
  • 1,171 posts
  • Local Club: Manchester Minis

Posted 11 January 2009 - 10:43 PM

Looking very very good, Keep them pics coming :(

#11 tony kenobi

tony kenobi

    Speeding Along Now

  • Members
  • PipPipPipPipPip
  • 381 posts
  • Location: Perth, Western Australia
  • Local Club: Mini Owners Club of WA

Posted 11 January 2009 - 11:44 PM

As soon as i got the shell home from its respray, i got as much Dinitrol as i possibly could into the sills and every crack of the car. Theres so much its running out of it from everywhere. SO hopefully its rust proof for another few years. Tho Simon who sprayed the car told me he has lots of paint on it, he said ill be dead and buried before it starts rusting again, i wish i shared his optimism,lol.

So after a week of applying Dinitrol, i got on with putting everything back together first up where the refurbished fuel lines.
Posted Image

With them on, and the battery cable, i could go about getting the back subframe in...

Posted Image

Posted Image

Then the moment came to get it on its 2 back wheels, ...

Posted Image

Posted Image

Posted Image

Even though at this stage i had decided against keeping th standard airbag and steering wheel in place, im keeping the wiring in for the SRS unit just incase i ever change my mind in the future, doubt it!

Posted Image

Most of the above work was done in a few days, so i really was picking up pace, and was hoping to have it on the road for the end of Septemeber, but the delay with Morspeed and the head work put a hault to that.
The fuel tank wont go into place, and is still just sitting there,2 hours of struggling and still no joy, have managed to mark the boot floor slightly as well, but itll be touched up later.
Then the front subframe was lined up and after about 3 hours of tweaking etc, it was on all fours for the first time in over a year.....
Posted Image

Posted Image

So it was on all fours for the first time over 1 year, indeed a very cool moment. I just wanted to jump in it and drive it there and then,bless!
It was fun time then fitting all the new shiney lights etc, infact not much has stayed standard, which i had originally started out with doing.

Posted Image

Posted Image

Posted Image

#12 tony kenobi

tony kenobi

    Speeding Along Now

  • Members
  • PipPipPipPipPip
  • 381 posts
  • Location: Perth, Western Australia
  • Local Club: Mini Owners Club of WA

Posted 11 January 2009 - 11:57 PM

It was time to put the dreaded headcloth in, and on my first atempt i screwed it up, so a new one ordered again from retrotrim. This time it went better, but its still not 100%. Out of everything on the car, its the thing im least happy with, due to me never having fitted one before, but its ok.
Heres a pic mid fitting...

Posted Image

So, im really flying through this, makes it look easy eh? lol, So with the front sub in, the loom in, next up was getting the gearbox and block in at least while i waited on the head from MED...

Posted Image

Posted Image

Posted Image

Above, having some fun getting the grill lined up and checking the bonnet for fitment,lol.
Posted Image

Posted Image

Posted Image

Obviously, the brakes had to be chaned to run the 10's, so bought a set of Minisport 7.9 calipers from ebay (i think the seller is on this forum,lol). New adjustable tie bars, hi lows, brake discs and braided hoses all round.

Posted Image

If you look at my original pics youll see my mpi only came with 1 clock, so i added the sportspack ones, plus mounted an oil pressure gauge which im now finding very helpful,more so than the oil temp! Plus my new Mota Lita steering wheel and boss from Wood and Pickett.Matches the dash better than i thought.
Also got my KAD quick shift fitted, sound deadening, pedals etc.

Posted Image

#13 tony kenobi

tony kenobi

    Speeding Along Now

  • Members
  • PipPipPipPipPip
  • 381 posts
  • Location: Perth, Western Australia
  • Local Club: Mini Owners Club of WA

Posted 12 January 2009 - 12:18 AM

Eventually i got my head back. MED stuck to their word and 1 month later i had my Road Competition head ready to fit....

Posted Image

Posted Image

Meanwhile i fitted the carpets, back seats and got my show cage fitted, though itll be out again for a polish.
Back arches fitted and a few other shiny bits. Also got the drivers seat fitted. Corbeau GT8, a classic racing seat and very comfy. Havent seen many of them about. Having not really sat in a bucket seat in a mini before, i feel like im very high, but im thinking this style of seat is very high compared to say the Classic Corbeau's or Cobras.

Also wired in my central locking and im keeping the sound system just down to 2 in the parcel shelf and my Alpine ipod stereo!
Posted Image
Posted Image
Posted Image

And thats nearly me up to date as off this weekend. Im having a few problems with it running at the moment (see injection thread) but the amount of mods ive done, i didnt expect it just to be perfect first time round.
Have the doors to build up and drill for the central locking.
Then my speedo isnt working at the moment, so thats to be sorted along with other small niggly probs. Then fit the doors and finally the passanger seat and my front and back badges. Then its off for a touch up in the body shop and a final polish, then off to get a valuation and engineers report before the insurance man touches me. Ive talked the gf into hitting a few off the big shows over with you guys in the mainland, really can not wait. Its taken 2 years, and ive still work to do.
Ill keep anyone intrested up to spec with progress.
Any comments or advice, please let me know, im all ears.
Posted Image

Posted Image

Posted Image

#14 Sir Cheat

Sir Cheat

    One Carb Or Two?

  • TMF+ Member
  • PipPipPipPipPipPipPip
  • 1,171 posts
  • Local Club: Manchester Minis

Posted 12 January 2009 - 12:47 AM

:- It didnt look bad when you 1st got it, but now well it looks A1 you should get it into one of the classic Mini mags.

#15 tony kenobi

tony kenobi

    Speeding Along Now

  • Members
  • PipPipPipPipPip
  • 381 posts
  • Location: Perth, Western Australia
  • Local Club: Mini Owners Club of WA

Posted 12 January 2009 - 12:59 AM

Hey, thanx for the comment.Everyone who looks at the beginning pics says the same "why did you take that apart?", but im picky like that and thought it be a good challange.
Im not sure its good enough to go into one of the magazines, though someone else mentioned it to me a few days ago.
To answer an earlier question, the shelter for the mini is by Protech. I found them on ebay and they where brillant give me some money of the shipping to N Ireland.
The shelter i have was designed for the mini, so it fits pretty well.
I know im late putting this thread up, but im hoping to continue using this for the years ahead i have the mini.
I have something similar on a few more local mini forums over here, but never thought about starting one here.
I suppose better late than never. I want it to serve a purpose of inspiration to anyone else out there in the midst of a project.


2 user(s) are reading this topic

0 members, 2 guests, 0 anonymous users