Jump to content


Photo
- - - - -

My 1993 Rio Rebuild


  • Please log in to reply
108 replies to this topic

#1 adam_93rio

adam_93rio

    Up Into Fourth

  • Members
  • PipPipPipPipPipPipPipPipPip
  • 3,271 posts

Posted 06 February 2009 - 08:27 PM

i posted a topic a few days ago asking wether or not i should start a project page, and thanks to a flood of replies... here it is

so, about the car:
shes a 1993 mini rio in black, called effy
i bought her in september of last year in hope of a quick spruce up and putting in for an MOT
heres what she looked like when i bought her

Posted Image
Posted Image

so a few days later the stipping started and, as with all minis once you start taking things off, rust appears

here are a few pictures of the progress so far in order of what ive done, im working from the back to the front as i learnt to weld in the boot wher eit wont be seen
it is me and my dad working on the car, so where ever i say we, its me and him, or where it says i, it could still mean us both

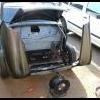
i emptied the boot and took the boot lid off so that i could get to the bad bits and repair
Posted Image

this is the damage on the passenger side
Posted Image

and the drivers side
Posted Image

this is the passenger side repair
Posted Image
Posted Image
Posted Image
my first bit of welding ever, not too bad but burnt through a little
Posted Image
Posted Image

the drivers side wasnt so bad so i thought id just patch the hole with steel plate
Posted Image
Posted Image

thats all i have time for tonight, had an 11 hour day at work so a bit tired, ill keep updating through the whole build tho
what do you all think?
thanks in advance for any replies

Edited by adam_93rio, 26 December 2010 - 06:18 PM.


#2 KenBen

KenBen

    Passed Test

  • Noobies
  • PipPip
  • 30 posts
  • Local Club: The Mini Clan

Posted 06 February 2009 - 08:38 PM

Looking good so far mate and welldone on the welding not bad at all for a first attempt , i have spent a fortune for someone else to weld for me so your doing yourself a favour by learning, keep up the good work

#3 feybrand

feybrand

    One Carb Or Two?

  • Members
  • PipPipPipPipPipPipPip
  • 1,247 posts
  • Location: Rugeley

Posted 06 February 2009 - 08:42 PM

ye well done my first welding was awfull good luck with the rest of the project

#4 adam_93rio

adam_93rio

    Up Into Fourth

  • Members
  • PipPipPipPipPipPipPipPipPip
  • 3,271 posts

Posted 07 February 2009 - 09:02 PM

ok so another big push today to get more of the panel work done, but i didnt show all of the progress up untill now last time, im hoping this update will get us to the present day, so ill pick up where i left off

this is the repair i made to the drivers side in the boot, it has a bit of filler on to smooth it out a bit
Posted Image

these repairs required the subframe being out
Posted Image

so i cleaned it up and stripped it
Posted Image
then rust cured the bad bits before paint
Posted Image
i have added a lick of black hammerite since but dont have a picture yet

this is what the valence looks like on, also shows pictures of the supports underneath that were custom made for strength and so we didnt have to wait for parts
Posted Image
Posted Image
Posted Image

so with the back end repairs done, i worked my way forward on to the drivers sill, which ended up being a mess
this is what it looked like cut out
Posted Image
Posted Image
Posted Image
Posted Image

with this all cut out we were on a role, i didnt want to wait untill the end of the month to buy new panels or wait for them to be delivered
so we made the inner sill
Posted Image
Posted Image

i had already bought the sill and doorstep because i knew they would need replacing, so here they are
Posted Image
Posted Image
Posted Image

with nothing else to do untill i could get the car out of the garage to turn around, i decided to take the windscreen out and see the damage
which damn near killed me
Posted Image

i have other pictures but photobucket wont let me upload any more at the moment, i think the uploader is down
so i will update in the next couple of days with the remaining pictures

i hope i get some more replies now
it took me about 2 hours to write this up as i kept daydreaming

#5 Junior Mini

Junior Mini

    Speeding Along Now

  • Members
  • PipPipPipPipPip
  • 313 posts

Posted 08 February 2009 - 06:36 AM

Keep at it your doing really well :thumbsup:

Should be a really nice car when your done :)

#6 daemonchild

daemonchild

    Up Into Fourth

  • Members
  • PipPipPipPipPipPipPipPipPip
  • 2,341 posts
  • Location: Pontypridd
  • Local Club: Unknown

Posted 08 February 2009 - 07:52 AM

Putting me to shame! I've got the same sort of issues to sort...
(Although three kids and no power in the garage are a reasonable excuse!)

But I've not been brave enough to get the angle grinder out yet.

#7 adam_93rio

adam_93rio

    Up Into Fourth

  • Members
  • PipPipPipPipPipPipPipPipPip
  • 3,271 posts

Posted 08 February 2009 - 09:50 AM

thanks for your replies and support

i should be able to update with the rest of the pictures today at some point, wont be doing too much on the car as i broke the grinder last night,
just cleaning up my radius arms today and see about painting them, then ill see if i can get some clear laquer for the suspenstion trumpets
then hopefully get the subframe back on

like i say tho, ill update with the pictures a bit later on

#8 adam_93rio

adam_93rio

    Up Into Fourth

  • Members
  • PipPipPipPipPipPipPipPipPip
  • 3,271 posts

Posted 08 February 2009 - 09:53 AM

Putting me to shame! I've got the same sort of issues to sort...
(Although three kids and no power in the garage are a reasonable excuse!)

But I've not been brave enough to get the angle grinder out yet.


what car do you have then?
i think its been quite slow progress, ive been working on it slowly since september now and being on an apprentice wage doesnt push things along smoothly
the grinder went caput yesterday so i need to try n get another today

lets see some pictures if youve got them

#9 Broomer

Broomer

    Camshaft & Stage Two Head

  • Members
  • PipPipPipPipPipPipPipPip
  • 1,771 posts

Posted 08 February 2009 - 10:00 AM

Do you really need those supports on the rear valance? i have not bothered putting them back on when i replaced my boot floor and valance.

#10 adam_93rio

adam_93rio

    Up Into Fourth

  • Members
  • PipPipPipPipPipPipPipPipPip
  • 3,271 posts

Posted 08 February 2009 - 10:06 AM

Do you really need those supports on the rear valance? i have not bothered putting them back on when i replaced my boot floor and valance.


the main reason is that im hoping they will stop the mud and crap being flicked up straight into the valence, they were in a sorry state before i took them off,
so i figured they must have been doing something, i guess it wouldnt really matter if you put them on or not
itll just be easier to clean than having to get right under the car

#11 MGMT

MGMT

    One Carb Or Two?

  • Members
  • PipPipPipPipPipPipPip
  • 1,109 posts

Posted 09 February 2009 - 06:47 PM

Looks like good progress to me! and also looks like your handy with metal and a welder (wish I was!)

well done, keep us updated!!!

#12 adam_93rio

adam_93rio

    Up Into Fourth

  • Members
  • PipPipPipPipPipPipPipPipPip
  • 3,271 posts

Posted 09 February 2009 - 10:05 PM

just a quick update, me and my dad lifted the back of the car and wheeled it out of the garage to turn it around to get to the other side
started work on the passenger side sill, discovering that the inner sill is just as bad as the drivers side was,
time for a new custom panel!!

first of all, heres what she looked like on the drive turning around

Posted Image
Posted Image
looks beaut!!!

this is the hole cut in the inner sill to be replaced as it was rusty and very thin
Posted Image
i have pictures of the damage but im too tired to sort them

the passenger wheel arch was as bad as the other side
Posted Image
if you cant tell, its basically a hole through into the passenger rear bin and slightly went under the seat

this is the custom panel made to patch this
Posted Image
Posted Image

i got this welded on aswell but didnt take a picture, reason being these were taken on my iphone and it got too dusty to get it out

#13 just_st3v3n

just_st3v3n

    Stage One Kit Fitted

  • Noobies
  • PipPipPip
  • 90 posts

Posted 22 March 2009 - 07:26 PM

good stuff man!
your saving yourself big bucks too making up your own replacement bits...

tip: the heelboard panel you made up in the last pic, make sure to line it up with the subframe on.. i had to do this a while ago with my own made replacememnts and was an absolute bia tch to line up on my own <---- wasnt happy with the strength and finances became good so i bought the replacememnt panel :thumbsup:

keep up the good work

steven

edit: oops just seen the date of last post

Edited by just_st3v3n, 22 March 2009 - 07:27 PM.


#14 feybrand

feybrand

    One Carb Or Two?

  • Members
  • PipPipPipPipPipPipPip
  • 1,247 posts
  • Location: Rugeley

Posted 22 March 2009 - 08:27 PM

good work excellent project just thought id mention that where youve got the axle stand isnt a jacking point and cant relly hold the weight of the car also i had one that was rusty on the missusus car and went through dont want to sound like a know it all but be carefull and spread the load more if you have to hold the car up by that bit

#15 stemini

stemini

    Passed Test

  • Noobies
  • PipPip
  • 28 posts

Posted 22 March 2009 - 09:32 PM

brill progress, keep it up :thumbsup:


0 user(s) are reading this topic

0 members, 0 guests, 0 anonymous users