Jump to content


Photo
- - - - -

My 1993 Rio Rebuild


  • Please log in to reply
108 replies to this topic

#16 adam_93rio

adam_93rio

    Up Into Fourth

  • Members
  • PipPipPipPipPipPipPipPipPip
  • 3,271 posts

Posted 04 April 2009 - 08:32 PM

there wasnt much weight in the car when i had it on these, and the floor is solid as a rock
its down on the floor now, and put the engine in this morning
not running tho as i need to get a few parts
but thanks for the advice
it sucks about the floor

good work excellent project just thought id mention that where youve got the axle stand isnt a jacking point and cant relly hold the weight of the car also i had one that was rusty on the missusus car and went through dont want to sound like a know it all but be carefull and spread the load more if you have to hold the car up by that bit


#17 adam_93rio

adam_93rio

    Up Into Fourth

  • Members
  • PipPipPipPipPipPipPipPipPip
  • 3,271 posts

Posted 04 April 2009 - 08:40 PM

good stuff man!
your saving yourself big bucks too making up your own replacement bits...

tip: the heelboard panel you made up in the last pic, make sure to line it up with the subframe on.. i had to do this a while ago with my own made replacememnts and was an absolute bia tch to line up on my own <---- wasnt happy with the strength and finances became good so i bought the replacememnt panel :ermm:

keep up the good work

steven

edit: oops just seen the date of last post


yeh it saves a lot, being an apprentice i cant get all the genuine panels yet,
although when i rebuild again i will be buying all new
i got the heelboard bit sussed
just make the template out of cardboard as its easier to work with
measure twice cut once
then marked the holes on the back of the panel i made through the holes,
drilled them then put the bolts in to hold it in place while i welded
ive got loads of other pictures and made loads of progress but not a lot of people seemed interested

but thanks for the input

#18 feybrand

feybrand

    One Carb Or Two?

  • Members
  • PipPipPipPipPipPipPip
  • 1,247 posts
  • Location: Rugeley

Posted 04 April 2009 - 09:06 PM

there wasnt much weight in the car when i had it on these, and the floor is solid as a rock
its down on the floor now, and put the engine in this morning
not running tho as i need to get a few parts
but thanks for the advice
it sucks about the floor

good work excellent project just thought id mention that where youve got the axle stand isnt a jacking point and cant relly hold the weight of the car also i had one that was rusty on the missusus car and went through dont want to sound like a know it all but be carefull and spread the load more if you have to hold the car up by that bit

like i said i just mentioned it because i had problems with it and you feel like a right numpty afterwards
also has there been any more progress

#19 adam_93rio

adam_93rio

    Up Into Fourth

  • Members
  • PipPipPipPipPipPipPipPipPip
  • 3,271 posts

Posted 07 April 2009 - 09:09 PM

there wasnt much weight in the car when i had it on these, and the floor is solid as a rock
its down on the floor now, and put the engine in this morning
not running tho as i need to get a few parts
but thanks for the advice
it sucks about the floor

good work excellent project just thought id mention that where youve got the axle stand isnt a jacking point and cant relly hold the weight of the car also i had one that was rusty on the missusus car and went through dont want to sound like a know it all but be carefull and spread the load more if you have to hold the car up by that bit

like i said i just mentioned it because i had problems with it and you feel like a right numpty afterwards
also has there been any more progress


theres been loads of progress and i must have about 50-100 more pictures
but nobody seemed interested so i gave up updating and to be honest the pictures are all mixed up in a mess
ill sort them out and update if you want to see it
got the engine in on saturday!!!

#20 just_st3v3n

just_st3v3n

    Stage One Kit Fitted

  • Noobies
  • PipPipPip
  • 90 posts

Posted 07 April 2009 - 09:48 PM

get the pics up! :)

#21 Twincam

Twincam

    Camshaft & Stage Two Head

  • Members
  • PipPipPipPipPipPipPipPip
  • 1,742 posts
  • Location: Londinium
  • Local Club: SMAG

Posted 18 April 2009 - 08:07 PM

Need pictures!!!

#22 scotty_09

scotty_09

    Stage One Kit Fitted

  • Noobies
  • PipPipPip
  • 76 posts

Posted 18 April 2009 - 08:42 PM

looking good mate hows it going will it be ready for l2b im trying to get mine done for it aswell

#23 adam_93rio

adam_93rio

    Up Into Fourth

  • Members
  • PipPipPipPipPipPipPipPipPip
  • 3,271 posts

Posted 21 April 2009 - 08:27 PM

ok ok ill spend a couple hours updating

#24 adam_93rio

adam_93rio

    Up Into Fourth

  • Members
  • PipPipPipPipPipPipPipPipPip
  • 3,271 posts

Posted 21 April 2009 - 10:31 PM

seen as tho i havnt updated in a while and a few people seem interested, i will post up the progress (or at least some of it)

so with my dad working on the car in the mornings and me a night, weve made a lot of progress

we finished off the inner sill on the passenger side, but at the moment i seem to have misplaced the pictures so will post them up at a later date

here is the inner sill from the outside, welded in and primed in red oxide
(the jacking point on the cross member has been rebuilt but will no longer be used)
Posted Image

then went on the put the outer sill on and primed
Posted Image

then off with the wings, (due to a lack of money and the wings not being too bad condition wise, i decided to just take them off, clean them up and refit them properly) i took them off for access to the scuttle
Posted Image

the scuttle was so bad that it had rusted straight through the bulkhead and dash rail aswell
so i bought them as a complete panel from minidaves on here

repair panel
Posted Image

bulkhead part cut out
Posted Image

cut out ready for replacement
Posted Image

welded in place
Posted Image

and scuttle on
Posted Image

as the scuttle panel didnt reach far enough up the door pillars to replace the rust,i also bought door pillars from the same car that minidaves was cutting up
(thanks again)
this is the gap on drivers side
Posted Image

and the repair before filler and primer
Posted Image

then painted in grey primer
Posted Image

the passenger side gap
Posted Image

and repair (again before filler and primer)
Posted Image

#25 adam_93rio

adam_93rio

    Up Into Fourth

  • Members
  • PipPipPipPipPipPipPipPipPip
  • 3,271 posts

Posted 21 April 2009 - 10:32 PM

the dash rail in and primered (picture taken after wings were put on if you look)
Posted Image

ok, the drivers door hinge panel (a post?) was very weak and thin so a repair panel was made for this too
Posted Image

the wings were then cleaned with a wire brush on the grinder on the inside then primed and put back on
test fit
Posted Image

then welded on and bonnet fit well first time
Posted Image

this just shows welding on the a panel which i think looks really good
Posted Image

so with the front end back together and all welding underneath done i turned my attention to the rear subframe
which was previously cleaned up and painted
i cleaned off the radius arms and painted
Posted Image
Posted Image

and the trumpets were cleaned up and painted silver
Posted Image

the rear brake assembly ( not the best picture)
Posted Image

and the subfamre built up ready to go on
Posted Image

with the subframe finished, we quickly set to work in getting it on (all new brake lines were run)
the car on the floor for the first time in months
Posted Image

and painted the engine bay black hammerite
Posted Image

i then primered up the front end to prevent rust coming back
Posted Image

then i applied a coat of black
Posted Image

i think thats alli will upload for tonight
its taken me ages to write out but probably will only be a couple of minutes reading

#26 adam_93rio

adam_93rio

    Up Into Fourth

  • Members
  • PipPipPipPipPipPipPipPipPip
  • 3,271 posts

Posted 21 April 2009 - 10:33 PM

looking good mate hows it going will it be ready for l2b im trying to get mine done for it aswell


thats how
also, i have a trust fund come through to give me some money to finish and pay for insurance

#27 just_st3v3n

just_st3v3n

    Stage One Kit Fitted

  • Noobies
  • PipPipPip
  • 90 posts

Posted 22 April 2009 - 11:25 AM

looking good man!
fair play to ya making up some of the panels...
im at the stage of fitting the front on.. was it a balls to get it right??

steven

#28 adam_93rio

adam_93rio

    Up Into Fourth

  • Members
  • PipPipPipPipPipPipPipPipPip
  • 3,271 posts

Posted 26 April 2009 - 05:00 PM

looking good man!
fair play to ya making up some of the panels...
im at the stage of fitting the front on.. was it a balls to get it right??

steven


it wasnt as bad as i thought, what panels have you got to put on?
thew only thing i really struggled with was where i didnt have enough steel to weld to,
i was using the ones that came off, so youll find that the seam on the drivers side is practically a perfect shaped seam made of weld

but just get loads of panel clamps, (or mole grips) and get it all nice before you start to weld, as keep putting your bonnet on to see

#29 adam_93rio

adam_93rio

    Up Into Fourth

  • Members
  • PipPipPipPipPipPipPipPipPip
  • 3,271 posts

Posted 19 May 2009 - 05:59 PM

ok seen as the car is finished and roadworthy i decided id finish updating

engine in
Posted Image
Posted Image

exhaust on and manifold
Posted Image

and carb fitted
Posted Image

we had a paint reaction on the first spray of the front end so we stripped it back to bare metal and started again
Posted Image

then re-primered
Posted Image

and back in black
Posted Image

then i put the lights back on
Posted Image

and grille
Posted Image

dash area sorted
Posted Image

door cards and furniture back in
Posted Image
Posted Image

seats and carpet back in : interior finished
Posted Image

and my car, after months of hard graft its finished and ready for the MOT
Posted Image


Looking fantastic sat outside the mot station
Posted Image

and just wide enough for the pit
Posted Image

me and the car
Posted Image

so after the MOT i went about fitting a new rocker cover with t bars that i aquired from newark mini show
plus a weather shield ready for london to brighton
Posted Image

London to Brighton pictures to follow
thanks to the people who have followed my project and shown an interest, i hope you like the 'finished' product
there are still so many things i may change so i will keep this as a running update thread

#30 adam_93rio

adam_93rio

    Up Into Fourth

  • Members
  • PipPipPipPipPipPipPipPipPip
  • 3,271 posts

Posted 04 October 2009 - 07:03 PM

ok i havnt been on this for a while to update,
since before L2B!!!!!
theres been a lot of changes since getting it on the road,
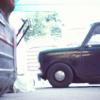
so anyway, last time i said i was going to put up a picture from london to brighton...
this is me and my dad in brighton with the car after making it all the way there with no problems at all
Posted Image

then i passed my test on the 8th of june, so i could go anywere without having someone at the side of me
Posted Image

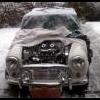
thing went well for about a month untill one night in the wet i aqua planed on a bend and ended up in a ditch
which looked like this
Posted Image
Posted Image

luckily me and my friend got out unharmed and there was only minor damage,
Posted Image

and even more luckily it was a few days before i was due to pick up a couple of fibreglass front ends
Posted Image
the white on will be fitted to effy while the blue one may be sold or put on the sprite although offers are welcome

she was back on the road in no time, however she still has the slightly bruised front end on
a couple of days later i went to ipswich (yes from doncaster) to pick up a roof rack that i won on ebay
Posted Image
i love the retro roofrack look, but its not just there to be pretty. i used it to get a few logs from my grandmas to my house for my dad
and also to pick up a rear panel for my sister mini from PandL minis
ill show pictures in the next update which should be sometime over the next few days
but it is late now and cant be bothered to get the cable to upload more pictures
let me know what you think

Edited by adam_93rio, 04 October 2009 - 07:05 PM.


1 user(s) are reading this topic

0 members, 1 guests, 0 anonymous users