
george

One Carb Or Two?


Posted 24 March 2010 - 11:35 AM
Up Into Fourth
Posted 24 March 2010 - 12:02 PM
Nice one mate, good to see another rio on the road, although just like mine there isn't much rio left, keep up the good work.
george
One Carb Or Two?
Posted 24 March 2010 - 12:36 PM
Nice one mate, good to see another rio on the road, although just like mine there isn't much rio left, keep up the good work.
george
i still have a lot of rio let in her, ive still got the original interior in good nick, (in my bedroom) lol
i dont use them because being limited i dont want them to wear out, they go in for big shows and runs tho,
theyll be in for the london to brighton this year
i really like yours aswell tho, been looking at your project thread its coming on well
Edited by george91, 24 March 2010 - 12:37 PM.
Up Into Fourth
Posted 25 March 2010 - 07:58 PM


Up Into Fourth
Posted 02 April 2010 - 09:38 AM


Up Into Fourth
Posted 02 April 2010 - 05:28 PM
Up Into Fourth
Posted 02 April 2010 - 10:10 PM
Camshaft & Stage Two Head
Posted 02 April 2010 - 10:20 PM
One Carb Or Two?

Posted 03 April 2010 - 01:01 AM
Up Into Fourth
Posted 04 April 2010 - 04:32 PM
Nice project you've got mate. Might get to see you at London to Brighton as long as mine is ready! Keep up the hard work
Up Into Fourth
Posted 04 April 2010 - 04:36 PM


Up Into Fourth
Posted 06 April 2010 - 08:00 PM


Edited by adam_93rio, 06 April 2010 - 08:02 PM.
Definitely Not Camp Or A Freddy

Posted 06 April 2010 - 08:10 PM
ok got some done after work tonight, i really wasnt happy the other day with the quality of the firbreglass front ive got. ive no idea who made it but its a terrible fit, the wings on it wouldnt lin eup with the a panels at all, and round the scuttle took some working aswell. and i thought the steel panels were a pain!!
anyway...
first thing was to make a bracket up to hold the wings to the a panels
i did make some new a panels with mountings welded on but i have gone a different way with it now
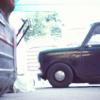
i went on a hunt to find the fibrglass bonnet, (can you spot it?)
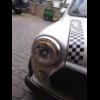
took a picture to show the fixing for the wings
and used a peice of angle iron mounted to the existing hinges for the bonnet pins
this shows the hinge down how it will sit and masking up on the wings
i marked where the brackets were then put the bonnet in place and drilled through, then used a special drill bit to elongate the holes, then drilled the brackets through and bolted pins in place
showing the pin hole, and marked holes for the top plates
and the pin mounted
i decided i would want the back of the bonnet raised, and i could do this by just unscrewing the threaded bar, however it vibrated as it wasnt a tight fit.
so out came the thinking caps
hmmm
sorted
for the slow ones out there, i cut the rubber seal off some old ht leads, this then pushed over the threaded bar and although it was quite a snug fit, i decided to put a nut behind it to make sure when i push down on the bonnet to secure the pins, i dont push the rubber down too
this rasied the bonnet lovely
and this is how she was left tonight
you can see at the front i have started to mount the spring hooks but i had no nuts and bolts small enough to mount the othe half
so tomoro i should be off to the bolt shop to get that sorted, then i should refit the indicators (need to do some soldering for the earth) and reconnect and align the headlights. gotta find a way of fitting the number plate untill i get stick on ones
im thinking if i can mount it sort of in front of the alternator i can get away with no grille for a bit till i get one off scott
oh, also need to trim the wings to get wheel clearance and refit the arches (staying with standard ones for now, untill funds allow for group 2's!
Up Into Fourth
Posted 06 April 2010 - 08:13 PM
Up Into Fourth
Posted 09 April 2010 - 05:19 PM


Edited by adam_93rio, 09 April 2010 - 05:22 PM.


0 members, 1 guests, 0 anonymous users


