Jump to content


Photo
- - - - -

First Time Engine Rebuild


  • Please log in to reply
7 replies to this topic

#1 dhirsty

dhirsty

    Passed Test

  • Noobies
  • PipPip
  • 32 posts

Posted 03 March 2009 - 03:01 PM

Model:Mini Clubman Estate
Year:1972
Description of problem (please be as in depth as possible):
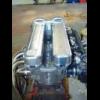
The big end bearings went on my mini about 3 years ago, the engine (998) is out and I have decided that it has been sitting in my garage too long, so I have taken a week off later in the month to try and strip/rebuild it.

Given that I have limited time and can't easily 'nip to the shops', before I start stripping it I want to get as many of the parts that I will need to replace - is there any such 'kit'? I am thinking of seals, parts, nuts/bolts that I should consider replacing since I don't plan on taking the engine out again (at least not soon!).

What specific tools will I require?

I was also looking at buying an engine hoist and stand - I have seen other threads talking about problems with finding a stand with the correct mounts, but I don't really want to have a special bracket made and would rather buy the right one first time. Any recommendations (stand and hoist)?

I expect that the crankshaft will need regrinding - how will I know, and how much am I likely to be looking at? (long shot, but has anyone had any experience of Whitmore of briston engine reconditioners?).

It's been quite a while since I did anything with this car, and have recently been inspired to get it back on the road (I really don't want to have to sell it).

Hope you can help...

Attached Files


#2 dhirsty

dhirsty

    Passed Test

  • Noobies
  • PipPip
  • 32 posts

Posted 24 March 2009 - 10:54 PM

Well, I'm well on my way - needed a few larger sockets than I already had, but the only 'specific' tools were a valve spring compressor tool and a flywheel remover. Engine is in far batter condition than anticipated and is at an engine specialists to have the head skimmed etc. (hopefully it won't need much replacing).

#3 stormintrooper

stormintrooper

    Up Into Fourth

  • Members
  • PipPipPipPipPipPipPipPipPip
  • 2,072 posts

Posted 24 March 2009 - 11:03 PM

is it just me or does the dyno look almost the same as the inertia starter ?

and good luck to ya fella

#4 mk1leg

mk1leg

    Crazy About Mini's

  • Members
  • PipPipPipPipPipPipPipPipPipPip
  • 9,343 posts
  • Location: Jersey
  • Local Club: Mini Club Jersey, MCR

Posted 24 March 2009 - 11:38 PM

Treat yourself to this DVD.............

http://www.minisport...o_DVDUMBAS.html

this will take you through strip down and assess worn and unuseable parts to a full rebuild ........its very good...... ;)

#5 mini7boy

mini7boy

    Speeding Along Now

  • Banned
  • PipPipPipPipPip
  • 389 posts
  • Local Club: moasf

Posted 25 March 2009 - 10:04 AM

Treat yourself to this DVD.............

http://www.minisport...o_DVDUMBAS.html

this will take you through strip down and assess worn and unusable parts to a full rebuild ........its very good...... :)


You can view a sample of this DVD at this website: http://www.minifilms...iesbuilder.html

There's a video viewing screen on this webpage and you can view 3+ minutes of the DVD, but not the interesting bits. It's just a sample, after all.

I own the video and it is excellent. I especially like the sections on the gearbox rebuild and the dyno session.

Worth every penny!

#6 Pauly

Pauly

    Up Into Fourth

  • Members
  • PipPipPipPipPipPipPipPipPip
  • 4,213 posts
  • Location: Wolverhampton
  • Local Club: Just 4 Fun Minis!

Posted 25 March 2009 - 12:17 PM

Just take your time, bag/tag things if you need to. If you can lay out parts in order you removed them, especialy when it comes to removing the head. Number the pushrods in order you have removed them by placing them in a bit of card for example. If you are not sure on anything then refer to the haynes.

Paul.

#7 ANON

ANON

    More Jammy than a Jammy dodger.

  • Traders
  • PipPipPipPipPipPipPipPipPip
  • 2,682 posts
  • Location: my house
  • Local Club: pony

Posted 25 March 2009 - 07:32 PM

crank grind should be about £60 or so.
and you'll want a tube of graphogen for when you slap it all backtogether

#8 dhirsty

dhirsty

    Passed Test

  • Noobies
  • PipPip
  • 32 posts

Posted 25 March 2009 - 08:10 PM

Thanks all :P -

Everything has been bagged/tagged as well as taking about 250+photos to boot.

The DVD looks like a very worthwhile buy - it's on the list!, along with the crankshaft paste... anything else?

The engine is now at a specialist, but it is in far better condition than expected, so I'm hoping that once they've checked it out it won't need a re-bore/new pistons. They quoted £70 for regrinding the crankshaft and whilst they don't seem to be absolutely the cheapest, it was on word of mouth and they seem very genuine having been there to drop it off.

I'll be putting some pics as I progress on a thread in the projects section (to avoid duplication).

Currently having problems removing the clevis pins securing the clutch and brake master cylinder push rods to their respective pedals...


1 user(s) are reading this topic

0 members, 1 guests, 0 anonymous users