Hey all
i am thinking of converting my wind up windows for mmk1 sliders i have red somewhere that this can be done does anybody knows where i can get the parts
thanks

Mk1 Windows Converison On A Mk4 Shell
Started by
Chewy
, Jun 01 2009 10:40 PM
13 replies to this topic
#1

Chewy
-
- Members
-

- 162 posts
Mini Mad
- Local Club: Leamington Spa Mini Massive
Posted 01 June 2009 - 10:40 PM
#2
Matt.P
-

- Members
-
- 591 posts
Super Mini Mad
- Local Club: Leyland Mini Club
Posted 02 June 2009 - 10:15 AM
Hi, not sure if you've already tried this, but give the minidoor people a shout! They're normally at most of the mini shows, mainly the midlands ones such as malvern, bingley and newark. They'd probably be the best bet.
just out of curiosity, how are you going about doing this? Read the title and it sounds brill!
Best of luck with it!
just out of curiosity, how are you going about doing this? Read the title and it sounds brill!
Best of luck with it!
#3
mike.
-

- Members
-
- 6,176 posts
Crazy About Mini's
Posted 02 June 2009 - 10:59 AM
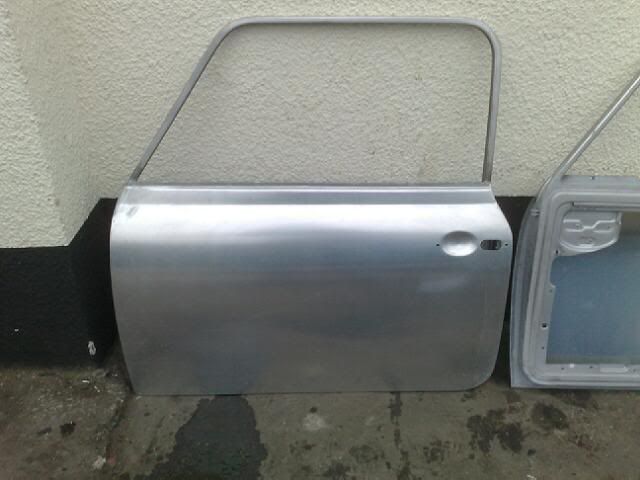
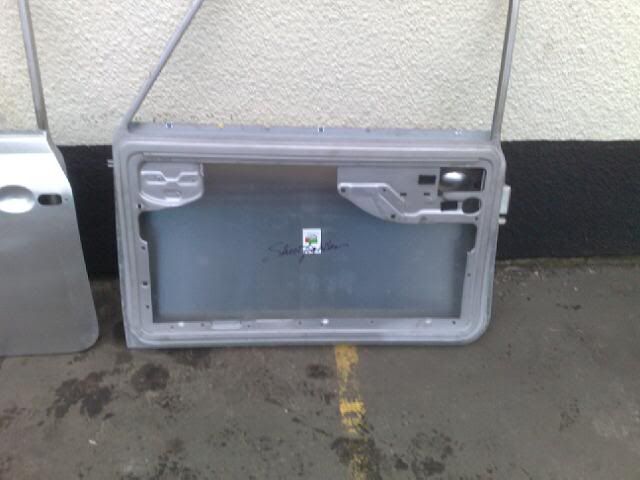
I'm doing this with my doors. The way i'm doing it, is with the street fighter doors from minidoorcompany.
They are a mk3> door, with an alu skin, the inner door frame cut away, and the window opening capped off to allow the rail for sliding windows to sit on.
I plan to use the mk1 perspex kit the minidoorcompany sell for my windows too.
Heres a couple of pics:
They are a mk3> door, with an alu skin, the inner door frame cut away, and the window opening capped off to allow the rail for sliding windows to sit on.
I plan to use the mk1 perspex kit the minidoorcompany sell for my windows too.
Heres a couple of pics:
#4
1984mini25
-

- Members
-
- 8,784 posts
Crazy About Mini's
- Location: -
Posted 02 June 2009 - 11:24 AM
I’ve converted my mk3 doors to mk1 poloycarb sliding windows on the green 89Mayfair.
I can give you a more detailed explanation into the in’s ands out’s of the conversation latter on this evening when I get a chance and more time.
In the mean time these a few picks in the link (89 Mayfair) to give you some ideas.
I can give you a more detailed explanation into the in’s ands out’s of the conversation latter on this evening when I get a chance and more time.
In the mean time these a few picks in the link (89 Mayfair) to give you some ideas.
#5
miniadventure
-

- TMF+ Member
-
- 724 posts
One Carb Or Two?
Posted 02 June 2009 - 07:35 PM
ooooooooooo them doors look the business. Didnt think you could do this
#6
mini.cooper998
-

- Members
-
- 685 posts
Super Mini Mad
- Local Club: looking
Posted 05 June 2009 - 06:44 PM
hi what sliding channel are you using in the doors is it standard mk1 or something more
thanks
andy
thanks
andy
#7
1984mini25
-
- Members
-
- 8,784 posts
Crazy About Mini's
- Location: -
Posted 05 June 2009 - 06:52 PM
Just standard unmodified, well slightly trimmed at each end as no two minis are ever the same, mk1/2 sliding channel (the chrome bit)
#8
mini.cooper998
-
- Members
-
- 685 posts
Super Mini Mad
- Local Club: looking
Posted 05 June 2009 - 07:01 PM
how have you mounted the sliding channel in the door
is it rivited or have you welded it in
thanks
andy
is it rivited or have you welded it in
thanks
andy
#9
Nightrain
-

- Banned
-
- 976 posts
One Carb Or Two?
Posted 05 June 2009 - 07:06 PM
Just standard unmodified, well slightly trimmed at each end as no two minis are ever the same, mk1/2 sliding channel (the chrome bit)
Thats because Mk1 & 2 doors, are bigger/longer than Mk3 onwards !
#10
1984mini25
-
- Members
-
- 8,784 posts
Crazy About Mini's
- Location: -
Posted 05 June 2009 - 07:08 PM
Just standard unmodified, well slightly trimmed at each end as no two minis are ever the same, mk1/2 sliding channel (the chrome bit)
Thats because Mk1 & 2 doors, are bigger/longer than Mk3 onwards !
I didn’t have to trim anything off just file the ends slightly to clean them up and they slotted into place perfectly.
#11
mini.cooper998
-
- Members
-
- 685 posts
Super Mini Mad
- Local Club: looking
Posted 05 June 2009 - 07:09 PM
have you used the channel and rubbers and top rubbers or just the channel and the standard mk4 rubbers
also what glass have you used standard mk1 or perspex
thanks
andy
also what glass have you used standard mk1 or perspex
thanks
andy
#12
mini.cooper998
-
- Members
-
- 685 posts
Super Mini Mad
- Local Club: looking
Posted 05 June 2009 - 07:10 PM
did you just screw them through the door or weld them in
#13
1984mini25
-
- Members
-
- 8,784 posts
Crazy About Mini's
- Location: -
Posted 05 June 2009 - 07:21 PM
have you used the channel and rubbers and top rubbers or just the channel and the standard mk4 rubbers
also what glass have you used standard mk1 or perspex
thanks
andy
did you just screw them through the door or weld them in
Now I’ve found the previous post I made a few months ago.
For the window conversion (about £80-£90 to do both doors the I did use second-hand stuff) but some of the parts are harder to find 2nd hand as you need the mk1 sliding window runners, I was lucky enough to find a decent pair at a show for £15. Some W -shaped felt window channel, the bottom rigid part wasn’t available when I was looking so used this instead but seams to have worked, again I picked up a roll of 5 meters which is enough to do both doors and have some left over from a show for £20 (I can’t remember the stand although I know pheonixminitrim.com do it)
A selection of mk1 window catches (all 4 are different) I was lucky again on this one as I found a box full of catches and bought a mix of about 10 good/not so good ones that just needed a clean up for £6, normally there about £5 each new.
And lastly the replacement glass/plastic windows, which I’m made from a 4mm sheet of polycarbonate I bought for £50.
As for modifying the doors, first you need to strip out the glass and old winder regulator then carefully cut a slot at each end of the inner door panel which the inner chrome strip clipped onto with a dermal or similar. This is to allow the upper lip to be beaten and flattened over with the help of a block of wood up inside the door and a hammer to give something for the metal runners to sit and be screwed to. This took quite a bit of skill to get right as to not to damage the top of inner skin and to get the runner to fit, some careful filing of the ends and corners of the door was needed for a snug fit and then temporarily fixing it in place with some sided tape.
Then it’s just a case of trimming and fitting the w-shaped felt channel to fit the channel in the doorframe and metal runner and some careful measuring/using the old glass a guide for making up some templates for the windows before making them out of Perspex/polycarbonate.
And for the real fun, getting the windows and bottom channel fixed in place, like so…
Rest the bottom felt channel on the slider channel then rest both pieces of glass on that. Remember that the front glass goes in the outer channel, rear glass in the inner as viewed from inside the car.
Guide the glass into the channel fitted to the top of the door and slide the assembly into place.
Use a centre punch to make marks through the felt channels into the slider channel. You want to make these punch marks on the "inside" channel for the front of the chrome strip and on the "outside" channel towards the rear of the chrome strip. (Why will become apparent later).
Remove the slider channel, bottom channel and windows again and offer up slider channel back to the door and drill through where you made the centre punch marks. Punch larger holes through the bottom felt channel at these points for screw clearance.
Now you can re-fit the windows to the felt/ slider channel and then offer up to the door like before and then secure in place with some screws, preferably countersunk ones so the windows can slide over the heads.
And then it’s just a case of offering up were the catches go on the slider and making/drilling the holes need in the windows before repeating the hole process on the other side.
#14
mini.cooper998
-
- Members
-
- 685 posts
Super Mini Mad
- Local Club: looking
Posted 06 June 2009 - 08:29 PM
thats great should maybe be stored as a sticky as im sure it gets asked alot
have you used the channel and rubbers and top rubbers or just the channel and the standard mk4 rubbers
also what glass have you used standard mk1 or perspex
thanks
andydid you just screw them through the door or weld them in
Now I’ve found the previous post I made a few months ago.
For the window conversion (about £80-£90 to do both doors the I did use second-hand stuff) but some of the parts are harder to find 2nd hand as you need the mk1 sliding window runners, I was lucky enough to find a decent pair at a show for £15. Some W -shaped felt window channel, the bottom rigid part wasn’t available when I was looking so used this instead but seams to have worked, again I picked up a roll of 5 meters which is enough to do both doors and have some left over from a show for £20 (I can’t remember the stand although I know pheonixminitrim.com do it)
A selection of mk1 window catches (all 4 are different) I was lucky again on this one as I found a box full of catches and bought a mix of about 10 good/not so good ones that just needed a clean up for £6, normally there about £5 each new.
And lastly the replacement glass/plastic windows, which I’m made from a 4mm sheet of polycarbonate I bought for £50.
As for modifying the doors, first you need to strip out the glass and old winder regulator then carefully cut a slot at each end of the inner door panel which the inner chrome strip clipped onto with a dermal or similar. This is to allow the upper lip to be beaten and flattened over with the help of a block of wood up inside the door and a hammer to give something for the metal runners to sit and be screwed to. This took quite a bit of skill to get right as to not to damage the top of inner skin and to get the runner to fit, some careful filing of the ends and corners of the door was needed for a snug fit and then temporarily fixing it in place with some sided tape.
Then it’s just a case of trimming and fitting the w-shaped felt channel to fit the channel in the doorframe and metal runner and some careful measuring/using the old glass a guide for making up some templates for the windows before making them out of Perspex/polycarbonate.
And for the real fun, getting the windows and bottom channel fixed in place, like so…
Rest the bottom felt channel on the slider channel then rest both pieces of glass on that. Remember that the front glass goes in the outer channel, rear glass in the inner as viewed from inside the car.
Guide the glass into the channel fitted to the top of the door and slide the assembly into place.
Use a centre punch to make marks through the felt channels into the slider channel. You want to make these punch marks on the "inside" channel for the front of the chrome strip and on the "outside" channel towards the rear of the chrome strip. (Why will become apparent later).
Remove the slider channel, bottom channel and windows again and offer up slider channel back to the door and drill through where you made the centre punch marks. Punch larger holes through the bottom felt channel at these points for screw clearance.
Now you can re-fit the windows to the felt/ slider channel and then offer up to the door like before and then secure in place with some screws, preferably countersunk ones so the windows can slide over the heads.
And then it’s just a case of offering up were the catches go on the slider and making/drilling the holes need in the windows before repeating the hole process on the other side.


1 user(s) are reading this topic
0 members, 1 guests, 0 anonymous users


