If you have read my about me page you will already know that my son Adam bought me a 1964 Morris Mini, thanks son.
Since then i have not had much time to do anything other than look it over and try to get it running, on two occasons.
the first attempt I checked the oil, plugs, points etc, fitted a battery and put some petrol in the tank. But the battery let me down and the jump start had gone flat so, strike one.
Second time at bat, armed with fully charged battery and jump start engine would not fire so poured some petrol direct into carb and it fired and ran, but only till petrol in carb had gone then it died, then realised electric pump not pumping, as it was getting late and dark I packed up, strike two.
Third time at bat, armed with a new fuel pump, not an original, they where out of stock, after fitting that and connecting the battery and priming the carb it fired and ran, very smoky but it soon cleared.
It was mis firing a little and running high so i tunred it off, wouldn't want to over do it at first, and cleaned the plugs and tryed again it ran alot smoother, after altering the idle speed, the gearbox and clutch work ok but got no foot brake, good job handbrake works.
As for the body work, checked it over and it doesn't seem too bad, they never do do they, wrote a list and got some photos (will post some soon)
Thats it for today.bye


Mk1 Project
Started by
mk1john
, Aug 07 2009 09:48 PM
84 replies to this topic
#2

feybrand
-
- Members
-

- 1,247 posts
One Carb Or Two?
- Location: Rugeley
Posted 08 August 2009 - 08:56 AM
get some pics up soon as pos everyone loves a mk1 rebuild
keep the updates coming and good luck
keep the updates coming and good luck
#3
mk1john
-
- Noobies
-
- 55 posts
Stage One Kit Fitted
Posted 20 September 2009 - 08:00 PM
get some pics up soon as pos everyone loves a mk1 rebuild
keep the updates coming and good luck
ill be learning how to use photobucket this week so i will have pictures soon
#4
adam_93rio
-
- Members
-
- 3,271 posts
Up Into Fourth
Posted 24 September 2009 - 04:23 PM
where are the pictures!!!!
you wrote down how to use photobucket the other day
when i showed you
you wrote down how to use photobucket the other day
when i showed you
#5
mk1john
-
- Noobies
-
- 55 posts
Stage One Kit Fitted
Posted 11 October 2009 - 05:27 PM
ok son guess i should post somthing!where are the pictures!!!!
you wrote down how to use photobucket the other day
when i showed you
Not done alot to my car as it is in my parents garage still, about half a mile down road, and no room to work on it.
I did clear out the space to bring it home but my daughter bought a mini and guess where that is and whos helping/ teaching her to do it up?
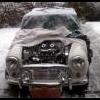
Anyway back to my mini, i have taken loads of photos of all the bad bits, more than first thought, or is that second thought?
So heres a few for now.


#6
mighty mini jack
-

- Members
-
- 5,095 posts
Mighty Before a Pint
Posted 11 October 2009 - 05:30 PM
Doesn't look too bad in the pics, its what lurks beneath that worries me!
#7
mk1john
-
- Noobies
-
- 55 posts
Stage One Kit Fitted
Posted 11 October 2009 - 06:35 PM
I am looking at repairing most parts, rather than complete replacement parts to try and keep costs down for now and getting it on the road for next years L2B in may, my sons deadline for having my daughters car and mine on the road, so if you are going see you their?
I have knocked some of the dents out, there were a couple in the roof above the passenger door which are barely visable now, unless you know where to look, the other one on top of the drivers wing is motly out but access was limited and i will sort it out when i get it out of my mums garage.
The rear valence is a fibreglass itemwhich was bolted on and had holes cut out for a homemade tow hitch which i have removed as it looked a mess, i will be replacing this with a steel one along with a new boot floor as this has been badly repaired in the past and has very little of the original metal left.


It does not look too bad inthe photo but believe me it is.
I have knocked some of the dents out, there were a couple in the roof above the passenger door which are barely visable now, unless you know where to look, the other one on top of the drivers wing is motly out but access was limited and i will sort it out when i get it out of my mums garage.
The rear valence is a fibreglass itemwhich was bolted on and had holes cut out for a homemade tow hitch which i have removed as it looked a mess, i will be replacing this with a steel one along with a new boot floor as this has been badly repaired in the past and has very little of the original metal left.
It does not look too bad inthe photo but believe me it is.
#8
mk1john
-
- Noobies
-
- 55 posts
Stage One Kit Fitted
Posted 11 October 2009 - 06:47 PM
while i was cleaning out my car i found this:-

Anybody know what it is? Does it belong to my mini or is it junk?
The ends are treaded tube and the tube in the middle is not.
Dont want to throw if i need it so thought i'd ask.
Anybody know what it is? Does it belong to my mini or is it junk?
The ends are treaded tube and the tube in the middle is not.
Dont want to throw if i need it so thought i'd ask.
#9
adam_93rio
-
- Members
-
- 3,271 posts
Up Into Fourth
Posted 11 October 2009 - 07:19 PM
I think I need to start the sprite at grandmas, I'm starting to miss working on a mini
we need Vicky to get hers done then the sooner we can all drive round in convoy
your getting used to updating your thread now so you have no excuse not to keep everyone updated
ill grass you up if not
by the way everyone I think she's still nameless!!!!
we need Vicky to get hers done then the sooner we can all drive round in convoy
your getting used to updating your thread now so you have no excuse not to keep everyone updated
ill grass you up if not
by the way everyone I think she's still nameless!!!!
Edited by adam_93rio, 11 October 2009 - 07:23 PM.
#10
mk1john
-
- Noobies
-
- 55 posts
Stage One Kit Fitted
Posted 17 October 2009 - 08:06 PM
yes, i have to confess she is nameless as yet, want to get to know her first before i give her a name, so wait and see.
Anyway I have not been sat doing notihng to her, even though i am skint (am out of work at mo) I have removed the front badge which has at some time had a hole drilled through it and the bonnet,and a machine screw fitted to hold it in place, maybe to stop it rattling because it was loose on the original clips.
I have decided to keep this as it is and refit it as it is part of its charecter, there is some rust on the bonnet behind the badge and i have Kurusted this and will prime it later, the badge has been cleaned and repainted, might not be bang on correct colours but I like it.
Before

After

I have also cleaned up a bumper and nudge bars which were donated by my son, thanks mate, I have painted the back with silver smootrite will get pictures of this later.
I have also bought some rear lights and some twin 1 1/4 carbs with a cooper airbox which i will strip down and rebuild soon.
Sorry its not alot but just trying to do bits that dont cost too much at mo.
catch you later
Anyway I have not been sat doing notihng to her, even though i am skint (am out of work at mo) I have removed the front badge which has at some time had a hole drilled through it and the bonnet,and a machine screw fitted to hold it in place, maybe to stop it rattling because it was loose on the original clips.
I have decided to keep this as it is and refit it as it is part of its charecter, there is some rust on the bonnet behind the badge and i have Kurusted this and will prime it later, the badge has been cleaned and repainted, might not be bang on correct colours but I like it.
Before
After
I have also cleaned up a bumper and nudge bars which were donated by my son, thanks mate, I have painted the back with silver smootrite will get pictures of this later.
I have also bought some rear lights and some twin 1 1/4 carbs with a cooper airbox which i will strip down and rebuild soon.
Sorry its not alot but just trying to do bits that dont cost too much at mo.
catch you later
#11
mk1john
-
- Noobies
-
- 55 posts
Stage One Kit Fitted
Posted 07 March 2010 - 07:35 PM
Hi mini fans I have finally got my mini home, just shipped my daughters mini off for spraying and refit so I can start my own car.
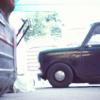
Heres a few photos of the car on the drive just afer being dropped off.


Just a few for now , I have stripped the car now and have some more photos to upload later.
Heres a few photos of the car on the drive just afer being dropped off.
Just a few for now , I have stripped the car now and have some more photos to upload later.
#12
analogue_radio
-

- TMF+ Member
-
- 4,897 posts
Up Into Fourth
- Location: Melton Mowbray, UK.
Posted 07 March 2010 - 08:10 PM
Really like this, is it staying pretty much as it is now? but rust free?
#13
Mini-Mad-Craig
-

- Members
-
- 9,298 posts
Crazy About Metro's
- Location: Travelling in a fried out Kombi
Posted 07 March 2010 - 08:42 PM
 Cool!
Cool!
#14
mk1john
-
- Noobies
-
- 55 posts
Stage One Kit Fitted
Posted 08 March 2010 - 07:55 PM
Really like this, is it staying pretty much as it is now? but rust free?
Hi, Glad you like it.
I was going to respray it the same as I thought it was the original colour, but same of the paper work I have got says it had alot of work done in 1988 and was stripped to a bare shell and resprayed in the Tartan red in the pictures from the original pale blue, ( speedwell I think), so i am going to spray it speedwell blue with a white roof.
As far as mods go it will be as standed as poss, with the addition of a period 60s wood and aluminium steering wheel , oh and maybe some nice 1 1/4 twin SUs I bought for it.

This is what I found under the blanking plate on the passenger side under the bonnet.

and this is a shot of the interior.

After a couple of days work I had stripped it all out and with my sons help I lifted the body off the front subframe and engine assembly complete.
As I expected it needs more work than first thought dont they all.
Have done quite abit more work and will post some more later. thanks for looking.
#15
adam_93rio
-
- Members
-
- 3,271 posts
Up Into Fourth
Posted 08 March 2010 - 08:01 PM
After a couple of days work I had stripped it all out and with my sons help I lifted the body off the front subframe and engine assembly complete.
thats me!! but what a pain it was. id like to say never again, but i will probably end up doing it to mine soon. then you can help me again
i might have a few more pictures that i can upload if you want dad


2 user(s) are reading this topic
0 members, 2 guests, 0 anonymous users


