
Car looks great.
Nice work-around on the filter adaptor. Bad luck on the wiper holes, at least it might avert someone else from making the same mistake.
Always good to post the pitfalls - it helps others.
Mart.


Mk1 Project
Started by
mk1john
, Aug 07 2009 09:48 PM
84 replies to this topic
#32

adam_93rio
-
- Members
-

- 3,271 posts
Up Into Fourth
Posted 14 May 2010 - 08:46 AM
Car looks great.
Nice work-around on the filter adaptor. Bad luck on the wiper holes, at least it might avert someone else from making the same mistake.
Always good to post the pitfalls - it helps others.
Mart.
there has been a few lol
ill get him to update some more again today, shouldnt be long today before weve got time for a beer
#33
mini_mad69
-

- Traders
-
- 5,417 posts
Let future you worry about it
- Local Club: urrrr no
Posted 14 May 2010 - 10:33 AM
Car looks great, havn't noticed this thread before.
#34
mk1john
-
- Noobies
-
- 55 posts
Stage One Kit Fitted
Posted 16 May 2010 - 02:03 PM
well here we are again, trying to bring this project up to date so here goes:-
I needed to repair the hole in my scuttle and my son suggested putting one of those blanking plates that are on later scuttles for now n sort it later, a better idea was to weld up the hole and repaint the scutttle but didnt really want to risk to much damage to the paint so, decided to bond a piece of metal under the scuttle with Tiger seal and then fill over, sand and paint.
So I bonded a peice in and went onto fitting the fuelpump in the boot, but where and how?
Didn't want ot drill any holes so hed use an existing one and make a bracket,
So template first

Mark the metal

Cut

a And trail fit

Guest were its going yet?
Well here it is


Don't worry about the state of the wheel as i plan to stripe and paint these later.
now back to the scuttle, I had bought some stopper filler in a tube to use on some small imperfections on the body so used this to skim the hole over a period of a few days letting it dry before applying more then sanding it flat, so was doing other jobs in the mean time such as washer bottle and jets

you can just see the repair in this picture, and with jets fitted


Then after i han applied primer with a brush (don't gringe works out well) and sanding, then a bit of top coat (again with a brush) I got here

Then I let it dry for a few days
I needed to repair the hole in my scuttle and my son suggested putting one of those blanking plates that are on later scuttles for now n sort it later, a better idea was to weld up the hole and repaint the scutttle but didnt really want to risk to much damage to the paint so, decided to bond a piece of metal under the scuttle with Tiger seal and then fill over, sand and paint.
So I bonded a peice in and went onto fitting the fuelpump in the boot, but where and how?
Didn't want ot drill any holes so hed use an existing one and make a bracket,
So template first
Mark the metal
Cut
a And trail fit
Guest were its going yet?
Well here it is
Don't worry about the state of the wheel as i plan to stripe and paint these later.
now back to the scuttle, I had bought some stopper filler in a tube to use on some small imperfections on the body so used this to skim the hole over a period of a few days letting it dry before applying more then sanding it flat, so was doing other jobs in the mean time such as washer bottle and jets
you can just see the repair in this picture, and with jets fitted
Then after i han applied primer with a brush (don't gringe works out well) and sanding, then a bit of top coat (again with a brush) I got here
Then I let it dry for a few days
#35
mk1john
-
- Noobies
-
- 55 posts
Stage One Kit Fitted
Posted 27 May 2010 - 08:11 PM
In the mean time my son had been fitting the old carpet from my daughters car and the old seats,


don't really like the red seats and the blue paint but they will do for now.
The speedo was cleaned and fitted along with the switches

Now for the glass starting with the rear quarter lights using some electrical wire

One

Two
Then the drivers window


then the passenger side

back screen which is smaller than later minis and you can't get the seal so you have to cut a front screen seal down, i allowed 10mm too much ,so that it was tight, but when the screen was in there was still a gap in the rubber so i just used some black silicone sealant to fix it . sorry cant fine the photoes of this will try to get some up later
Lastly with help from my son the windscreen

well thats it for now will do more later
don't really like the red seats and the blue paint but they will do for now.
The speedo was cleaned and fitted along with the switches
Now for the glass starting with the rear quarter lights using some electrical wire
One
Two
Then the drivers window
then the passenger side
back screen which is smaller than later minis and you can't get the seal so you have to cut a front screen seal down, i allowed 10mm too much ,so that it was tight, but when the screen was in there was still a gap in the rubber so i just used some black silicone sealant to fix it . sorry cant fine the photoes of this will try to get some up later
Lastly with help from my son the windscreen
well thats it for now will do more later
#36
mk1john
-
- Noobies
-
- 55 posts
Stage One Kit Fitted
Posted 27 May 2010 - 08:16 PM
almost forgot heres the repair to the scuttle after a quick sand and polish

and

I didn't think it come out too bad for a brush job
and
I didn't think it come out too bad for a brush job
#37
mk1john
-
- Noobies
-
- 55 posts
Stage One Kit Fitted
Posted 27 May 2010 - 08:20 PM
Oh by the way guys thanks for reading this topic, i was going to stop updating as didn't think anyone was interested, glad you like it.
#38
adam_93rio
-
- Members
-
- 3,271 posts
Up Into Fourth
Posted 27 May 2010 - 08:26 PM
Oh by the way guys thanks for reading this topic, i was going to stop updating as didn't think anyone was interested, glad you like it.
get it updated!
#39
sonikk4
-

- Admin
-
- 16,168 posts
Twisted Paint Polisher!!!
- Name: Neil
- Location: Cotwolds.
Posted 27 May 2010 - 08:27 PM
Thats come up really well, i hope my son buys me a mini when i've finished all the work on his. Nudge nudge son!!!!
#40
mk1john
-
- Noobies
-
- 55 posts
Stage One Kit Fitted
Posted 27 May 2010 - 09:05 PM
Just spent an hour adding to this using fast reply. so will do more later,Oh by the way guys thanks for reading this topic, i was going to stop updating as didn't think anyone was interested, glad you like it.
get it updated!
#41
mk1john
-
- Noobies
-
- 55 posts
Stage One Kit Fitted
Posted 01 June 2010 - 09:21 PM
Right then time for start up, didn't start out too good, Put petrol in the tank, found a leak on the outlet pipe so drained the tank replaced pipe as it was split, try again, fill tank, another leak, this time where the rubber pipe meets the steel pipe under the car, tried a new clip but still leaked,this time clamped pipe in boot using brake pipe clamp,changed rubber pipe from pump to steel pipe, at last no leaks.
So now try to start engine, ignition on, press floor start, tried a few times but battery not good so swapped it for one off my volvo, try again, engine fired and failed, try again started, cheer crack a beer with my son who was filming it,then shut it down as fuel leak, this time from the float chamber lid where it sits on the float chamber, tightened screws,turne on fuel pump, still leaked, took lid off to check gasket and float, float ok but adjusted it to shut off sooner and changed gasket, try again, still leaked, same place so used instant gasket, job done, engine started first time ran well, even went into gear and moved, not too far as i,ve not bleed the brakes.
BLEEDIN BRAKES (more ways than one)
While my son was there we decided to bleed the brakes by pumping the fluid through instead of using the easy bleed kit,
well guess what found a few leaks, when i assembled the front and rear subframes i only tightened the nuts up finger tight and went over them after but missed a few,so spanners out go round again, pump more fliud through, got brakes, not brilliant but getting late so packed up and try again the next day.
Got up early opened garage door to the strong smell of petrol, yes another laek, this time halfway along the metal fuel line under the floor, front to back, air blue, clamped pipe and bought new rubber fuel pipe to renew pipe from fuel pump to carb, sorted.
found another brake fluid leak, where the front flexi hoses fit to the front drums, i had not fitted the copper washers so they leaked, great eh, only excuse working nights doesn't agree with me and old age take your pick, end of the day my own stupid fault. Had to disconnect hoses from the subframe end so put some cling film over the top of the master cylinder and put the lid back on while i fixed my error, then used easy bleed kit to bleed up this time, at last got brakes, so decided to drive car out of garage for first time, started up, petrol leak on float chamber, this time from small breather just under inlet pipe,so off again this time blocked breather hole with tiger seal, fitted new gasket and sealed with Tiger seal, not what i wanted to do but needed to get car done for L2B, job done, car drove out of garage under own steam.
#42
mk1john
-
- Noobies
-
- 55 posts
Stage One Kit Fitted
Posted 01 June 2010 - 09:24 PM
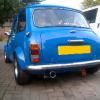
Hope this works, video of my car,son says you can click on this to see it if you like.
dobfwU6q1vs
edit: son got home and fixed it, hope you like it
dobfwU6q1vs
edit: son got home and fixed it, hope you like it
Edited by mk1john, 02 June 2010 - 03:30 PM.
#43
nathansminis
-
- Members
-
- 584 posts
Super Mini Mad
Posted 02 June 2010 - 08:09 AM
Hope this works, video of my car, son says you can click on this to see it if you like.
dobfwU6q1vs.
link fixed. nice mini, i like some of the custom touches.
Click Here For Vid
#44
mk1john
-
- Noobies
-
- 55 posts
Stage One Kit Fitted
Posted 02 June 2010 - 12:29 PM
Thanks for fixing the link mate, didn't know how to do it myself, great, just got to upload adobe flash player so i can watch it myself.thanks again.
#45
mk1john
-
- Noobies
-
- 55 posts
Stage One Kit Fitted
Posted 02 June 2010 - 12:30 PM
Thanks for fixing the link mate, didn't know how to do it myself, great, just got to upload adobe flash player so i can watch it myself.thanks again.


0 user(s) are reading this topic
0 members, 0 guests, 0 anonymous users


