
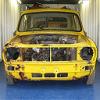
Lovely work, nice to see someone breathing life into an old engine. Them bearings are pretty bad!!


Mk1 Project
Started by
mk1john
, Aug 07 2009 09:48 PM
84 replies to this topic
#62

mk1john
-
- Noobies
-

- 55 posts
Stage One Kit Fitted
Posted 10 June 2010 - 08:23 AM
Lovely work, nice to see someone breathing life into an old engine. Them bearings are pretty bad!!
Yes they are pretty bad but its mainly number 2 cylinder with number 3 just starting, looks like i stopped using it at the right time , before it did too much damage, as for breathing new life into an old engine, like to think its right for the car, i would like a little more power but that will come later when I have more funds to tune this engine. Not too many changes though, trying to keep it standard, with a few small improvments.
Thanks for looking.
Edited by mk1john, 10 June 2010 - 08:26 AM.
#63
rich2
-
- TMF+ Member
-
- 353 posts
Speeding Along Now
Posted 10 June 2010 - 06:53 PM
This thread is a real inspiration. The mini expertise you and your family have is awesome! Keep up the good posts and stop rushing jobs to get the car ready for events! 
#64
adam_93rio
-
- Members
-
- 3,271 posts
Up Into Fourth
Posted 10 June 2010 - 06:59 PM
This thread is a real inspiration. The mini expertise you and your family have is awesome! Keep up the good posts and stop rushing jobs to get the car ready for events!
yeah dad!! stop rushing!!
(it was my idea though
 )
)
#65
mk1john
-
- Noobies
-
- 55 posts
Stage One Kit Fitted
Posted 11 June 2010 - 09:04 PM
Thanks for your comments Rich2, now that the deadlines over i do intend to take my time with the engine, can't rush that it has to be right, i was given a 998 engine to put in my car while i got mine rebuilt.


Not very pretty ,but i was told it was a good runner apart from the gearbox which had lost syncro on second gear, but just to be sure i decided to strip it and see.
So split it from the gearbox to check the crank,

The crank journals were very good as were the bores
BUT

This is the timing chain end of the crank where the crankshaft gear fits, its supposed to have a groove where the woodruff key fits to stop the gear spinning, some plank has filled it with weld and ground it flat. That makes the crank scrap.
So back to my engine, and time to remove the head so i can get the pistons out and check them.


Pistons out all ok and

bores clean and unscoured.
The head

and piston tops

just need a decoke and can be pressed back into service
The crank has been reground before 10thou so it will have to go to 20thou and fitted with new shells, the con rods will be checked just in case the big ends have gone oval due to wear.
I have drilled a board to keep all the pushrods in the right order


And checked that the cam followers were ok and replaced them in their correct location

and remember my gearbox well, from this

to this


Wicked ain't it, the outside just needs a wirebrush and repaint. so that and decoke the head tommorrow.
thats all for now.
Not very pretty ,but i was told it was a good runner apart from the gearbox which had lost syncro on second gear, but just to be sure i decided to strip it and see.
So split it from the gearbox to check the crank,
The crank journals were very good as were the bores
BUT
This is the timing chain end of the crank where the crankshaft gear fits, its supposed to have a groove where the woodruff key fits to stop the gear spinning, some plank has filled it with weld and ground it flat. That makes the crank scrap.
So back to my engine, and time to remove the head so i can get the pistons out and check them.
Pistons out all ok and
bores clean and unscoured.
The head
and piston tops
just need a decoke and can be pressed back into service
The crank has been reground before 10thou so it will have to go to 20thou and fitted with new shells, the con rods will be checked just in case the big ends have gone oval due to wear.
I have drilled a board to keep all the pushrods in the right order
And checked that the cam followers were ok and replaced them in their correct location
and remember my gearbox well, from this
to this
Wicked ain't it, the outside just needs a wirebrush and repaint. so that and decoke the head tommorrow.
thats all for now.
#66
Mini-Mad-Craig
-

- Members
-
- 9,298 posts
Crazy About Metro's
- Location: Travelling in a fried out Kombi
Posted 11 June 2010 - 09:31 PM
Wow what a stunning little car, lovely work.
#67
xBR4DLEY
-

- Members
-
- 1,618 posts
>>mine's still gay<<
Posted 11 June 2010 - 09:50 PM
Good work mate , lovely car , well done
#68
mk1john
-
- Noobies
-
- 55 posts
Stage One Kit Fitted
Posted 12 June 2010 - 07:30 PM
Thanks for your comments guys, I appriciate it.
As i said yesterday head and gearbox today so here goes.
Head first

First a quick clean with a wire brush and parrafin

I also cleaned out the waterways with a drill as some of them were nearly half their size due to corrosion.I just used a small drill bit and ran it round till it reached the original size.
Then removed the valves,

Keeping them in order

Now onto grinding in the valves, a quick clean first, then grinding them in with coarse grinding paste to get this

I got them all to this stage then used fine grinding paste to get a smooth even coloured band on the valve and valve seat

The valve seat should look something like the one on the right, (this one has only been ground in with coarse paste, it would be smoother with the fine} the one on the left has not been touched yet.

Then just had to replace the valves using new engine oil to help assembly and lubricate the stems when i eventually start it up.


Only thing left was the paint, so after i cleaned the loose paint off the gearbox i painted them both

and the gearbox


and thats all for now folks, more later
As i said yesterday head and gearbox today so here goes.
Head first
First a quick clean with a wire brush and parrafin
I also cleaned out the waterways with a drill as some of them were nearly half their size due to corrosion.I just used a small drill bit and ran it round till it reached the original size.
Then removed the valves,
Keeping them in order
Now onto grinding in the valves, a quick clean first, then grinding them in with coarse grinding paste to get this
I got them all to this stage then used fine grinding paste to get a smooth even coloured band on the valve and valve seat
The valve seat should look something like the one on the right, (this one has only been ground in with coarse paste, it would be smoother with the fine} the one on the left has not been touched yet.
Then just had to replace the valves using new engine oil to help assembly and lubricate the stems when i eventually start it up.
Only thing left was the paint, so after i cleaned the loose paint off the gearbox i painted them both
and the gearbox
and thats all for now folks, more later
#69
mighty mini jack
-

- Members
-
- 5,095 posts
Mighty Before a Pint
Posted 12 June 2010 - 07:34 PM
Nice work, love the bmc green bits.
#70
mk1john
-
- Noobies
-
- 55 posts
Stage One Kit Fitted
Posted 08 July 2010 - 07:49 PM
Cheers mate glad you like it.
I know its been a while since i posted but been a bit busy, so here goes.
Firstly, after waiting a few days for a quote to have the crank reground i rang my usual firm and got one straight away.
I dropped the crank in the next day, (Tuesday) and got it back Friday along with gaskets, shells and a good second hand con rod, ( mine was damaged where the crank had worn through the shell)

the reground crank

Gasket sets and


the new shells
So onto the rebuild.
Put the shells in the big end caps first

Then shells into the block

Crank next

I coated the shells and crank with vaseline, (no dont laugh, it sticks to the parts and dissolves in oil, without contaminating it, I also filled the oil pump with it, as it creates suction in the pump and picks the oil up quicker on first start) as i went along and made sure that the caps were seated properly before i tightened the nuts finger tight, checking the crank still turned freely as each cap was put on.
When they were all in place I torqued them down to the correct torque,Turning the crank as i went along, to check it still turned freely and slid in the pistons. As i didnt have a ring compressor handy and no jubilee clip big enough i had to improvise, so used a blade out of my hole saw, teeth upwards of course.

Again i coated the piston and bores with vaseline then passed the con rod through the block

Then placed the blade over the piston and rings

squeezed it round the piston to compress the rings and tap them down with the shaft of my hammer

and all done

Next, fasten the con rods to the crank, again one at a time, turn the crank then torque them down and turn again

When that was all done and checked i knocked over the locking tabs.
I know its been a while since i posted but been a bit busy, so here goes.
Firstly, after waiting a few days for a quote to have the crank reground i rang my usual firm and got one straight away.
I dropped the crank in the next day, (Tuesday) and got it back Friday along with gaskets, shells and a good second hand con rod, ( mine was damaged where the crank had worn through the shell)
the reground crank
Gasket sets and
the new shells
So onto the rebuild.
Put the shells in the big end caps first
Then shells into the block
Crank next
I coated the shells and crank with vaseline, (no dont laugh, it sticks to the parts and dissolves in oil, without contaminating it, I also filled the oil pump with it, as it creates suction in the pump and picks the oil up quicker on first start) as i went along and made sure that the caps were seated properly before i tightened the nuts finger tight, checking the crank still turned freely as each cap was put on.
When they were all in place I torqued them down to the correct torque,Turning the crank as i went along, to check it still turned freely and slid in the pistons. As i didnt have a ring compressor handy and no jubilee clip big enough i had to improvise, so used a blade out of my hole saw, teeth upwards of course.
Again i coated the piston and bores with vaseline then passed the con rod through the block
Then placed the blade over the piston and rings
squeezed it round the piston to compress the rings and tap them down with the shaft of my hammer
and all done
Next, fasten the con rods to the crank, again one at a time, turn the crank then torque them down and turn again
When that was all done and checked i knocked over the locking tabs.
#71
mk1john
-
- Noobies
-
- 55 posts
Stage One Kit Fitted
Posted 08 July 2010 - 07:53 PM
Thats it for now got to get ready for work so will catch up later.
#72
grahama
-

- Members
-
- 2,442 posts
Up Into Fourth
- Location: Warrington
- Local Club: None in my area !!
Posted 08 July 2010 - 08:15 PM
Hi,
nice engine part of the thread, not that the rest is crap !!!, but it's just what I am doing at the moment too. How much was a re grind of the crank, considering it myself ?? Also have you stripped the gearbox or just had it steam cleaned as it looks great if a little dry, lol.
coming along nicely though,
Graham
#73
mk1john
-
- Noobies
-
- 55 posts
Stage One Kit Fitted
Posted 09 July 2010 - 06:35 PM
Hi,
nice engine part of the thread, not that the rest is crap !!!, but it's just what I am doing at the moment too. How much was a re grind of the crank, considering it myself ?? Also have you stripped the gearbox or just had it steam cleaned as it looks great if a little dry, lol.
coming along nicely though,
Graham
Hi
glad you like it,
price for crank regrind, new shells, all new gaskets and s/h rod was £192.83.
Gearbox was just cleaned and checked, looked to be in good shape, so just pressed it back into service. Just hope it lasts for a while as i will be rebuilding it at a latter date when funds allow as third is a bit iffy.
#74
mk1john
-
- Noobies
-
- 55 posts
Stage One Kit Fitted
Posted 10 July 2010 - 04:57 PM
Went on to the timing chain next, used the one that i took off as it is new and still dont know if i want to go down the duplex chain root as i dont really want to change the cover for a deeper one, still thinking about it though so time will tell

made sure i lined up the marks again.Before i fitted the cover and pully

then the clutch and housing

sorry didn't get a picture of the clutch in place, seen it before so forgot to take one.
Well time for the head, gasket first

then the head

along with the push rods and rockers

I made sure that the head nuts were tightened in the correct order and to the correct torque
As i was reuseing the old water pump I decided to clean it but it looked crap so decided to piant it silver but didn't have any left so painted it dark green instead

Not to sure about this but its tidy for now, then remembered to fit the oil filter head this time and the filter filled with oil.

So thats it ready to go back in, AGAIN

Bit of a deje vu picture i know but hopefully this is the last time the engine will be out for a while at least.
While i was waiting for the loan of the engine lift and help to get it back in I decided to fit a fuel regulator ( which was donated by Ewen, thanks mate) to try and stop the carbs leaking fuel when the pump is running

I fitted this in the boot

Yes i know still not painted the wheel but had other things on my mind
Any how that took me up Ewen arriveng with the lift so within 10 Mins the engine was in

That was all for the day, so had a shower and some tea washed down with a couple of beers, and left the rest for the next day.
made sure i lined up the marks again.Before i fitted the cover and pully
then the clutch and housing
sorry didn't get a picture of the clutch in place, seen it before so forgot to take one.
Well time for the head, gasket first
then the head
along with the push rods and rockers
I made sure that the head nuts were tightened in the correct order and to the correct torque
As i was reuseing the old water pump I decided to clean it but it looked crap so decided to piant it silver but didn't have any left so painted it dark green instead
Not to sure about this but its tidy for now, then remembered to fit the oil filter head this time and the filter filled with oil.
So thats it ready to go back in, AGAIN
Bit of a deje vu picture i know but hopefully this is the last time the engine will be out for a while at least.
While i was waiting for the loan of the engine lift and help to get it back in I decided to fit a fuel regulator ( which was donated by Ewen, thanks mate) to try and stop the carbs leaking fuel when the pump is running
I fitted this in the boot
Yes i know still not painted the wheel but had other things on my mind
Any how that took me up Ewen arriveng with the lift so within 10 Mins the engine was in
That was all for the day, so had a shower and some tea washed down with a couple of beers, and left the rest for the next day.
#75
mk1john
-
- Noobies
-
- 55 posts
Stage One Kit Fitted
Posted 10 July 2010 - 06:17 PM
Got striaght in to fitting the ancilleries and exhaust etc
Starting with the starter, dizzy and alternator

Then onto the radiator, bit of a pain this as i find it difficult to get the bolts in the fan with the rad in place and cant get the rad in with the fan on,

Any how after abit of a struggle i got it all in, fitted all the pipes to the carb, exhaust and wired the engine back up, ready for my son getting home for start up
Did it run? did it eck.
I forgot to fit the ht lead to the coil, dumb or what
Try again, still no joy. the engine wouldn't fire, after checking the static timing and the leads it still wouldn't run, knew it was something simple but decided to leave it till the next day.
Got up early to get this thing sorted, but after a couple of hours, still no joy, just couldn't think straight.
So called my father in law, dennis, just to see if he had any ideas. With in an hour he was in my garage to help and after a another had passed we found that the dizzy timing was out, see something simple, hate doing nights, even when i get a day off i seem to be really tired.
Anyhow got it running but as i had decided to fit my original carb it leaked, so much for fitting a regulator, any how to cut a long story short we found a small piece of debris in the needle valve, took some finding as it was so small and was only jamming the valve some of the time.With that removed the car ran really well with no leaks, great eh! job done?
No, could not get any gears and no matter how we followed the instructions on adjusting the clutch, it didn't get any better, well getting late so time for a drink and a rest.
Next day tried to adjust it again, but still no joy, So decided to strip the clutch just to check its all ok, this is a pain with the engine in but it can be done.
Well that was a waste of time as it was all ok.
In the end I stripped the master and slave cylinders to clean n check them, and i changed the metal pipe that runs between the master and flexi hose, then i bled it again.After the last tries at adjustment i decided to try trail and error, (stand back in amazement)... it worked, the clutch is really low but it changes great, apart from third which is a little crunchie.
So from now, in the words of the beach boys. its all ''fun, fun, fun''
Starting with the starter, dizzy and alternator
Then onto the radiator, bit of a pain this as i find it difficult to get the bolts in the fan with the rad in place and cant get the rad in with the fan on,
Any how after abit of a struggle i got it all in, fitted all the pipes to the carb, exhaust and wired the engine back up, ready for my son getting home for start up
Did it run? did it eck.
I forgot to fit the ht lead to the coil, dumb or what
Try again, still no joy. the engine wouldn't fire, after checking the static timing and the leads it still wouldn't run, knew it was something simple but decided to leave it till the next day.
Got up early to get this thing sorted, but after a couple of hours, still no joy, just couldn't think straight.
So called my father in law, dennis, just to see if he had any ideas. With in an hour he was in my garage to help and after a another had passed we found that the dizzy timing was out, see something simple, hate doing nights, even when i get a day off i seem to be really tired.
Anyhow got it running but as i had decided to fit my original carb it leaked, so much for fitting a regulator, any how to cut a long story short we found a small piece of debris in the needle valve, took some finding as it was so small and was only jamming the valve some of the time.With that removed the car ran really well with no leaks, great eh! job done?
No, could not get any gears and no matter how we followed the instructions on adjusting the clutch, it didn't get any better, well getting late so time for a drink and a rest.
Next day tried to adjust it again, but still no joy, So decided to strip the clutch just to check its all ok, this is a pain with the engine in but it can be done.
Well that was a waste of time as it was all ok.
In the end I stripped the master and slave cylinders to clean n check them, and i changed the metal pipe that runs between the master and flexi hose, then i bled it again.After the last tries at adjustment i decided to try trail and error, (stand back in amazement)... it worked, the clutch is really low but it changes great, apart from third which is a little crunchie.
So from now, in the words of the beach boys. its all ''fun, fun, fun''


1 user(s) are reading this topic
0 members, 1 guests, 0 anonymous users


