Hi Ash-g800,
Its only been off the road for 2 years, I've enjoyed driving it for three years, travelling the country going to shows and events, from newquay, to blackpool.
Oh the good days!
Thanks for looking.


My Project Mini Mayfair (pearl)
Started by
mini_mad_andy
, Jan 02 2010 10:01 PM
58 replies to this topic
#17
: post #17")
cookie4343
-

- Traders
-

- 2,257 posts
**Caution: Do Not Feed Alcohol**
- Local Club: CV1 Mini's
Posted 28 October 2010 - 03:27 PM
Hi mate nice mini and project you have, excellent work so far aswell. 
I see your from coventry, me to, where is it you work mate as ive got 2 radius arms that need the same treatment as yours and was wondering what your work would charge to replace bushes and bearings if i buy the rebuild kits, thanks mate
I see your from coventry, me to, where is it you work mate as ive got 2 radius arms that need the same treatment as yours and was wondering what your work would charge to replace bushes and bearings if i buy the rebuild kits, thanks mate
#18
newbambeeno
-
- Members
-
- 360 posts
Speeding Along Now
- Local Club: None
Posted 28 October 2010 - 04:33 PM
Looks like good progress so far!
#19
mini_mad_andy
-
- Noobies
-
- 56 posts
Stage One Kit Fitted
Posted 28 October 2010 - 06:42 PM
Hi cookie4343,
I work for an aerospace company, an we did the radius arms during my lunch break.
I think min-it's do a good price for an exchange.
Update;
I've started to repair the third rusty part on the door step, but as halted as I ran out of gas for the welder
I also primered the steering rack tonight. I'll get the photos up tomorrow
Thanks for the comments,
Andy.
#20
mini_mad_andy
-
- Noobies
-
- 56 posts
Stage One Kit Fitted
Posted 29 October 2010 - 07:06 AM
Hey all,
As promised the photos from last night;
 IMG_0303.jpg 972.68K
6 downloads
IMG_0309.jpg 1.44MB
3 downloads
IMG_0303.jpg 972.68K
6 downloads
IMG_0309.jpg 1.44MB
3 downloads
As promised the photos from last night;
IMG_0303.jpg 972.68K
6 downloads
IMG_0309.jpg 1.44MB
3 downloads
#21
mini_mad_andy
-
- Noobies
-
- 56 posts
Stage One Kit Fitted
Posted 12 November 2010 - 07:32 AM
Quick update;
I've finnally got my flywheel off! I broke two halfrauds pullers, and an 8 ton hydraulic puller in the process!
I ended up cutting it off, I'll upload the photos later when i get home! I'm well chuffed!
Andy.
I've finnally got my flywheel off! I broke two halfrauds pullers, and an 8 ton hydraulic puller in the process!
I ended up cutting it off, I'll upload the photos later when i get home! I'm well chuffed!
Andy.
#22
mini_mad_andy
-
- Noobies
-
- 56 posts
Stage One Kit Fitted
Posted 12 November 2010 - 09:19 PM
Hey all,
Pics as promised;
Butchered flywheel;


Do you reckon its salvageable? Lol. Maybe as a paper weight!
Repair to subframe;


Prepped passanger side inner wing, needs patch behind shock mount, and bottom of flitch;


Thanks for looking, Andy.
Pics as promised;
Butchered flywheel;
Do you reckon its salvageable? Lol. Maybe as a paper weight!
Repair to subframe;
Prepped passanger side inner wing, needs patch behind shock mount, and bottom of flitch;
Thanks for looking, Andy.
#23
Tomf
-

- Traders
-
- 6,440 posts
Baby Tom
Posted 12 November 2010 - 09:41 PM
Damn and i thought i was an animal!!!
You defo went cave man on that flywheel lol.
You defo went cave man on that flywheel lol.
#24
mini_mad_andy
-
- Noobies
-
- 56 posts
Stage One Kit Fitted
Posted 13 November 2010 - 06:44 AM
I know, i was getting really frustrated that it wasn't coming off!!!
I did plan to salvage as much as possible, but after heating it up, I decided it probably wasn't gonna be much cop any way, so on came the butchering! lol.
For those with keen eyes will notice theres no ring gear! That went flying after a fight with the hammer! Lol.
I did plan to salvage as much as possible, but after heating it up, I decided it probably wasn't gonna be much cop any way, so on came the butchering! lol.
For those with keen eyes will notice theres no ring gear! That went flying after a fight with the hammer! Lol.
#25
mini_mad_andy
-
- Noobies
-
- 56 posts
Stage One Kit Fitted
Posted 18 November 2010 - 12:19 PM
Hey all,
Small update, I've repaired the inner wing behind the shock mount, and welded the inner scuttle on now. I also welded the area of bulkhead that the ultimate engine steady damaged.
The progress is slow, but I feel i'm getting somewhere now. I plan to repair the passanger side front floor and door step, weld the scuttle on, and then flip it onto its side (on a matress) and repair the sills, rear subframe mount, and boot. Soon hopefully!
Any way, enough talking, PICS;


Thanks for looking, Andy.
Small update, I've repaired the inner wing behind the shock mount, and welded the inner scuttle on now. I also welded the area of bulkhead that the ultimate engine steady damaged.
The progress is slow, but I feel i'm getting somewhere now. I plan to repair the passanger side front floor and door step, weld the scuttle on, and then flip it onto its side (on a matress) and repair the sills, rear subframe mount, and boot. Soon hopefully!
Any way, enough talking, PICS;
Thanks for looking, Andy.
#26
grahama
-

- Members
-
- 2,442 posts
Up Into Fourth
- Location: Warrington
- Local Club: None in my area !!
Posted 18 November 2010 - 07:27 PM
Hi Andy,
nice work as usual Andy. Just a quickie, the scuttle filler is welded I take it, why have you not fitted the scuttle before this part ?? I have this coming up and just wondering if this is an easy way of doing things?? All looking good tho!
Graham
nice work as usual Andy. Just a quickie, the scuttle filler is welded I take it, why have you not fitted the scuttle before this part ?? I have this coming up and just wondering if this is an easy way of doing things?? All looking good tho!
Graham
Edited by grahama, 18 November 2010 - 07:28 PM.
#27
mini_mad_andy
-
- Noobies
-
- 56 posts
Stage One Kit Fitted
Posted 18 November 2010 - 08:01 PM
Hi graham,
I've done it this way so I can get some sealant on the top so the water won't get trapped and rot it again.
Loving your project, I wish I could bring parts into the house! Lol.
I've done it this way so I can get some sealant on the top so the water won't get trapped and rot it again.
Loving your project, I wish I could bring parts into the house! Lol.
#28
mini_mad_andy
-
- Noobies
-
- 56 posts
Stage One Kit Fitted
Posted 28 April 2011 - 10:56 PM
Oh dear oh dear!!! I think i'm well overdue an update, sorry!!!
I haven't really made as much progress as I had planned! Because of this, and more rust than originally thought, the project completion date needs revision! This means it won't be rady for my wedding, GUTTED!!!
Anyway, my progress;
Painted some ancillaries and frames;


Passenger floor pan welded up;

Passenger door step, two repair patches;


Scuttle welded on;


Passenger door skin removed, and frame repaired;


This was a bit awkward on my own, I had arranged for help, but got impatient! Lol.

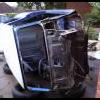
The bloody kick in the teeth!


Thanks for looking, Andy.
I haven't really made as much progress as I had planned! Because of this, and more rust than originally thought, the project completion date needs revision! This means it won't be rady for my wedding, GUTTED!!!
Anyway, my progress;
Painted some ancillaries and frames;
Passenger floor pan welded up;
Passenger door step, two repair patches;
Scuttle welded on;
Passenger door skin removed, and frame repaired;
This was a bit awkward on my own, I had arranged for help, but got impatient! Lol.
The bloody kick in the teeth!
Thanks for looking, Andy.
#29
grahama
-
- Members
-
- 2,442 posts
Up Into Fourth
- Location: Warrington
- Local Club: None in my area !!
Posted 29 April 2011 - 07:48 AM
Hi Andy,
nice progress, both my rear subframe mounts are surrounded by rusty patches, one I knew about when I bought it and one looked mint !! Just goes to show how a little paint covers up the brown stuff so easily !!
Graham
nice progress, both my rear subframe mounts are surrounded by rusty patches, one I knew about when I bought it and one looked mint !! Just goes to show how a little paint covers up the brown stuff so easily !!
Graham
#30
mini_mad_andy
-
- Noobies
-
- 56 posts
Stage One Kit Fitted
Posted 18 August 2011 - 06:57 PM
Hey all,
I've finally got back to it again!!! Still gutted I didn't get it ready for my wedding, but never mind!
I've done a few things, which include spraying up most the suspension and subframes, and refurbing the hub bearings and ball joints.
Cleaned the garage and sorted some of the rubbish out, and created more space to work in.
I've started hackin away at the sill to get that off, and then i'll be starting on the closing panels and subframe mounts.
Anyway, pics;


Thanks for looking, Andy.
I've finally got back to it again!!! Still gutted I didn't get it ready for my wedding, but never mind!
I've done a few things, which include spraying up most the suspension and subframes, and refurbing the hub bearings and ball joints.
Cleaned the garage and sorted some of the rubbish out, and created more space to work in.
I've started hackin away at the sill to get that off, and then i'll be starting on the closing panels and subframe mounts.
Anyway, pics;
Thanks for looking, Andy.


1 user(s) are reading this topic
0 members, 1 guests, 0 anonymous users


