 Engine_side2.JPG 54.7K
22 downloads
Carb2.JPG 45.77K
16 downloads
Coil3.JPG 53.09K
16 downloads
Engine_side2.JPG 54.7K
22 downloads
Carb2.JPG 45.77K
16 downloads
Coil3.JPG 53.09K
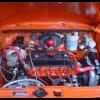
16 downloadsThe Engine that's been sat in the garden under a tarpaulin for a year, not as bad as i remember but didn't want to look!
 Bad times.


Mini Mad

Posted 02 March 2010 - 12:09 AM
Engine_side2.JPG 54.7K
22 downloads
Carb2.JPG 45.77K
16 downloads
Coil3.JPG 53.09K
16 downloads Bad times.
One Carb Or Two?
Posted 02 March 2010 - 07:31 PM
Mini Mad
Posted 02 March 2010 - 09:14 PM
Ouch, How much you pay for that? Whats been done to it..
Mini Mad
Posted 03 March 2010 - 12:39 AM

One Carb Or Two?
Posted 03 March 2010 - 12:43 AM
Mini Mad
Posted 03 March 2010 - 05:55 PM
get yourself a tube of Autosol and polish the alloy bits, replace the coil and condenser - bung some new oil into the motor and crank it over and see how you go.
Broken_Bit.JPG 24.63K
4 downloads (was drilling the pilot hole and when it broke thru, the large bit dug it at full speed)
Front_of_Subfame.JPG 63.92K
62 downloadsEdited by Scholes2012, 03 March 2010 - 11:23 PM.
Crazy About Metro's

Posted 03 March 2010 - 08:06 PM
Mini Mad
Posted 16 March 2010 - 06:51 PM
 Lower_sub_holes.JPG 63.19K
3 downloads
Close_up_hole.JPG 63.02K
4 downloads
Lower_sub_holes.JPG 63.19K
3 downloads
Close_up_hole.JPG 63.02K
4 downloads Top_of_holes.JPG 34.13K
5 downloads
Top_of_holes.JPG 34.13K
5 downloads
Edited by Scholes2012, 16 March 2010 - 07:09 PM.
Mini Mad
Posted 18 March 2010 - 11:02 PM
Hub_before_paint.JPG 29.06K
3 downloads
Ball_joint.JPG 25.75K
5 downloads
Hub_Bearing.JPG 38.64K
4 downloads
Hub_painted.JPG 30.41K
3 downloadsEdited by Scholes2012, 10 April 2010 - 12:48 AM.
Mini Mad
Posted 23 March 2010 - 05:52 PM
sub_with_plate.JPG 37.94K
20 downloads
sub_plate.JPG 37.5K
9 downloads
Short Guy

Posted 23 March 2010 - 05:56 PM
Mini Mad
Posted 23 March 2010 - 09:45 PM
isn't checker board alluminium quite flexible though. or have you put it on to spread the load of the jack?

Edited by Scholes2012, 23 March 2010 - 10:03 PM.
Mini Mad
Posted 04 April 2010 - 05:57 PM
Blue_sub_on_bench.JPG 41.42K
18 downloads
smooth_tower.JPG 32.14K
7 downloads
Plate_on_sub.JPG 31.72K
4 downloads
colour_match.JPG 40.69K
7 downloads
Blue___yellow.JPG 41.63K
3 downloadsMighty Before a Pint

Posted 04 April 2010 - 06:20 PM
Mini Mad
Posted 04 April 2010 - 06:24 PM
Edited by Scholes2012, 25 August 2010 - 09:03 PM.


0 members, 1 guests, 0 anonymous users


