


Bring Back "you've Been Tango'd Ad"
Started by
Scholes2012
, Feb 25 2010 09:42 PM
105 replies to this topic
#61

LuckyThe1275
-
- Members
-

- 258 posts
Mini Mad
- Location: Berkshire/Oxfordshire
- Local Club: Not yet part of one!
Posted 28 October 2010 - 09:01 AM
Gorgeous rebuild!
#62
Scholes2012
-
- Members
-
- 239 posts
Mini Mad
- Local Club: NONE
Posted 02 November 2010 - 02:13 PM
Cheers for the comments but...
So much for the 1st post in this topic...
This is how the paint looks now.

Started like this, as just a crack, but soon bubbled and with minimum effort now looks like this...


Just doesn't seem to have etched into the bare metal.
Still have some paint from when it was sprayed, but don't know if it's usable.
So much for the 1st post in this topic...
A few shots of the good work the previous owner put in.
This is how the paint looks now.
Started like this, as just a crack, but soon bubbled and with minimum effort now looks like this...
Just doesn't seem to have etched into the bare metal.
Still have some paint from when it was sprayed, but don't know if it's usable.
Edited by Scholes2012, 25 January 2011 - 09:13 PM.
#63
Scholes2012
-
- Members
-
- 239 posts
Mini Mad
- Local Club: NONE
Posted 24 January 2011 - 06:54 PM
I have not posted on this for a while because I wasn't sure that the bank would let me keep the car, but that's sorted and I can. 
Since I put the 1275 engine in, it has only had the top engine steady, because the lower bracket was still on the 1000 engine, and with it rocking back and forward that work a bolt loose off the exhaust manifold, making it blow out the top of the centre exhaust port, so I went up to the motor club and used the ramp, so much nicer to be able to get at the car from underneath without having to lie on a cold wet floor, so new exhaust gasket done.


You may have seen the post about the Mini stuttering whilst driving and then not starting, but fingers crossed that's sorted, the not starting was a bad earth in the boot, although I hadn't touched it.
And the stuttering seem's to have been down to the points not opening enough, so that seem's to have sorted it.
And today to stop a repeat of the exhaust blowing, I got around to fitting the thermostat steady that I bought at MITP

Not put the heater pipes through the holes yet, as another job I need to do is check the heater matrix as I noticed a few drips the other day.
(I ordered the wrong pipes for my year of car, but by the time I fitted them it was too late to take them back and I had the matching heater from another car)


The only problem I had was the that the holes didn't seem to quite match the studs, the stud's were new when I put the engine in and have not had an engine steady hanging off them before, so took the decision to drill out the hole closest to the rad to 9mm, the cover then just slipped on the with a gentle tap.
Since I put the 1275 engine in, it has only had the top engine steady, because the lower bracket was still on the 1000 engine, and with it rocking back and forward that work a bolt loose off the exhaust manifold, making it blow out the top of the centre exhaust port, so I went up to the motor club and used the ramp, so much nicer to be able to get at the car from underneath without having to lie on a cold wet floor, so new exhaust gasket done.
You may have seen the post about the Mini stuttering whilst driving and then not starting, but fingers crossed that's sorted, the not starting was a bad earth in the boot, although I hadn't touched it.
And the stuttering seem's to have been down to the points not opening enough, so that seem's to have sorted it.
And today to stop a repeat of the exhaust blowing, I got around to fitting the thermostat steady that I bought at MITP
Not put the heater pipes through the holes yet, as another job I need to do is check the heater matrix as I noticed a few drips the other day.
(I ordered the wrong pipes for my year of car, but by the time I fitted them it was too late to take them back and I had the matching heater from another car)
The only problem I had was the that the holes didn't seem to quite match the studs, the stud's were new when I put the engine in and have not had an engine steady hanging off them before, so took the decision to drill out the hole closest to the rad to 9mm, the cover then just slipped on the with a gentle tap.
#64
Scholes2012
-
- Members
-
- 239 posts
Mini Mad
- Local Club: NONE
Posted 25 January 2011 - 09:47 PM
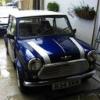
Going to Bingley on Sunday, not been before but should be a nice family day out, sent off for my L2B ticket too, Hope to have the rear arch's tubbed and the carbon arches on, and the 13" wheels that are in some of the earlier pic's by then, they've been sitting in the shed for a year or so, hope they are still ok.
see wheels here
and here
see wheels here
and here
#65
buddylove
-

- TMF+ Member
-
- 1,640 posts
Camshaft & Stage Two Head
- Location: North America
- Local Club: SAMOA
Posted 30 January 2011 - 07:46 AM
Nice build, it will be nice to see the Mini with the arches and 13s. Did you get the front paint work sorted?
#66
analogue_radio
-

- TMF+ Member
-
- 4,897 posts
Up Into Fourth
- Location: Melton Mowbray, UK.
Posted 30 January 2011 - 02:46 PM
That workspace looks fantastic, is it a community funded thing?
& those DSN bits are the nuts, think I'll treat my engine bay to some bits when I'm in the final stages.
& those DSN bits are the nuts, think I'll treat my engine bay to some bits when I'm in the final stages.
#67
Scholes2012
-
- Members
-
- 239 posts
Mini Mad
- Local Club: NONE
Posted 30 January 2011 - 09:40 PM
Nice build, it will be nice to see the Mini with the arches and 13s. Did you get the front paint work sorted?
That workspace looks fantastic, is it a community funded thing?
& those DSN bits are the nuts, think I'll treat my engine bay to some bits when I'm in the final stages.
Cheers, didn't sort the paint yet, had some issues when I lost my job and didn't know if I was keeping the car, but that's now sorted and I'm keeping it, so need to get the paint sorted, I think all the paint may need to come off at some point because it just chips so easy.
Yes. we lived by the Wittering RAF camp and they have a scheme for them to work on there own cars, was lucky and got in as a civilian.
#68
Scholes2012
-
- Members
-
- 239 posts
Mini Mad
- Local Club: NONE
Posted 31 January 2011 - 11:20 AM
It would seem that I have a poor connection from the ignition on the multi block on the steering column, went to fill up the night before Bingley,
turned the key, got ignition lights but then nothing, not even a tick. Got a piece of wire and hot wired the starter and it started fine. Went to the garage and filled up, using the wire to get it started again (got a few funny look's
  ) Then in the morning before setting off to Bingley, had a bit of a fiddle with the for-mentioned wires and Hey Presto starts fine.
turned the key, got ignition lights but then nothing, not even a tick. Got a piece of wire and hot wired the starter and it started fine. Went to the garage and filled up, using the wire to get it started again
(got a few funny look's ) Then in the morning before setting off to Bingley, had a bit of a fiddle with the for-mentioned wires and Hey Presto starts fine.
#69
Scholes2012
-
- Members
-
- 239 posts
Mini Mad
- Local Club: NONE
Posted 09 February 2011 - 12:55 AM
Well it's that time of year again, got my ticket for London 2 Brighton, so best get the stuff done that i want on the car, at least it's running this time around, no bleeding brake's or rebuilding the engine the nite before. (Touch wood)(and i don't mean put my hand down my pants) 
#70
Scholes2012
-
- Members
-
- 239 posts
Mini Mad
- Local Club: NONE
Posted 10 March 2011 - 03:48 PM
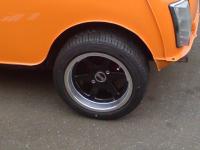
Well did a bit today. trimmed the front arch to clear the 7x13 wheels.


Full lock.

neatened up the lip.
Will dig out the old paint from the shed and do the arches and scuttle at the same time.
Got a sheet of mild steel to tub the rear arches, so i can crack on with that now, then dig out the carbon fibre.
Full lock.
neatened up the lip.
Will dig out the old paint from the shed and do the arches and scuttle at the same time.
Got a sheet of mild steel to tub the rear arches, so i can crack on with that now, then dig out the carbon fibre.
#71
Scholes2012
-
- Members
-
- 239 posts
Mini Mad
- Local Club: NONE
Posted 14 March 2011 - 05:53 PM
Started to tub the rear arches today.

surprised by the amount of filler use to skim the arch, but will sand this back later.

bit of rust in the rear quarter where i wanted to weld the lip to, so cut it out and will make a repair.

gap under the arch, that will be the flat bit at the top of the arch.
Have ordered a fuel tank sender/float, because when it gets to half a tank the needle just drops down to empty, not a problem really
because i could just keep filling up every time it drops, but you don't seem to get far on half a tank, also got a alloy filter king pressure
regulator off fleabay £17 bargin, will put the new sender in when i take the tank out to do the passenger side.
surprised by the amount of filler use to skim the arch, but will sand this back later.
bit of rust in the rear quarter where i wanted to weld the lip to, so cut it out and will make a repair.
gap under the arch, that will be the flat bit at the top of the arch.
Have ordered a fuel tank sender/float, because when it gets to half a tank the needle just drops down to empty, not a problem really
because i could just keep filling up every time it drops, but you don't seem to get far on half a tank, also got a alloy filter king pressure
regulator off fleabay £17 bargin, will put the new sender in when i take the tank out to do the passenger side.
#72
Scholes2012
-
- Members
-
- 239 posts
Mini Mad
- Local Club: NONE
Posted 16 March 2011 - 04:33 PM
Bit more done on the rear arch today, weather has been miserable. 6 degrees C and threatening to rain.

Arch repair... took the corner off the valance as well because when i do the closing plate repair their was only rust to weld too.

Welder is playing up, the wire feed is very inconsistent, the wire its self is a little rusty, will try a new roll.

Quite pleased with the repair so far, a lot better that what was already there.
Arch repair... took the corner off the valance as well because when i do the closing plate repair their was only rust to weld too.
Welder is playing up, the wire feed is very inconsistent, the wire its self is a little rusty, will try a new roll.
Quite pleased with the repair so far, a lot better that what was already there.
Edited by Scholes2012, 16 March 2011 - 04:34 PM.
#73
Scholes2012
-
- Members
-
- 239 posts
Mini Mad
- Local Club: NONE
Posted 20 March 2011 - 05:33 PM
Bit more done today, but it's two steps forward one back...


Got the welder going a bit better using new wire, dressed the weld back, not the neatest but with a skim of filler should be ok?

Don't head but the rear valance trying to look under the wheel arch.

Made up the closing piece for the top of the arch, but the step/lip on it was a bit shallow, so as i started to plug weld, it move off line,
so pulled it off and will make another with a deeper step. (have a bead roller in the shed, all the gear![=]](http://www.theminiforum.co.uk/forums/public/style_emoticons/default/genius.gif) no idea!
no idea!  )
)
Got the welder going a bit better using new wire, dressed the weld back, not the neatest but with a skim of filler should be ok?
Don't head but the rear valance trying to look under the wheel arch.
Made up the closing piece for the top of the arch, but the step/lip on it was a bit shallow, so as i started to plug weld, it move off line,
so pulled it off and will make another with a deeper step. (have a bead roller in the shed, all the gear
no idea! )
Edited by Scholes2012, 20 March 2011 - 05:39 PM.
#74
Scholes2012
-
- Members
-
- 239 posts
Mini Mad
- Local Club: NONE
Posted 21 March 2011 - 07:48 PM
more done...

Found it easier to cut the panel in half to reduce it twisting.

Plug welded under the wing and stitch welded the edge.

Cut off the excess lip.

But I found that when I ground this back, the penetration into the body was poor, so had to re-weld the edge.

Inside.
Think i will take the rear light out so i can get in to seam weld the top of the arch.
Hope this dry weather keeps up.
Found it easier to cut the panel in half to reduce it twisting.
Plug welded under the wing and stitch welded the edge.
Cut off the excess lip.
But I found that when I ground this back, the penetration into the body was poor, so had to re-weld the edge.
Inside.
Think i will take the rear light out so i can get in to seam weld the top of the arch.
Hope this dry weather keeps up.
#75
mentalmini89
-

- Members
-
- 232 posts
Mini Mad
Posted 21 March 2011 - 08:23 PM
lovely project mate and awesome mini I love the colour as mine is orange to and im tubbing my rear arches soon cant wait itll be sat on the floor lol
dean
dean


0 user(s) are reading this topic
0 members, 0 guests, 0 anonymous users


