Jump to content


Photo
- - - - -

Engine Steady Mounting - Rusted Through


  • Please log in to reply
20 replies to this topic

#1 TwoMonths

TwoMonths

    On The Road

  • Noobies
  • PipPip
  • 47 posts
  • Location: Northampton
  • Local Club: <looking>

Posted 13 April 2010 - 08:34 AM

Model:Mayfair
Year:1991
UPDATED: (See End of Thread) Not sure of the nuts I need to undo to get the Servo unit off\out - Think they might be rusted to fluff
UPDATED: (20th May 2010) More progress - nearly ready to weld new bracket (See end of thread for post with more details)

Posted Image
Link to bigger version of same

Hello!

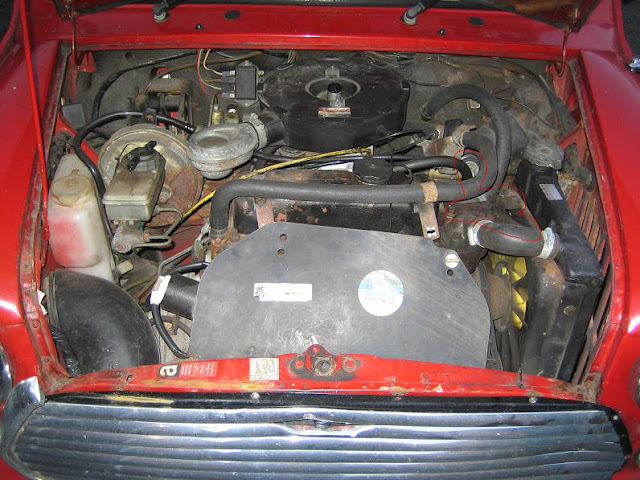
I posted a hello in the newbie forum to introduce myself and 'Chippy' my newly aquired and first ever mini. I mentioned as part of my intro a number of the things I know or suspect are wrong with Chippy. One piece of advice I got straight back when I mentioned "creaking when going on or off the throttle" was to check my engine steadies and possibly add another.

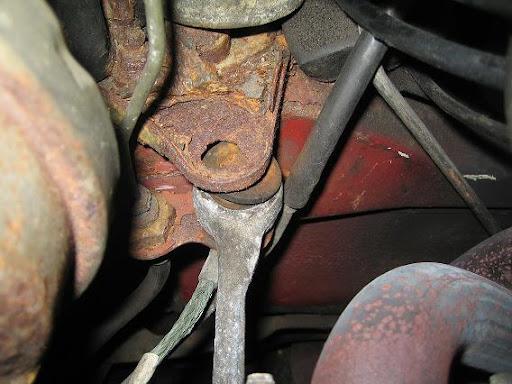
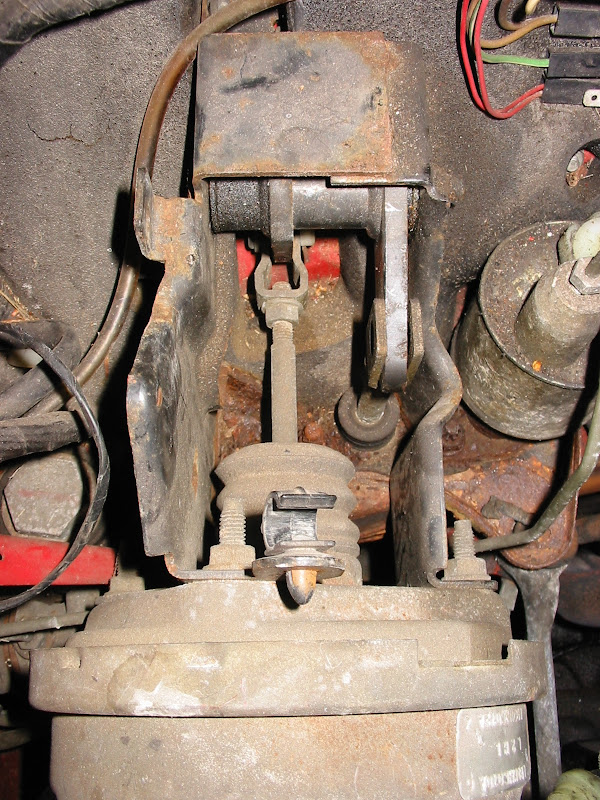
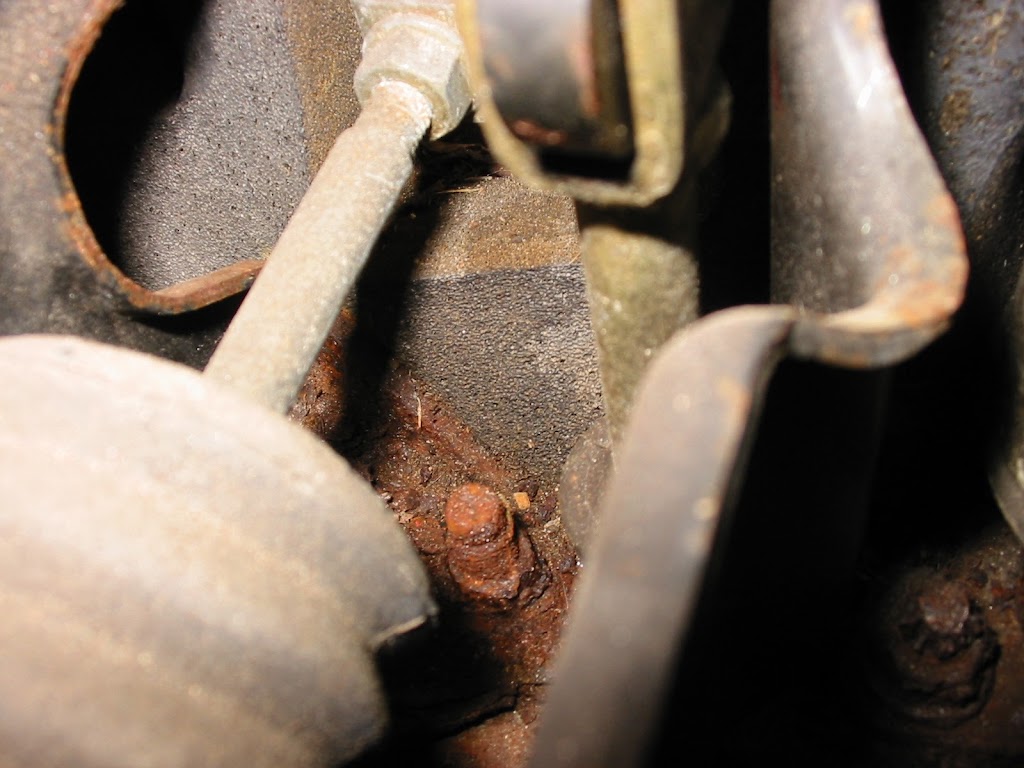
My initial idea was to follow the FAQ on changing the bushes and add the additional one the FAQ mentions. Having looked at the state of the existing bushes I see I have another (more serious?) issue on my hands, the mounting point for the bulkhead end of the left hand side (left hand as you look at it - is that the correct way to say it?) is badly corroded.

So I would very much appreciate advice on what I could\should do in this situation?

I have used the search function but searching on "+rust +mounting" gave lots of results but nothing seeminly related, adding in "+steady" as well gave me just one result (regarding detailing). Happy to be told to RTFF if someone can suggest a better search to run?

My ideas, for what little they are worth, included:
  • Big washer - if the bolt was long enough
  • Maybe the bracket itself is replaceable?
  • Try to clean up and weld in reinforcement - but that's not realistic in the short term and I'd like to be driving her
  • Add another engine steady (or two), as well as or until doing one or more of the above
TIA
/TwoMonths
aka Andrew

Edited by TwoMonths, 20 May 2010 - 12:19 PM.


#2 daemonchild

daemonchild

    Up Into Fourth

  • Members
  • PipPipPipPipPipPipPipPipPip
  • 2,341 posts
  • Location: Pontypridd
  • Local Club: Unknown

Posted 13 April 2010 - 09:00 AM

The removal of the upper bracket is a little involved as you'll have noted that the two master cylinders sit on it...
This means that you'll have to mess about with removing and refitting these. (Think: bleed clutch, bleed brakes, undo pedals.)
It's not hard, but is time consuming.
The reason it rusts out is because the hydraulic fluid used for the brakes and clutch easts the paint --> leading to rust.

The lower one is welded to the bulkhead...

This is a job that you're going to want to do eventually!
Might be worth considering something like an ultimate engine steady in the meantime.
This goes on the other side attached from the thermostat housing back to the bulkhead.

#3 TwoMonths

TwoMonths

    On The Road

  • Noobies
  • PipPip
  • 47 posts
  • Location: Northampton
  • Local Club: <looking>

Posted 13 April 2010 - 12:21 PM

The removal of the upper bracket is a little involved as you'll have noted that the two master cylinders sit on it...
This means that you'll have to mess about with removing and refitting these. (Think: bleed clutch, bleed brakes, undo pedals.)
It's not hard, but is time consuming.
The reason it rusts out is because the hydraulic fluid used for the brakes and clutch eats the paint --> leading to rust.

The lower one is welded to the bulkhead...

This is a job that you're going to want to do eventually!
Might be worth considering something like an ultimate engine steady in the meantime.
This goes on the other side attached from the thermostat housing back to the bulkhead.


Thanks for that daemonchild.

I'm pleased the upper bracket is changeable. But from what you've said it involves I don't think I want to take it on at the moment unless I have to. Difficulty is a relative thing and I think whilst I probably could do it, it might take me a good deal of time. If I could delay it will winter when I plan to have chippy off the road anyway that would be preferable, but I don't want to be negligent in the meantime

There seems to be something of an ongoing debate about ultimate engine steady vs other alternative engine steadies (and also whether standard cars need additional steadies at all - but I guess if one of mine is deficient then I really do). I've had a look for engine steadies online - there seem to be a lot of alternatives. I'm tempted to start with additional one mentioned in the FAQ simply because it's linked to and I'd be most confident about it fitting.

#4 daemonchild

daemonchild

    Up Into Fourth

  • Members
  • PipPipPipPipPipPipPipPipPip
  • 2,341 posts
  • Location: Pontypridd
  • Local Club: Unknown

Posted 13 April 2010 - 12:39 PM

No probs.

You've got two steadies at the moment. Top and bottom.
The top one is broken essentially, so I'd look at getting another one at the top end - hence recommending something like the U.E.S.
If you put another at the bottom, you'll have a very steady bottom (ooh er!) and a wobbly top.

Oh - this is the bracket that you've got in your picture.
Mine cleaned up ok!

Posted Image

And painted:

Posted Image

Edited by daemonchild, 13 April 2010 - 12:42 PM.


#5 wile e coyote

wile e coyote

    One Carb Or Two?

  • Members
  • PipPipPipPipPipPipPip
  • 1,230 posts
  • Location: North Somerset

Posted 13 April 2010 - 12:42 PM

Hard to tell from a photo but how much strength has the metal got left??? - the mounting plate is not the strongest piece of metal ever and it seems to have suffered from a lack of a suitable sized washer being used with the result that the bolt head has worn through - a quick and effective bodge would be to clean up the metal - get a small tube of JB weld and slap a thick washer in there of the biggest diameter that will fit, match it up with another thinner similarly fixed one on the underside of the plate - that should temporaily give it enough strength to last a while longer - best fix as has been said is to replace the reservoir mounting plate

#6 TwoMonths

TwoMonths

    On The Road

  • Noobies
  • PipPip
  • 47 posts
  • Location: Northampton
  • Local Club: <looking>

Posted 13 April 2010 - 01:19 PM

You've got two steadies at the moment. Top and bottom.
The top one is broken essentially, so I'd look at getting another one at the top end - hence recommending something like the U.E.S.
If you put another at the bottom, you'll have a very steady bottom (ooh er!) and a wobbly top.

Ahh - the light shineth. Top steady, bottom steady. Right I'm with you now. I, err, saw and thought of them as left and right. It's a bit embarrassing because really I know enough physics\mechanics to understand about torque reactions etc. So actually a U.E.S. isn't so U. if it only does the top? But in my case it's probably what I need.

Hard to tell from a photo but how much strength has the metal got left??? ... a quick and effective bodge ... JB weld ... a thick washer ... another thinner ... underside ... last a while longer ...

Ok so there might be some mileage in a bodge...

I fully accept the best thing to do is to replace the bracket and would look to do that in the future. Right now a bodge of the existing, with the sourcing and fitting of a U.E.S. too soon after would seem my way forward.

Thank you both!

#7 TwoMonths

TwoMonths

    On The Road

  • Noobies
  • PipPip
  • 47 posts
  • Location: Northampton
  • Local Club: <looking>

Posted 19 April 2010 - 11:43 AM

UPDATE: My engine steady mounting on the bulkhead is actually completely fubar. When I looked the first time I thought the lower part of the bracket was ok and that I just needed to attend to the top. Actually the bottom is completely snapped off. :)(

Can I please ask once more for advice on my options?

In an ideal world I could replace the top bracket and get a new bottom bracket welded on - From previous posts in this thread I have an idea about what replacing the top bracket entails, but no idea about how involved trying to replace the bottom one is?

Is there any way to safely run without that engine steady?

A U.E.S has been mentioned as a good idea. I haven't yet worked out where\how it fits, or whose to get (suggestions welcome) but this strikes me as one avenue for alternative\additional steadying.

I have to say I'm gutted - although the situation isn't really any worse than it actually was before (when I was still driving Chippy) but now I don't think I can afford to take the risk of driving her and doing any (more) damage. So I need to clench my teeth and try to get something sorted. DIY if possible.

TIA,

/Andrew

PS On the positive side whilst doing this I did notice what I think is my vacuum ignition advance tube connector to the carb was broken which might explain some of the poor running\acceleration I 'thought' I might have. Should be a simple fix and improvement ones she's fit to drive again.

#8 TwoMonths

TwoMonths

    On The Road

  • Noobies
  • PipPip
  • 47 posts
  • Location: Northampton
  • Local Club: <looking>

Posted 24 April 2010 - 07:46 PM

Is this a standard engine steady? (Right hand side of the picture drawn round with a red line)

Re-reading the FAQ on replacing engine steady bushes it doesn't mention that one and looking at it it I wondered if it was an example of a U.E.S or similar extra engine steady?

Still planning on properly fixing the original (parts on order, mini in my now cleared garage) but would like to like to know for reference.

Posted Image

#9 samsfern

samsfern

    Likes Rovers, loves Jeremy Kyle

  • Members
  • PipPipPipPipPipPipPipPipPipPip
  • 5,243 posts
  • Location: Ringwold, kent
  • Local Club: medway mini club/medwaymonkeys

Posted 24 April 2010 - 08:02 PM

that is an ultimate engine steady

is the bottom one snapped off like this? this was my fault, i was ragging it, lol

Posted Image

Edited by samsernie, 24 April 2010 - 08:04 PM.


#10 TwoMonths

TwoMonths

    On The Road

  • Noobies
  • PipPip
  • 47 posts
  • Location: Northampton
  • Local Club: <looking>

Posted 24 April 2010 - 08:29 PM

is the bottom one snapped off like this?

Yep it's snapped off and worse the top of the bracket is so rusted the bolt has pulled through.

Thanks for the clarification!

My U.E.S. doesn't look terribly well fitted (goes over an exhaust stud and there's no nut fitted for instance). So after I've (hopefully) sorted my original upper (including bush change of that one and the standard lower & fitted an additional lower) I'll turn my attention to that. Should be rock solid by the time it's all done :D)

#11 samsfern

samsfern

    Likes Rovers, loves Jeremy Kyle

  • Members
  • PipPipPipPipPipPipPipPipPipPip
  • 5,243 posts
  • Location: Ringwold, kent
  • Local Club: medway mini club/medwaymonkeys

Posted 24 April 2010 - 09:29 PM

i had the same problem with mine, i removed it, put it in the vice and cut a bit off it. i also enlarged the holes slightly to make it easier to fit.

#12 TwoMonths

TwoMonths

    On The Road

  • Noobies
  • PipPip
  • 47 posts
  • Location: Northampton
  • Local Club: <looking>

Posted 24 April 2010 - 09:31 PM

i had the same problem with mine, i removed it, put it in the vice and cut a bit off it. i also enlarged the holes slightly to make it easier to fit.

That to your U.E.S.?

#13 samsfern

samsfern

    Likes Rovers, loves Jeremy Kyle

  • Members
  • PipPipPipPipPipPipPipPipPipPip
  • 5,243 posts
  • Location: Ringwold, kent
  • Local Club: medway mini club/medwaymonkeys

Posted 24 April 2010 - 10:37 PM

yep. im also making a hevier duty bottom bracket on the bulkhead for the standard steady,(to replace the broken one) and its going to be a bolton thing, so next time it breaks, i simply unbolt it, and make and fit a new one. it shouldnt break again in a hurry though, im making it out of thicker steel. ill pm you a picture of what ive made/done when ive done it if you want. i wanted to avoid grinding/welding and getting everything dusty in the engine bay.

Edited by samsernie, 24 April 2010 - 10:39 PM.


#14 TwoMonths

TwoMonths

    On The Road

  • Noobies
  • PipPip
  • 47 posts
  • Location: Northampton
  • Local Club: <looking>

Posted 25 April 2010 - 07:28 AM

yep. im also making a hevier duty bottom bracket on the bulkhead for the standard steady,(to replace the broken one) and its going to be a bolton thing, so next time it breaks, i simply unbolt it, and make and fit a new one. it shouldnt break again in a hurry though, im making it out of thicker steel. ill pm you a picture of what ive made/done when ive done it if you want. i wanted to avoid grinding/welding and getting everything dusty in the engine bay.


I'd be interested to see anything you do. I'm going to push on with the plan to weld a new one in. But having done it once (hopefully) if it goes again then I'd look to do something different. When I'm done though I should have four steadies on there which for a standard tune 998 is I belive known as overkill ;-)

#15 TwoMonths

TwoMonths

    On The Road

  • Noobies
  • PipPip
  • 47 posts
  • Location: Northampton
  • Local Club: <looking>

Posted 26 April 2010 - 02:41 PM

UPDATE:

So I've got the mini in the garage and started taking things out to make room to work. The engine bay currently looks like this:Posted Image

Now I need to get the servo unit & bracket out. The Haynes just says "undo the mounting bolts and remove". What it doesn't say is where these mounting bolts are. I've removed an obvious one at the top of the bracket but there's at least one more and I'm a little stumped. I think it might be the scarily rusty thing next to where the servo linkage goes down to the brake pedal in the following photo...
Posted Image

Possibly better illustrated in this next shot. (Rusty nut on the left).
Posted Image

If it is that nut - then I'm really worried about how I'm going to get it undone. I'm not sure there's enough of it left to get a socket on (can't tell because none of my sockets are deep enough) and it's a bugger to get to!?


1 user(s) are reading this topic

0 members, 1 guests, 0 anonymous users