Jump to content


Photo
- - - - -

1960 Morris 850 And Friends


  • Please log in to reply
417 replies to this topic

#1 CLM

CLM

    One Carb Or Two?

  • Members
  • PipPipPipPipPipPipPip
  • 817 posts

Posted 12 August 2010 - 01:20 AM

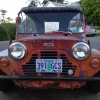
Not got many pictures of it available yet but managed to get the old rusty cut and shut mini on my trailer, and the sadly deteriorating shell in the back of my moms truck, will need to get it up to my dads house to tear it down to see what I can salvage... the past 10 years or so have not been good on them :( The foor in the shell looks a bit better then it is, under the crossmember is a hole, and there is one hole in the sil after sitting.. I really should have worked on it years ago.. but I had no where to work on it. Oh well, it's time to work on it now!

Chris

Attached Files


Edited by CLM, 16 September 2012 - 01:22 AM.


#2 CLM

CLM

    One Carb Or Two?

  • Members
  • PipPipPipPipPipPipPip
  • 817 posts

Posted 12 August 2010 - 02:53 AM

Bah and the trailer wiring is faulty... :thumbsup:

First thing to work on tomorrow.

Chris

#3 olds_kool_lews

olds_kool_lews

    Up Into Fourth

  • Traders
  • PipPipPipPipPipPipPipPipPip
  • 3,601 posts

Posted 12 August 2010 - 06:57 AM

good luck with that! people on here have restored worse i can asure you! lol

#4 CLM

CLM

    One Carb Or Two?

  • Members
  • PipPipPipPipPipPipPip
  • 817 posts

Posted 13 August 2010 - 02:58 AM

Thanks I hope to have enough donor sheetmetal excluding usable front wings to put together the good shell... with extensive rust fighting :D

Got everything loaded! Weight on the trailer is good, wiring checks out fine just had a weak power level with the engine off so lights were pulsing as the voltage dropped slightly when the turn signals flashed and is good..

unfortunatly when I went to service the trailer wheel bearings and repack them that 'good' string ended, only have one wheel off right now but both bearings in that wheel need replacing $20 per bearing 2 bearings per wheel :) And I have to assume both wheels will need bearings.

Early tomorrow I will go purchase bearings, and with luck I can get on the road on schedule. With luck!

Chris

#5 olds_kool_lews

olds_kool_lews

    Up Into Fourth

  • Traders
  • PipPipPipPipPipPipPipPipPip
  • 3,601 posts

Posted 13 August 2010 - 06:34 AM

try get some more pics up if you can of the shell, and before you run out of space, sign up to photobucket, you'll be able to upload tons more pictures than uploading direct to this site, as you'll run out of space in no time and will end up having to delete pictures!

will be watching this thread, always love a good mk1 rebuild! (and it gives me tips for my own mk1 rebuild :D )

#6 CLM

CLM

    One Carb Or Two?

  • Members
  • PipPipPipPipPipPipPip
  • 817 posts

Posted 16 August 2010 - 04:57 AM

Sorry about the lack of replies, but arrived at home late friday and have worked the weekend like normal.. hope to start disassembling the cut and paste mini on the trailer so I can start planning on how it will be disected for panels... and what I can salvage >.< I do need to buy a new camera as well... my dads has dissapeared which leaves me with my old palm treo heh.

Chris

#7 CLM

CLM

    One Carb Or Two?

  • Members
  • PipPipPipPipPipPipPip
  • 817 posts

Posted 16 August 2010 - 05:05 AM

people on here have restored worse i can asure you! lol

Haha well yeah, the shell in the back of the nissan is still rather sound aside from some holes in the sill panel, and aside from the rathewr.. uh.. large hole in the rear seat where someone tried to install another eghine :P As for the one on the trailer, it has a fair ammount of cancer, I have plans for it's remains.. and about $3000 worth of panels... or something of the sort :D

Chris

#8 CLM

CLM

    One Carb Or Two?

  • Members
  • PipPipPipPipPipPipPip
  • 817 posts

Posted 18 August 2010 - 03:27 AM

Well got at the car with tools today, I picked up a Blair spot weld cutter today.... :) though it does tend to skitter around a bit if I am not carefull D:

I started out removing the rear quarter rails from the cut and shut shell, I ended up having to get a die grinder out to break a few welds. to the rear seat brace and the b pillars.

Posted Image

Posted Image

Posted Image

the left hand one needs just a little cleaning up but the right one is rather damaged towards the front, likely I will need to splice it with the half remaining in the good shell.

Posted Image

After the quarter rails came out I cut out the whole quarter panel on the right side, I wont be leaving much behind the doors intact on this mini, But I am not killing it... I have... plans for it! *cackles like a mad man* but both quarters will be removed so I have access to the rear inner panelsto remove them with as little damage as possible.

Posted Image

An ugly view of the seat pan in the car I am salvaging panels out of.

Posted Image

and a rotten rear section I have had forever, I picked it up years ago for panels and sections I could salvage, I should be able to juggle and patch and use it to build a seat pan, I also have a pattern boot rear panel. there should be enough... we will see :)

Posted Image

and finally, a view of what I am trying to rebuild.. someone attempted to put a second engine in it years ago, I need to undo that ;)

Posted Image

I had the sanding block in my hand looking for the spotwelds to drill out on the donor shell... and.. uh.. my hand jumped shells and lightly rubbed a bit watching the light surface rust dissapear.

Posted Image

Tomorrow I plan to remove the left side quarter panel for more access to the rear seat brace, and maybe get that rear seat brace out >crosses fingers< I am going to have to patch the hole cut in it for rear shock nut access, and the rust ont he bottom edge. I will also have to patch the holes where the rear quarter rails were removed, but that can be later.

Chris

#9 luigi86

luigi86

    Mini Mad

  • Members
  • PipPipPipPip
  • 165 posts
  • Local Club: Tyred&exhausted mk

Posted 18 August 2010 - 04:40 PM

before you go to mad cutting huge panels off i would get some decent bracing in there to stop the shell flexing, Use the door appatures as a brace point, or get it on a proper spit through the bulkhead

#10 CLM

CLM

    One Carb Or Two?

  • Members
  • PipPipPipPipPipPipPip
  • 817 posts

Posted 18 August 2010 - 08:42 PM

before you go to mad cutting huge panels off i would get some decent bracing in there to stop the shell flexing, Use the door appatures as a brace point, or get it on a proper spit through the bulkhead


Sadly, this reccomendation is about 15 years too late, the shell was a rather poor cut and shut, enough to get me driving around in it back then in a rather ratty beater, It was my first car yes, but I still remember my first driving it and the unsettling feeling of the body flex when I engaged the brakes. The car was being held together by the windshield frames then and the remains of the lower left sil. We purchased the remains of the front of a later mk1 auto shell to cut into the car to get strength back in. Though being 17 at the time my father really "knew it all and decided how it was to be done" unfortunatly. I had expressed my desire to do a bit more work and split the whole forward portion window frame out of the front of my original shell and then the interior portion of the auto shell, but father knows best and said we were cutting the window posts and so that is how it had to procede. \

Currently the car has no indention for the windscreen seal towards the top of the windsheild aperature and the later indention for the seal around the bottom of the aperature... Really messed up in my opinion. It is how it is unfortunatly. So really, brace bars in that shell are far too late, it is going to take extrordinary work to get it square again, but as I have a project planned, I am not going to totally give up on it and will eventually do the work. Lots of work to make myself happy with it, but I will..

The other shell is still virgin floor toebord healboard sides etc, so still retains it's propper shape. Thankfully... I just have to extract and rejuvinate the panels I plan on using it in from the bad shell right now :wub:

Chris

#11 CLM

CLM

    One Carb Or Two?

  • Members
  • PipPipPipPipPipPipPip
  • 817 posts

Posted 19 August 2010 - 12:22 AM

So... unfortunately the lifts are in use in the shop so I cant use them to hold the car as I remove the subframe and exhaust. Instead I rolled the good shell on its side and started cleaning the surface rust off using a wire wheel on a hand grinder, following that up with a good bath of phosphoric acid and rustoleum primer for a temporary coating.

It seems the only "Bad" tin worm is in a 7 inch wide strip across the floor where the crossmember covers. I will need to remove and repair the crossmember as well as remove the inner sills to take care of rust.

I will get some pictures up soon of the floor bottom.

Chris

#12 CLM

CLM

    One Carb Or Two?

  • Members
  • PipPipPipPipPipPipPip
  • 817 posts

Posted 19 August 2010 - 04:18 AM

Pictures as promised :wub:

The bottom, wavy as a breezy bay, but 80% still intact, about 90% of this floor (and 50% of the car :) ) has minor pitting from surface rust, I figure some decent high build primer will take car of the pitting, it is too sound of a car to worry too much about it. by the way, from the bottom, can you tell where the crossmember mounts? I dont think it would be that hard as it is almost the only place the floor is badly rotted.

Posted Image

And a couple shots of the left hand a-panel, gotta love early single panel construction! minor surface pitting, but only a couple dings.

Posted Image

Posted Image

I have seen minis in this forum restored, that were worse... and a fraction of this shells age heh.

Chris

#13 Colliazz

Colliazz

    Stage One Kit Fitted

  • Noobies
  • PipPipPip
  • 53 posts
  • Local Club: Welsh mini club

Posted 19 August 2010 - 01:58 PM

Haha hardly anything left good effort tho mate

#14 buddylove

buddylove

    Camshaft & Stage Two Head

  • TMF+ Member
  • PipPipPipPipPipPipPipPip
  • 1,639 posts
  • Location: North America
  • Local Club: SAMOA

Posted 20 August 2010 - 07:25 AM

Seems like you got your work cut out for you. Where in the PAC NW are you?

#15 CLM

CLM

    One Carb Or Two?

  • Members
  • PipPipPipPipPipPipPip
  • 817 posts

Posted 21 August 2010 - 04:13 AM

Hey all, sorry, missed a day, was too tired after pulling the read subframe exhaust and sway bar out, but today I got to salvaging more metal.. I had taken several nice pictures in the sunlight... camera however had decided not to save them :P

As stated my plan was to remove the left hand side panel and work at freeing the rear seat brace and parcel shelf. Taking out therear quarter was no big deal, however when I started in on the spot welds that were still holding it, my blair cutter balked at the odd contortions and the blade busted so I resorted to a 3/8 drillbit. That was deffinatly not as nice as the cutter :(

The bottom edge of the seatbrace was rather rotted and will require fabbing up a new edge almost all the way across the bottom. However there is enough left I can use to duplicate the shape... and I do have plenty of scrap 1960 sheet metal... thanks to the clipped quarters ;)

Posted Image

and I have to close that hole cut in the bulkhead for shock access when I am repairing it.

Posted Image

The rear parcel shelf is in fairly decent shape, just some random holes in it to repair that mounted a fan unit a previous owner used as a rear demister and a couple minor rust nicks around the panel edge.

Posted Image

I do have a later rear parcelshelf that will be donating shaped steel for filling the holes.. it is a vastly different pressing for the most part however so would not have worked in the car... to my liking at least ;)

Posted Image

Then on to the rotted rear seat base/boot floor... One word, uggghhh.

It seems I should not have left my rear seat in the car all that time, the foam has destroyed the steel, oddly though, the boot floor is for the most part rust free. the Rotted out metal I should be able to replace from a combination of the remains in the other shell and the remains from the cooper clip I have. I am however kind of worried about the valley between the boot floor and seat bottom, It might be difficult to fabricate....

Posted Image

bottom side shows still smooth unpitted boot floor next to swiss cheese seat pan.

Posted Image

To get the parcel shelf out I had to cut a thin slice out of the rear panel, I didnt want to but needed the shelf off, well I cut a thin flat strip out that should be easy enough to replace if it's ever neccisary.

Posted Image

Well, that's all for now :)

P.S. Buddy, currently in vancouver washington, but could at any time be told to head back down the coast to my moms house..


1 user(s) are reading this topic

0 members, 1 guests, 0 anonymous users